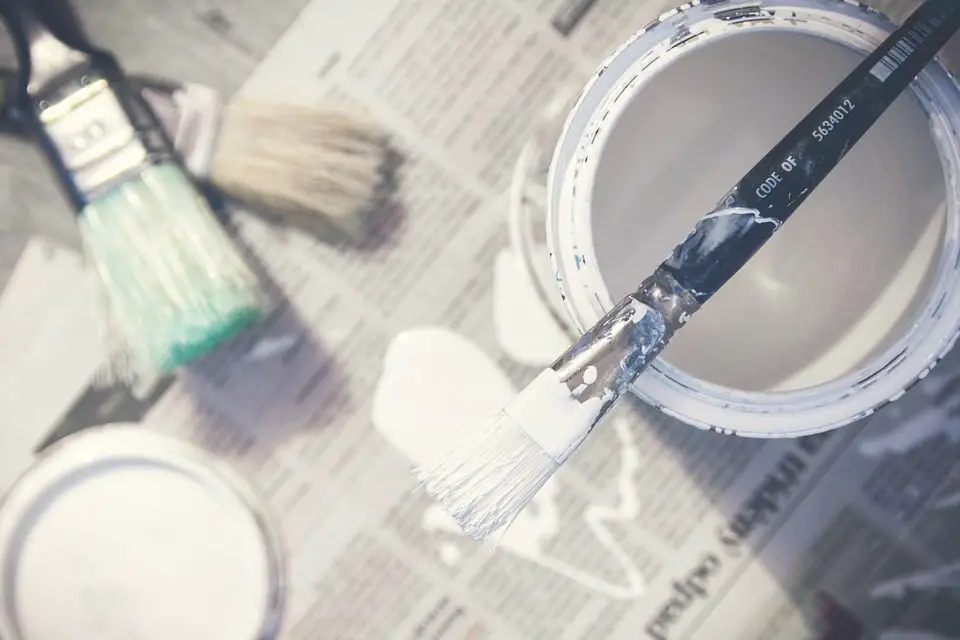
Giving your home, a room or an item of furniture a fresh coat of paint is one of the best and most affordable ways to refresh and upscale it. Here are some 2019 trends and tips to make your next painting job a breeze.
Whites Are Back In
It’s time to abandon the cooler grey tones which have dominated the home decor space for the past few years. More and more people are going back to warmer white tones and adding colour to the room with brightly coloured furniture and decor. Conversely, giving an old item of furniture a bright coat of paint may be just what your room needs to lighten it up. Have a look at these tips and tricks for painting furniture and cabinets.
White helps to reflect the light in your home which instantly brightens it up and greats the illusion of more open space.
Keep Your Brushes Wrapped Up
Whether you’re in the middle of a painting job and need to take a break for a few hours or you’re storing your clean paint brushes for a few months, this tip is a must.
Instead of cleaning off your brushes every time you take a break, simply wrap them up in plastic wrap, foil or a sandwich bag. This will prevent the paint from drying out and let you take a break and get back to work much quicker and more easily.
This tip also works well for long term storage of your brushes. Keeping them wrapped up keeps the bristles together and in good condition. Preventing dirt, dust and fibres from contaminating the bristles.
Ceilings No Longer Need To Be White
More and more people are dressing up their ceilings with a coat of coloured paint instead of the traditional white.
A dark coloured ceiling creates a more cozy and intimate feel, which really helps if you have double volume rooms or really high ceilings. This work particularly well in rooms used for relaxation such as bedrooms, the living room or a library.
Light colours offer a more vibrant and spacious feel, brightening up the mood of a room. These are more suited for “busy” spaces such as in the kitchen or play area. The best tip when working with light colours is that the less the contrast between the colour of your walls and your ceilings, the more spacious the room will feel.
Don’t Buy Cheap Brushes
In the competitive world of home products and DIY, suppliers are always looking at ways to reduce costs and create a perception of value for money. Don’t get caught out buying cheap brushes and rollers to apply your expensive paint. Buying more expensive brushes will give you a better surface finish, better coverage, leading to less money spent on paint and will save you time and frustrating in not having to pick bristles out of your fresh coat of paint or having a roller seize up halfway through a wall. Cheap brushes and rollers usually land up costing you more in the long run.
Box Your Paint
A new trend in the painting industry is to “box your paint”. For those who have never heard the term before, you get a good estimate on your paint quantity required, buy it all at once and then mix the individual containers together into one large container to ensure that you get a uniform texture and colour regardless of the batches and production dates of the paint.
If you’ve ever purchased the same paint colour in different batches then you’ll know the frustration in seeing the paint dry to reveal an obvious line of colour difference. Boxing your paint aims to alleviate this problem.
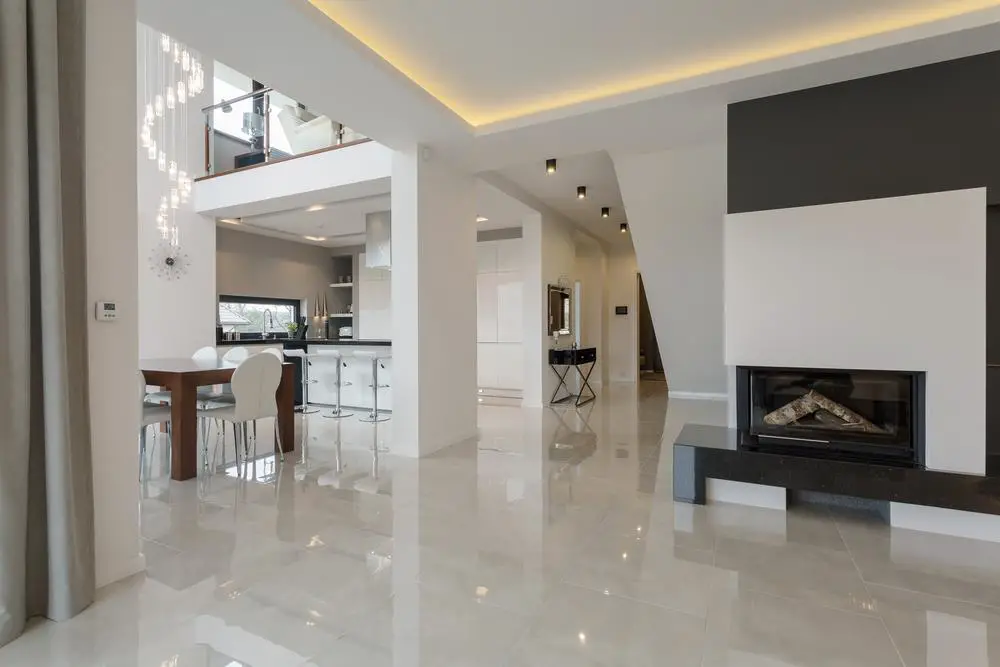
When you’ve decided to renovate a fixer-upper, one of the easiest ways to transform the space is by installing new flooring. Whether the home currently has old carpet, cracked tile floors, or outdated vinyl flooring, you can give the space a dramatic makeover by installing beautiful new floors. New flooring will not only revive the space but can also create a fresh new look that enhances the style, theme, and ambiance of the home. Here are some tips and ideas for renovating your fixer-upper with new flooring:
Invest in Longevity and Durability
If you plan on keeping the home for many years and don’t anticipate doing any major renovations after this one, consider investing in the flooring that is least likely to get scratched, start buckling, or require costly repairs, such as:
Bamboo — Bamboo flooring is a very durable type of flooring material and comes in a variety of shades and plank widths. You can create a classic hardwood flooring look with brown and tan shades or something more modern and trendy with antique gray or dark red shades. You’ll need a professional installer to make sure the bamboo planks are installed perfectly, but the investment can be worth it in the long run.
Natural Stone — Stone tile flooring is another option when you’re considering flooring materials that will withstand the test of time. Granite is the hardest of all natural stones and is very scratch-resistant. Slate and marble are some other popular options for flooring, especially in areas where you want to create a more dramatic look. You can find stone tile in a variety of finishes and colors to create the ideal ambiance for your living space.
Hardwood — Hardwood floors are fairly easy to maintain but will require using a special hardwood floor cleaner. They will last for decades and can be sanded down or polished when it’s time for a refresh. However, hardwood floors will show signs of wear and can get damaged when exposed to moisture. They may warp in extremely hot and cold environments, so, if you live in a humid climate, hardwood floors may not last as long as you would like. For these homeowners,tile flooring can be an attractive alternative to hardwood.
Laminate — If you’re on a tight budget but want the look of wood, laminate flooring may be your best option. Laminate flooring is less expensive than real wood and is also cheaper to install. Today’s laminate flooring manufacturers use advanced technologies and techniques to achieve lifelike finishes that replicate the grain patterns and even texture of hardwood flooring. You can choose from distressed styles, high gloss finishes, and even hand-scraped textures when you want to transform your space. Laminate floors are stain and scratch-resistant, so you can maintain the floors for years to come.
Vinyl Plank — Vinyl plank flooring is another versatile option for virtually any space around the home. It’s designed to be stain and scratch-resistant like other types of flooring and is also inexpensive. You can find vinyl planks in several thicknesses, widths, colors, and designs to transform your living space.
Leave Room in the Budget for Installation
Renovating a fixer-upper means you’ve probably set aside a budget for all your materials, contractors, and any DIY projects. When it comes to installing new flooring, you really need to consider whether you’re confident enough in your DIY skills to handle the project or if you should hire a professional. While you will save money by doing it yourself, you also run the risk of making costly mistakes and spending more time than you planned on the project.
Easier DIY Flooring Options
Vinyl flooring is one of the few types of flooring you can install on your own and is typically installed with an adhesive on top of the underlayment. Engineered wood planks are another popular option for DIY projects. Unlike solid wood, engineered planks are made with thin sheets of wood veneer and can also “float” on top of an underlayment for an easy installation.
Laminate flooring is another floating floor option. Since it’s made of plastic, it’s relatively easy to work with and installation only takes a few hours . Since it’s also one of the more affordable options out there, it’s a popular choice for homeowners working on larger areas or fixer-upper projects.
Consider Your Decor, Style & Theme
You have many options to choose from when it comes to flooring, and it’s important to consider how you’ll be styling the space and what type of furniture will be sitting on the floors before making your final decision.
For example, do you want to invest in luxury vinyl or bamboo floors in heavy-use areas like the family room and hallways when most of the floor will be covered by a rug, runner, or furniture? Is it wise to cut costs with laminate flooring in the living room or master bedroom when you plan on spending a fair amount of time in that room or want to impress your guests?
Taking some time to prepare a decorating plan for your fixer-upper—from the theme and color palettes to the furniture and artwork—can help you make the right decision on flooring. The last thing you want to worry about is the color of the floors clashing with the wallpaper and decor, or how you paid a premium for bamboo and hardwood flooring in a room that’s almost entirely covered with a rug.
Mapping out the details of your interior decorating and design plans before you install your new floors can set you up for a successful home makeover. You can speed up this process by working with an interior designer or decorator. These design professionals will not only help you pick out the right colors and styles of furniture and decor, but can also make recommendations on what type of flooring will complement the theme and ambiance you’re trying to create.
Get Ready for Your Home Makeover
Transforming your fixer-upper with new floors can be a fun and exciting renovation project. Whether you decide to install the new flooring yourself or hire professional installers, you’ll need some time to consider all your options and styles. Use these tips as a guide to help you make the most informed decisions about your flooring project, and start looking forward to your home makeover in a few short weeks.
A beautiful healthy lawn is more than just looks. A well-maintained lawn has many benefits including improved soil, reduced temperature, air cleansing, and Carbon dioxide reduction. However, to maintain and clean a lawn is not always an easy task so below are the seven DIY tips to help you better clean and maintain your lawn.
Did you know that fallen leaves and weeds in your lawn allow pests to settle in? Moreover, weeds compete with flowers for moisture and nutrients. It is easy to stop weeds from growing in your lawn by using a pre-emergent herbicide. This will help to prevent and reduce the presence of crabgrass and other weedy plants from growing.
Not a fan of using chemicals in your yard? No problem. You can also remove weeds naturally rather easily if you do it after a rain. The soil is softer and the weeds will pull out without as much effort.
A good tip for after cleaning out falling autumn leaves is to let them sit for a year behind shrubs. After a year, you can then use them for flower beds because they become humus-rich leaf mold.
2. Clean out gutters
Gutters are known for becoming clogged with leaves and other debris and this problem may lead to sagging gutters, foundation problems, or even worse, a flooded basement.
If you have gutter covers, remove them, then flush the gutters with a water hose to remove any collected leaves. Also, don’t forget to clear out the down spouts too.
3. Trim branches
Overgrown and rogue tree branches take away the beauty of the tree. Damaged, diseased and odd growing branches can also kill your shrubs and trees if they are left unattended.
You should inspect the trees and shrubs in your lawn and cut down branches that have died or seem out of place.
After trimming, always use a rake to remove debris and dead leaves. Dead leaves and debris can be dangerous since they invite bacteria and mould to grow which results in infection on shrubs and trees.
4. Mow grass appropriately
A properly maintained lawn is denser and has the ability to resist weeds. To ensure it stays protected, always use a mower with sharp blades to achieve a clean cut. Dull blades will damage the lawn and make the surface uneven.
Adjust the height of mower so that it can trim the grass to about 2 ½ inches. Selecting this height is beneficial for grass growth as it will not only leave your lawn looking plush but also better prevent weed growth and pests.
Another good tip is to always change your mowing pattern by mowing at a 45 or 90-degree angle from the last time you mowed. This will result in upright grass growth and reduced soil compaction.
A cordless mower is the best choice for you as it cuts the grass evenly and easy to control. It is also less expensive to maintain over time and costs less to operate than a gas-powered mower. If you are wondering which lawn mower is suitable for your home then read this guide on the best cordless lawn mowers. It has everything you need to make a good choice.
5. Protect the mower deck
A deck is a covering for grass cutting blade at the base of your lawn mower. You need to ensure proper precautionary measure to protect the deck. Clean your lawn mower deck twice during mowing period will reduce the incidence of grass clippings sticking to the lawn mower’s underside.
It will boost mower performance as well as reduce the emergence of lawn diseases. Use water, soap, and a brush to clean lawn mower from dirt and grass clipping. A unique tip here is that you can spread vegetable oil on the deck after cleaning it to prevent any future grass clippings from sticking to it.
6. Water and feed grass
The two most important things that your lawn will need are water and nutrients. Early morning is the best time to water, because the sun is not as harsh and won’t dry it out as fast. When you water the lawn in the night it will result in prolonged moisture too.
Simply wetting the grass is not watering though. You need to fill the lawn with enough water so that moisture reaches a few inches down into the soil. Nitrogen is the most important nutrient lawns like to consume. Feed your lawn with a mixture of slow and fast releasing fertilizers so that grass grows quickly.
Fall is the best time to apply fertilizers because the grass will utilize fertilizer to grow healthy roots and reserve some nutrients for a healthy start in spring.
7. Apply grass seeds to bare spots
Naturally, a patchy lawn is hated by every lawn enthusiast. Determine and remove the problem which is causing dead turfs such as fungi, bacteria bugs or other pests. You can use a sharp shovel to cut the area around the bare spot. Remove the dead turf and fill the area with clean soil.
Cast seeds on the area and spread compost on it. Dampen the area with a good bit of water and then cover it with mulch or hay to protect it from the sun and birds. Continue to water the seeds in early morning and evening until they germinate.
Has your home button on your old iPhone 6 stopped working? Did you know that you can repair this problem at home for less than $10? This is a really easy repair to carry out yourself and you should be able to do it in 10-15 minutes. Get your old iPhone 6 working again to use yourself or to sell for some extra cash.
The guide below will take you through the process of replacing your home button assembly step by step. Some suggested purchase links for replacement parts and tools are provided below.
While this repair restores the home button functionality, the touch ID sensor is paired to your iPhone’s logic board so you will lose the touch ID functionality. At this stage only Apple can replace the home button and retain the touch ID functionality.
If you’ve got any other problems with your old iPhone or you’ve got a different model, have a look at these other iPhone repair guides.
What You’ll Need To Replace Your iPhone 6 Home Button Assembly
Find yourself a nice flat and well lit area to work on. You’ll need an area to lay down the screws you have removed. I like to keep a small sheet of paper nearby and lay the screws I’ve removed down on the paper and mark off where they were removed from. There are a number of different sized screws in your iPhone and it’s important that you put them back in the correct places.
The two most important parts of this repair are to keep your screws really well organised so that you know exactly which one came out of where and to be careful when working with the ribbon cables, especially when opening up your phone, they are extremely fragile.
If you enjoyed this guide, have a look at these other iPhone repairs you can do yourself. Most iPhone repairs can be done at home for a few dollars, so don’t replace your iPhone until you’ve had a look at whether you can repair it at home first.
Good luck with your repairs and let me know how it went in the comments section below.
If you’ve ever owned a GoPro and you’ve recently got yourself the new DJI Osmo Pocket then you’ll also likely be looking for ways to mount it and hold it to capture those great moments from a variety of angles. While one of the downfalls of the Osmo Pocket is its lack of a tripod mount thread or any other mounting arrangement, there is still a way to use it with your favorite GoPro mounts. With a 3D printer, you can easily print your own bracket to interface with all of your existing GoPro mounts.
If you don’t have a 3D printer or you don’t feel like making your own bracket, you can buy a similar bracket on Amazon – buy here.
What You’ll Need To Make A Osmo Pocket GoPro Mount
3D Printer & Filament (ABS or PLA for strength)
Soft Foam, Felt or Material To Line The Adapter
Superglue
Craft Knife
Your GoPro Mount & Screw
How To Make An Osmo Pocket GoPro Mount Adapter
The bottom section of the Osmo Pocket is free from buttons or ports and so it makes the perfect area to for a band to wrap around and hold the Osmo Pocket, you just need a band and two flat pegs to interface with the GoPro mount.
I started out by finding some foam to line the inside of the 3D printed bracket with so that the Osmo Pocket doesn’t get scratched or damaged when “clamped” into the bracket. The foam I found was a few millimeters thick and easily compressible so I only needed to add around 1mm of clearance between the bracket and the Osmo Pocket to fill with the foam strips.
I then measured up the bottom width and thickness of the Osmo Pocket and put this into the CAD model to shape the bottom bracket and the GoPro mount interface.
I 3D printed the bracket in solid PLA with no infill.
Once the bracket was printed, I filed the rough edges, cleaned up the holes and trial fitted it to the GoPro mount. Once I was happy with the fit, I could line the inside of the bracket with foam strips.
The height of the bracket is 15mm, so I cut strips of 15mm from the foam section I had. I trial fitted them and trimmed them to the correct length and then used superglue to stick them to the inside of the bracket. I used the back edge of the craft knife to press the foam snugly into the corners.
Once the glue has dried, the GoPro adapter is ready to be used.
Slide the bracket onto the bottom of your Osmo Pocket, squeeze the two flat edges into the GoPro mount to clamp the Osmo Pocket and attach it with the screw. You should now be able to connect your Osmo Pocket to any of your GoPro accessories and mounts.
Have you tried a bracket like this or something similar? Let us know in the comments section below. We’d love to hear your tips, tricks and ideas.
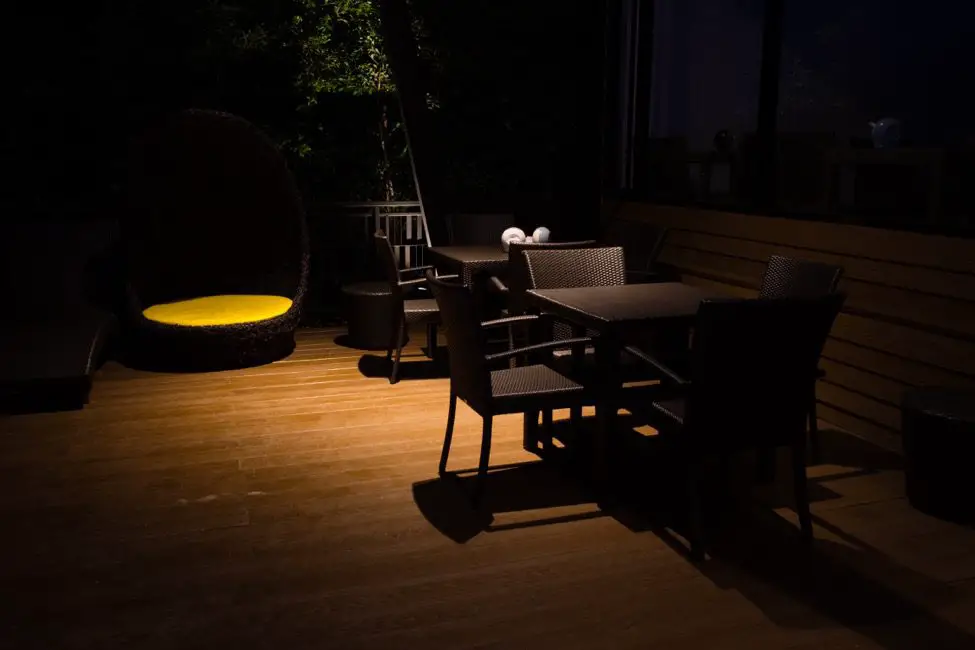
Lighting is a key ingredient when designing any outdoor space. From some late-night poolside barbecues to elegant dinner parties, you never know when you might need to light up your backyard or patio. But you shouldn’t have to spend a fortune just to bring out the best in your property after the sun goes down. In terms of cost, lighting should be the least of your concerns when bringing your outdoor space to life. If you know where to look, you can quickly transform the space by investing in some low-cost, energy-efficient lighting fixtures that will help you dress up the space for less. Use these outdoor lighting trends if you’re decorating on a budget.
Vintage Lanterns
Skip the lighting design aisle at your local hardware store and head over to a flea market for some vintage housewares instead. You can use vintage lanterns to light up the space without spending a lot of money. You can just insert a candle or screw in a bulb to bring the lantern back to life. It might be tough to find multiple lanterns that look the same, so you might have to mix and match your outdoor style. But vintage lanterns can help you bring some character to the space, as opposed to filling up your patio with stainless steel or brass fixtures that will cost you a pretty penny.
Switch to Candle Lighting Fixtures
While
candles don’t produce the same kind of light and reach as electric lighting
fixtures, you can save a lot of money by switching to candle fixtures because
you don’t have to worry about wiring them to your home’s electric grid. You can
put candles all over the space without giving a second thought to power outlets
and your electricity bills.
If you’re trying to set the mood over your outdoor dining table, you can use a candlelit chandelier instead of trying to wire an electric one. Candles are also so cheap that don’t have to worry about weather and tropical storms wreaking havoc on your lighting setup. You can rearrange them with ease and bring them in the house if the weather takes a turn for the worse.
LED Lights for Less Energy Consumption
Another way to lower your outdoor lighting bills is to switch to LED bulbs whenever possible. Traditional incandescent bulbs give off a lot of their energy to heat, which can be a major energy hog that drives up your utility bills. But LED lights use only 25 percent of the energy used by incandescent bulbs, which can help you save around $45 a year or more. You’ll also save money by not having to replace your LED bulbs as often as incandescent bulbs. They last anywhere from 15 to 25 times longer, helping you make the most of your lighting setup.
String It Up
A
cheap way to quickly light up your backyard space is to use string lights. They
can help you cover a lot of ground as you extend a string of lights from one
side of your patio to the other. You don’t have to worry about dotting the
space with dozens of fixtures because the long strands will fill the space with
ample low-wattage light. You can choose between incandescent and LED string
lights based on how you want to use the space. Both types of
string lights have their pros and cons.
String lights tend to cost much less than more durable lighting fixtures such as those made of metal and stone. You can quickly bring the space to life by only spending a few hundred dollars. You might want to take the lights down if you’re expecting some unruly weather, but as long as you keep your string lights out of harm’s way, you should be able to keep your property lit for a fraction of the cost you’d normally pay.
Repurposing Interior Fixtures
If
you have an outdoor space that’s covered by an awning or some type of
enclosure, you can repurpose some of your interior lighting fixtures and bring
them outside. You’ll need access to power outlets if you want to bring out some
of your electrical fixtures, but if you have an outdoor space that feels like
an extension of your living room, you can make it work.
You don’t want to bring your fixtures in and out of the house every time you want to sit on the patio, but if you find yourself spending all your time outside in the summer, it might make a lot of sense. You can always put them back in the house when fall rolls around. Unless you’re using your outdoor space just as much as the other rooms in your house, you can cut down your lighting expenses dramatically by reusing your existing fixtures.
Solar-Powered Fixtures for Less Wiring Hassle
Solar panels are an effective way to lower your energy bills, but you can also use individual solar-powered outdoor lights to make your backyard space more functional. These small lights will help you save money on outdoor lighting because the sun provides all the energy you need. But one of the best reasons to use solar-powered lighting fixtures in your outdoor space is that you don’t have to worry about wiring them to your home’s electrical grid. They are completely energy-efficient and independent, drawing power from the sun as they recharge throughout the day. Just stick them in the ground and your work is done.
No
outdoor space is complete without some kind of lighting setup. From swimming pool
maintenance to reading outdoors and spending time
with your loved ones, you can do everything you need to do outside when the
space is properly lit. But you can transform the space by using your money
wisely. Avoid costly fixtures and expensive wiring plans that can drain your
bank account. When in doubt, go with gently-used, cost-effective or
solar-powered lighting options. You’ll have a gorgeous outdoor space for a
fraction of the price.
Warmer weather means spending more time outside. But having a gorgeous patio won’t do you or your guests much good if no one can see the space after the sun goes down. From doing some last-minute pool maintenance at night to hosting an after-hours cocktail party, if you want to make the most of your outdoor space, you’ll need to light it up with a series of immaculate lighting fixtures. Nothing sets the mood like light, so make sure you’re creating a welcoming environment for your guests by choosing fixtures that complement the space. Learn more about the latest outdoor lighting trends and how you can use them to transform your backyard area.
Built-in Lighting for More Subtlety
We’re
living in the age of minimalist interior design. Many homeowners are opting for
hidden lighting accessories as a way of creating a more seamless approach to
interior design. These kinds of fixtures won’t bring attention to themselves as
they switch on in the evening, so your guests will focus more on the experience
at hand instead of obsessing over a gaudy light fixture. If you’re looking for
subtler lighting options, you can hide the fixture behind a panel or a slab of
wood to make sure it matches the rest of the wall. The light is typically
pointed down, illuminating the ground and creating a series of shadows on the
wall.
If you really want to make your lighting as subtle as possible, you can have them slowly turn on automatically with a timer. The light will steadily increase as day turns to night, so the difference in mood will be nearly imperceptible as the minutes go by.
Minimalist design is catching on with millennials. If you’ve just bought your first home, you can fit in with your peers by designing a sleek, seamless space. Or if you’re the parent of a millennial, you can impress this younger generation by tamping down the look of your property.
Going Solar
Looking
to reduce energy consumption when lighting up your backyard? You can reduce your
energy bills and create a self-sufficient lighting system in your backyard by
using solar-powered lights. These fixtures get to sit outside all day, so it
makes sense that they draw their power directly from the sun. When dusk rolls
around, the lights will use this power to turn on automatically, so they won’t
pull energy away from your home. Your utility bills will be lower, and you
don’t have to worry about wiring these new lights to your home’s electric grid.
If you’re worried about large solar grids taking up space on your property, don’t be. Solar energy has come a long way in years past. You can find attractive lighting fixtures with subtle solar panels that won’t distract from the overall flow and design of the space.
One
of the biggest reasons to add some light to your outdoor space is so your
guests can see where they’re going. But if it’s just a matter of helping your
guests get from point A to point B, you shouldn’t have to fill up the space
with large spotlights and overbearing fixtures that can be more blinding than
anything else. Your guests don’t need a lot of light to walk several feet from
the pool to the patio or vice versa. That’s why many homeowners are using
lighted pathways and staircases to lead their guests around without filling up
the space with too much light. These small lights are tucked into the pathway
or staircase, so the guest can easily see where they’re going as they take each
step. If you need to rush out to do some swimming pool
maintenance, you can quickly get to the pool
without having to search for a light. You can also take advantage of pool lighting to
help light the way!
You’ll want to go with LED lights when designing the space. They are more energy efficient and they last three to 25 times longer than traditional bulbs, so you won’t have to replace them as often. The lights don’t emit a lot of light, so they’re best used for transition areas instead of a gathering place like the pool or a patio.
Motion-Sensor Security
Motion-activated
lighting has also exploded in popularity in recent years. These fixtures are
convenient because they turn on automatically as soon as someone gets near the
light. Your guests won’t be fumbling around in the dark trying to find a switch
if you’re not there.
But motion-activated lighting is also about security. If a suspicious character gets onto your property, you can deter them with motion-activated lights. You can use mild lighting fixtures around the more functional parts of your outdoor space to create a soothing environment for your guests. But you can also add stronger, if not blinding, spotlights to the perimeter of your property to ward off unwelcome intruders. You can keep the space lit and safe at the same time.
Cordless for More Portability
When
we think of lighting, we usually think of it as stuck in one place. That’s why
we place lights strategically around the space, so every corner is illuminated.
But with the advancement of cordless lighting fixtures, that no longer holds
true. You can be more selective with your lighting fixtures if you and your
guests can move them around without a second thought. These fixtures tend to be
solar or battery-powered, so no power cord is required. Someone can easily
reposition a light or carry it out to the party without having to find a power
outlet nearby. You don’t have to buy as many fixtures because you can move them
around like pieces on a chess board.
Nothing
helps you make the most of your outdoor space like the right lighting fixtures.
Your guests can enjoy the space long after the sun goes down without having to
sit around in the dark. Transform your patio with the latest outdoor lighting
trends and set the mood for your next outdoor get-together.
The Skybasic Wireless Digital Microscope is an inexpensive digital microscope which can be paired to your phone or computer to allow you to take photos or videos of objects at a high magnification. This device is great for looking at your PCB joints or inspecting components and part numbers on circuit boards. It’s also fun to have a look at fibres, crystals and insects, exploring the world of macro photography around you.
Let’s have a look at my experience unboxing and using the Skybasic wireless digital microscope…
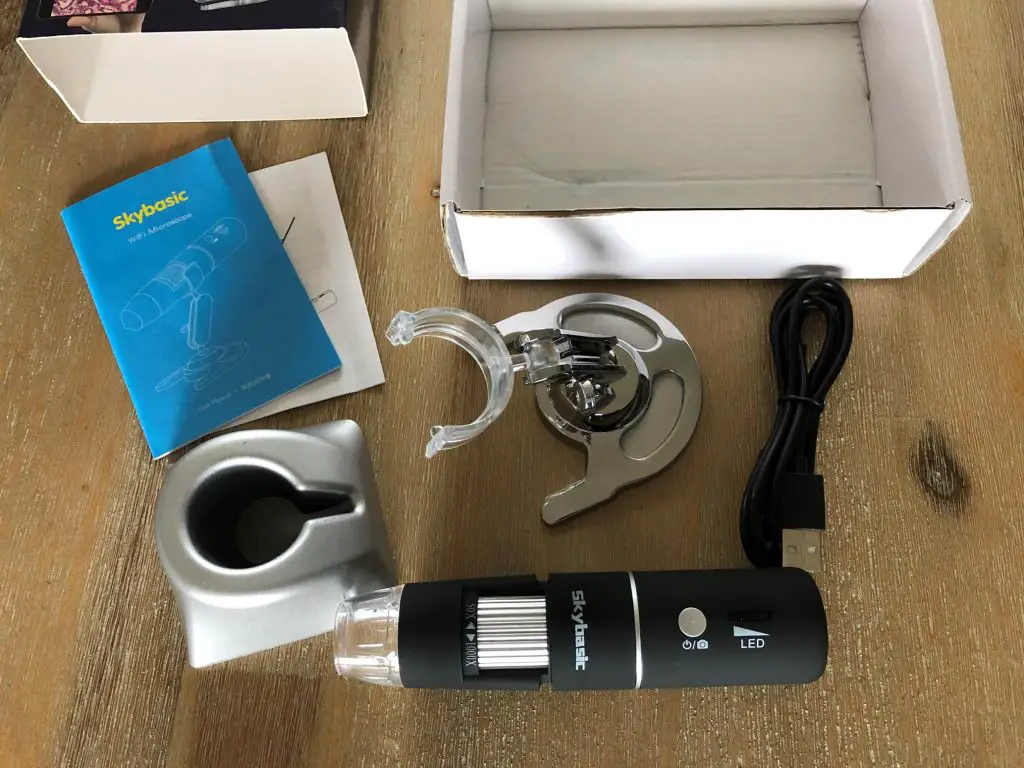
Unboxing
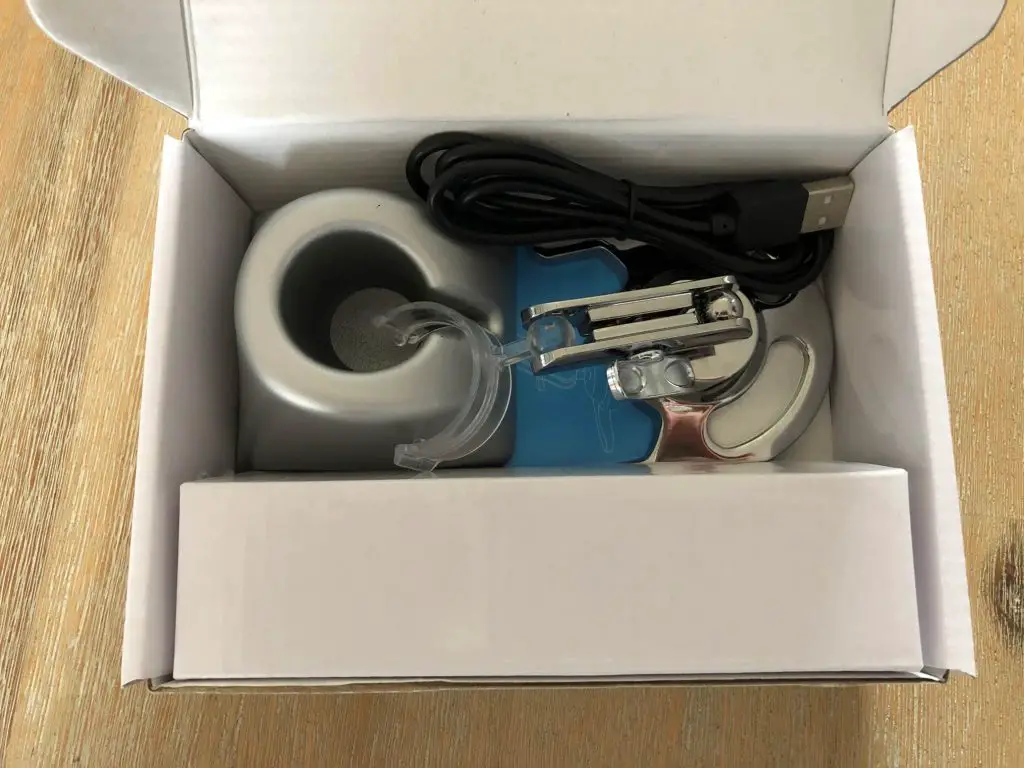
The Skybasic wireless digital microscope arrived in a relatively small rectangular box with most of the information available on the Amazon page displayed on the box as well.
Slipping off the outer sleeve and opening the inside box, you’re presented with the stands and cable, the microscope is further covered in a cardboard sleeve with plastic bubble wrap.
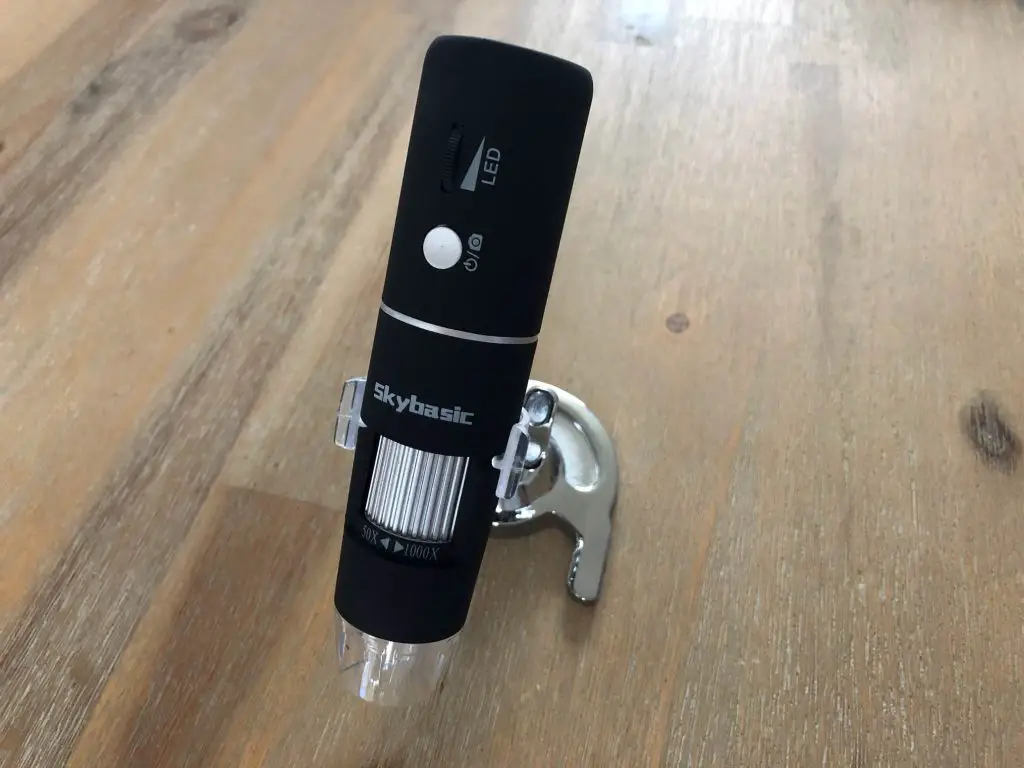
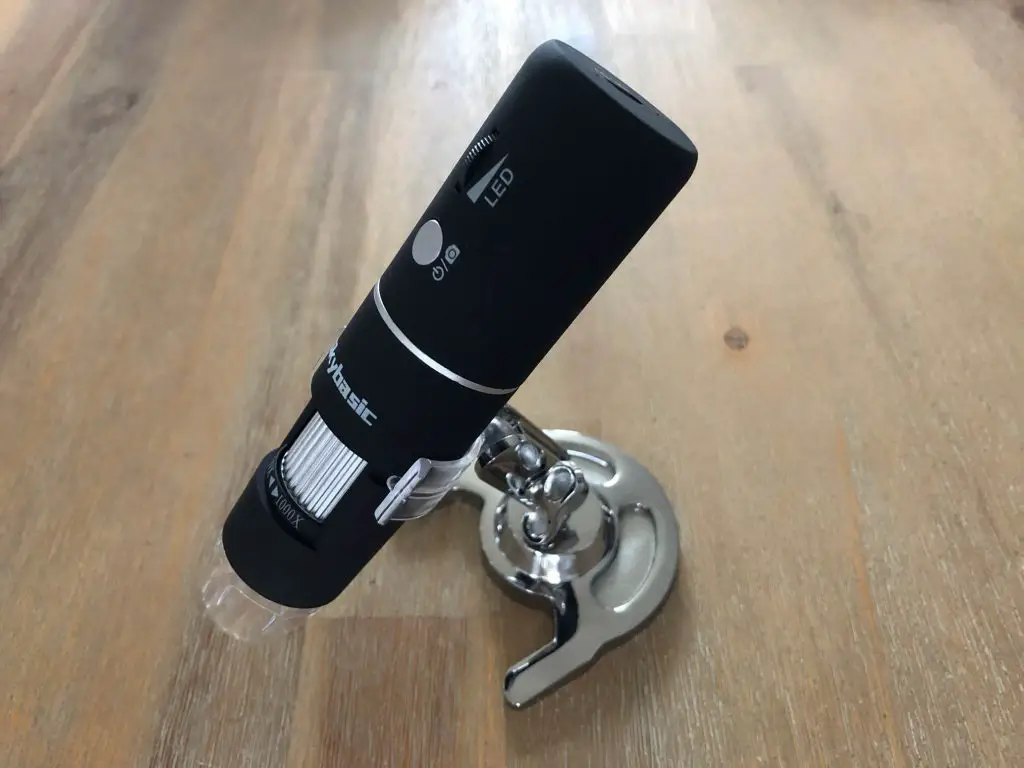
The physical microscope has a micro-USB interface on the top end and a plastic cover plate on the optic end which should be removed for use. It has a power/photo button along with a wheel to adjust the LED brightness, a wheel to adjust the “zoom” and two buttons on the back to adjust the magnification.
I’ve put “zoom” in inverted commas as it is stated as the zoom in the manuals and on the actual device but this is actually the focus wheel, there’s more about this below.
Included In The Box
Skybasic Wireless Digital Microscope
Rotatable Metal Stand
Fixed Stand
Charging Cable
Manual
Technical Specs
If you’re not that interested in the technical details, skip to the next section.
The technical spec’s are not very detailed online, on the box or in the manuals. The below information is all that is provided:
2MP 1080P HD Camera
50X – 1000X Magnification
8 Adjustable LED Lights
Compatible With Windows, Mas OS, iOS and Android
Resolutions – 1920×1080, 1280×720, 640×480
Internal Lithium Battery – Capacity Unknown
Setup & First Impressions
Unpacking the microscope, I was quite impressed by the quality and feel of the product. While it is mostly plastic, it doesn’t look and feel as cheap as some plastic electronic products do. The build quality is generally quite good and the body of the microscope is a matt rubbery plastic which feels good to hold.
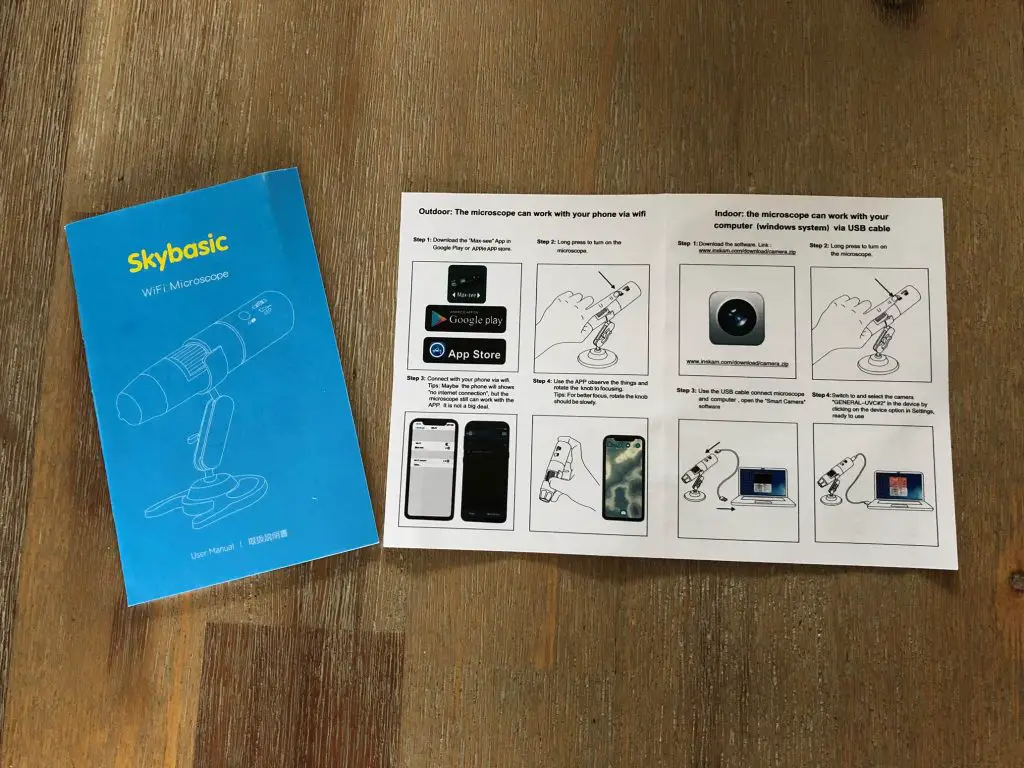
I had a quick flip through the manual. The language isn’t great but you can get a general idea of how to set everything up from it and I didn’t struggle to make anything out.
You have two options to use the microscope, one is to connect it to your phone and use it wirelessly through an app and the second is to plug it into your computer through the provided USB cable.
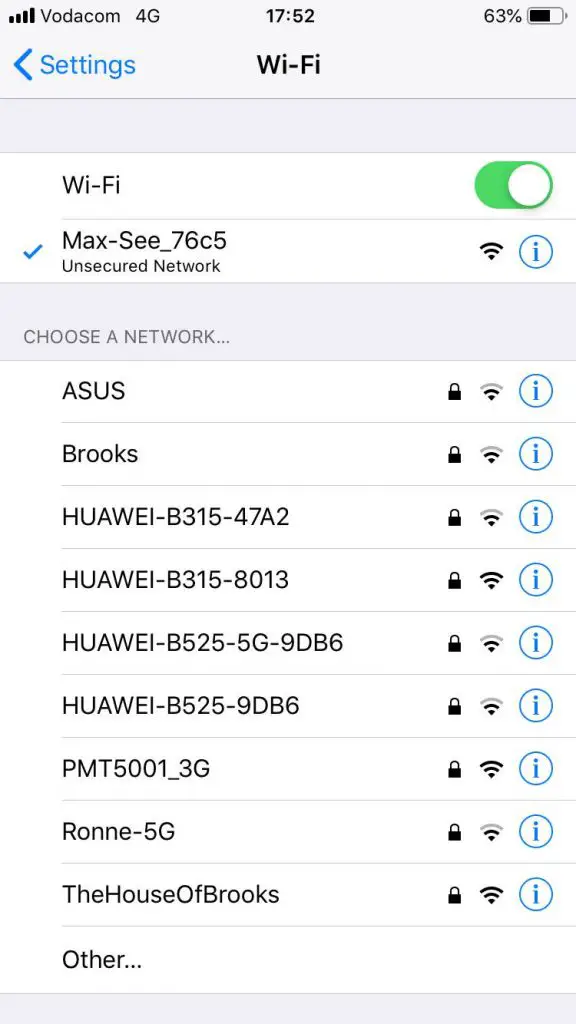
Connect To Your Phone
Download the Max-See app in the iOS App Store or the Google Play Store.
Next, you simply join the Skybasic Wireless Digital Microscope WiFi network and then launch the app. The app takes a few seconds to load and establish the video feed and then starts streaming the video from the microscope.
I was really impressed at how quick and easy it was to get the microscope paired and working with my phone. There isn’t any fiddling involved and it simply worked the first time.
My only complaint about the app interface is that it is a bit laggy, the picture jumps around when you move the microscope, it isn’t fluid and there is a definite lag between moving the object and observing the movement on your phone. That said, although there is some lag, the video feed is very reliable – it doesn’t drop out or lose signal.
Connect To Your Computer
The second option is to connect it to your computer. This is even easier than the connection to your phone although you can’t connect wirelessly.
Simply plug the USB cable into the port on top of the microscope and then into your computer and launch the Photobooth app on your Mac or download the application for your PC.
The app connects to your microscope immediately and you can begin making a video or taking photographs.
The downsides to using your computer is that it is not wireless and you can’t use the photo or zoom buttons but I haven’t found these to be useful in any case.
The video feed is substantially more responsive through the wired connection to the computer with almost no lag. This makes it much easier for videos and to position objects under the microscope as the lag in the app often makes your “overshoot” your target when moving the object around.
General Operation & Use
The operation of the Skybasic Wireless Digital Microscope is pretty straight forward. You place an object underneath the optical side, set up the microscope on the stand to look at the area you’re interested in and then adjust the “zoom” wheel to focus correctly.
This is where it may get a bit confusing. The 50X – 1000X zoom wheel is actually the focus wheel. When you place an object underneath the microscope, you’ll see a blurry image and you’ll need to adjust this wheel to bring the object into clear focus. The focusing process does involve a bit of magnification adjustment but this is a side effect of the focusing, not the wheels primary purpose. There is no way to zoom in on an object and keep it in focus, you need to physically move the object closer to the lens and then refocus.
There appears to be two points throughout the range of the “zoom” wheel which bring an object into focus. The first is in the first half of the wheel’s travel and the second is in the second half of the wheel’s travel. The second providing a much higher magnification than the first. You can see more on this in the sample images below.
I know there are zoom buttons on the back of the microscope but these are a digital zoom (so you lose image quality) and they only work with the app. I haven’t really found much use for this function.
The LED ring around the lens is great for illuminating the subject and it can be adjusted using the LED wheel near the top of the microscope and can be turned off all together if required. I’ve found that in most cases you only need around half of the brightness and you get a nice well lit subject.
The snapshot/camera button function on the power button is also quite useful when paired with the app, especially when you’re holding it with your hands and you don’t want to loose focus on the object while reaching for your phone to take a photograph. This function doesn’t work with the computer connection.
The rotatable metal stand is quite nice to hold the microscope still and set up clear and in-focus images. The only downfall to this stand lies with the plastic arm and ball joint. The metal ball joint is smooth and works really well but the plastic one on the arm has a rough seam on it which is almost always in the way when trying to make tiny adjustments to the positioning. This ball should really also have been metal.
The fixed stand I have never found a use for and I’m not really sure what the intention behind it is. The microscope fits into it front first as a simple storage stand, but you could do that as well with the rotatable stand.
The battery life seems to be quite good. It charges quickly and it easily lasted over two hours while I was testing it out. There aren’t any battery level LEDs on the device or an indicator on the app so it’s difficult to tell how fully charged (or empty) it is.
As far as the magnification is concerned, it is nowhere near the quoted 1000X magnification. A quick image search for objects under a microscope at 1000X magnification reveals that you should be able to easily see blood cells at this magnification and you definitely cannot do that with the Skybasic Wireless Digital Microscope. It’s great for looking at circuit boards, small components, fibres, insects and large cell structures but I would guess that the magnification is generally somewhere between 50X and 100X.
Sample Images From The Skybasic Wireless Digital Microscope
These images were all taken using the microscope with the standard settings. They have not been modified or enhanced in any way.
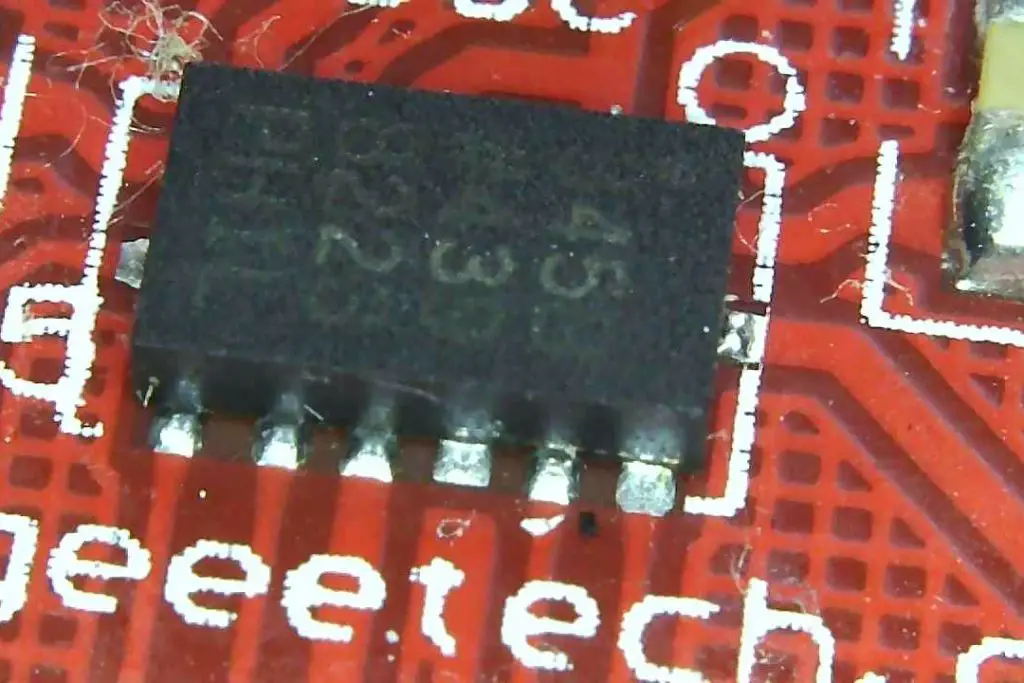
Arduino Chip & LED At Low Magnification
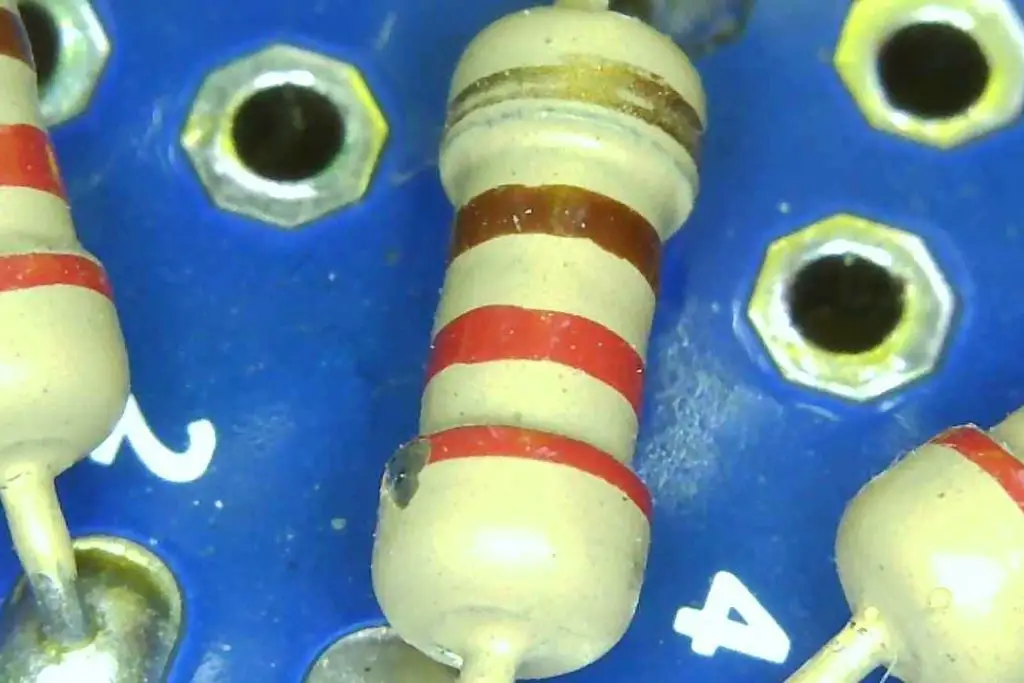
Resistor At Low Magnification
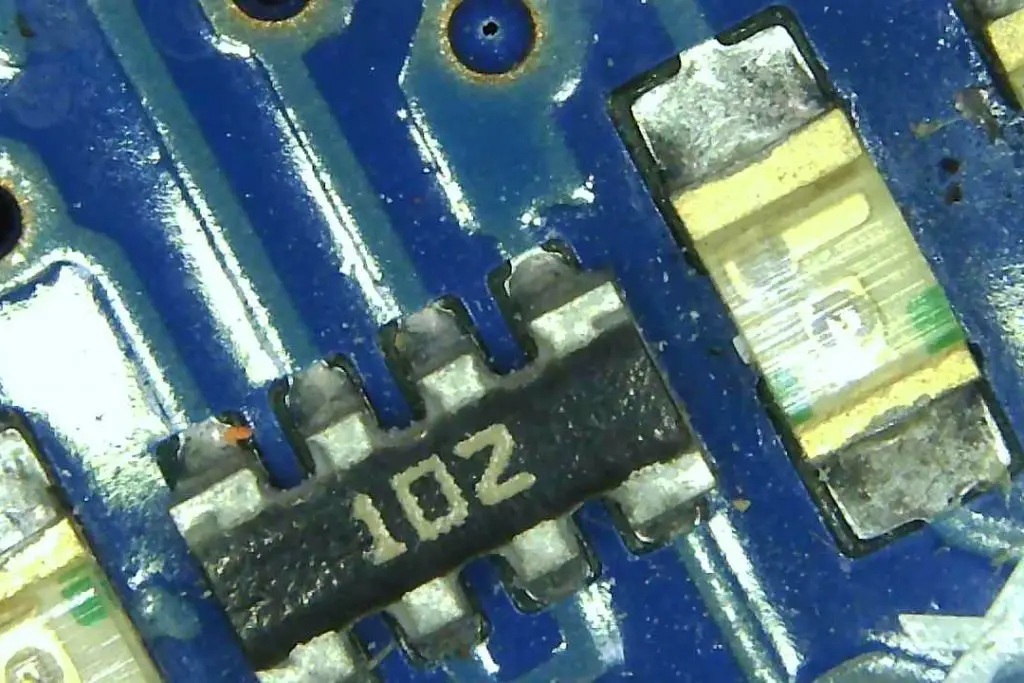
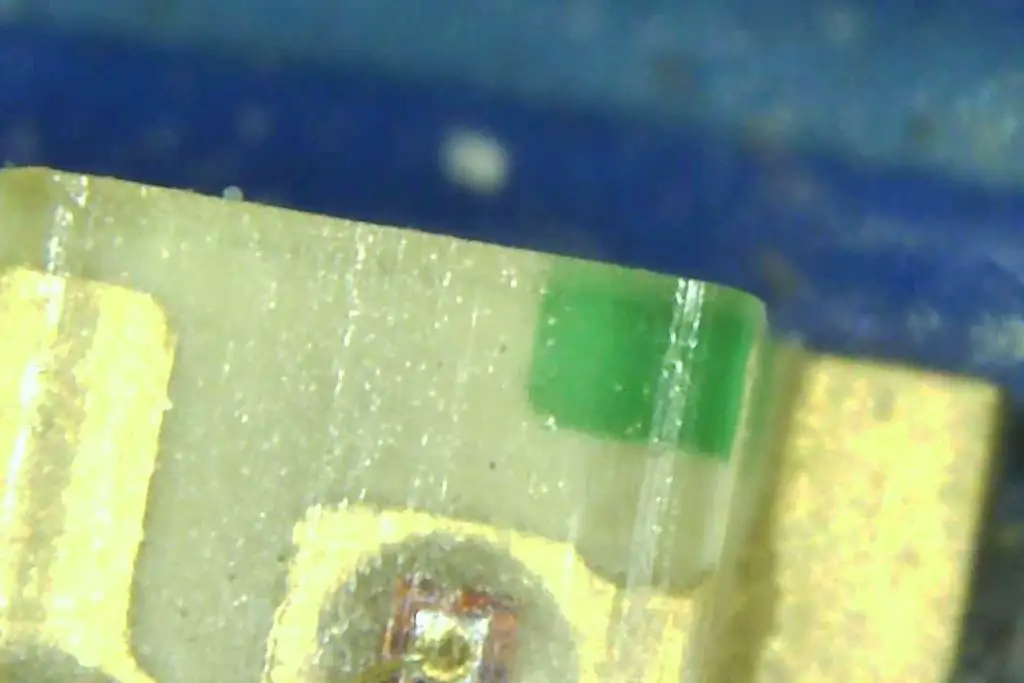
Chip At Low Magnification
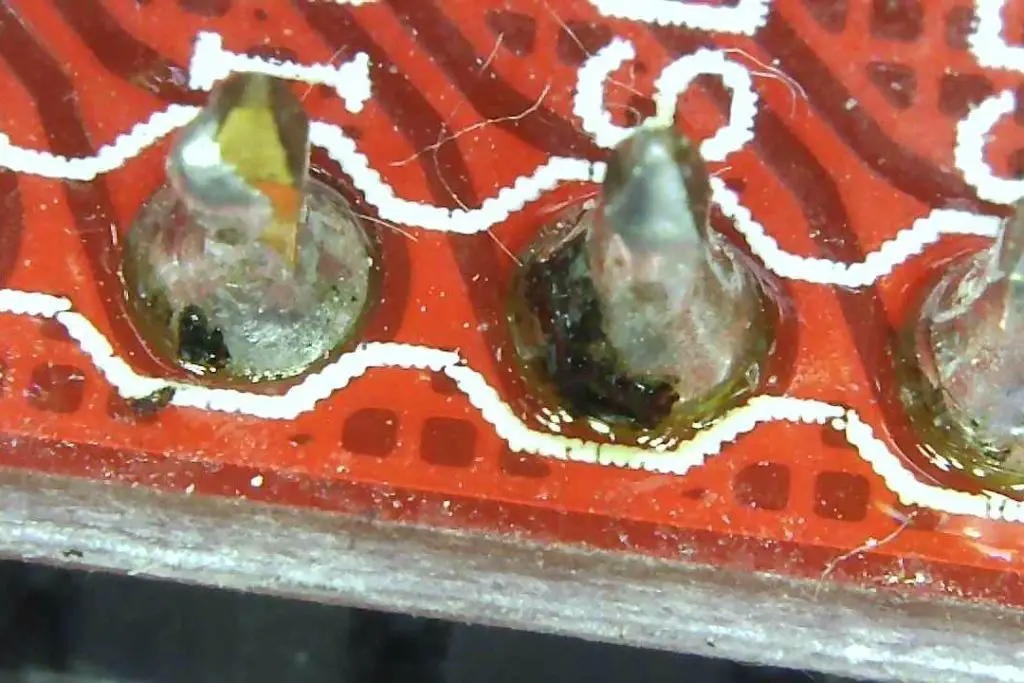
Solder Joint At Low Magnification
Coin At Low Magnification
Coin At Low Magnification
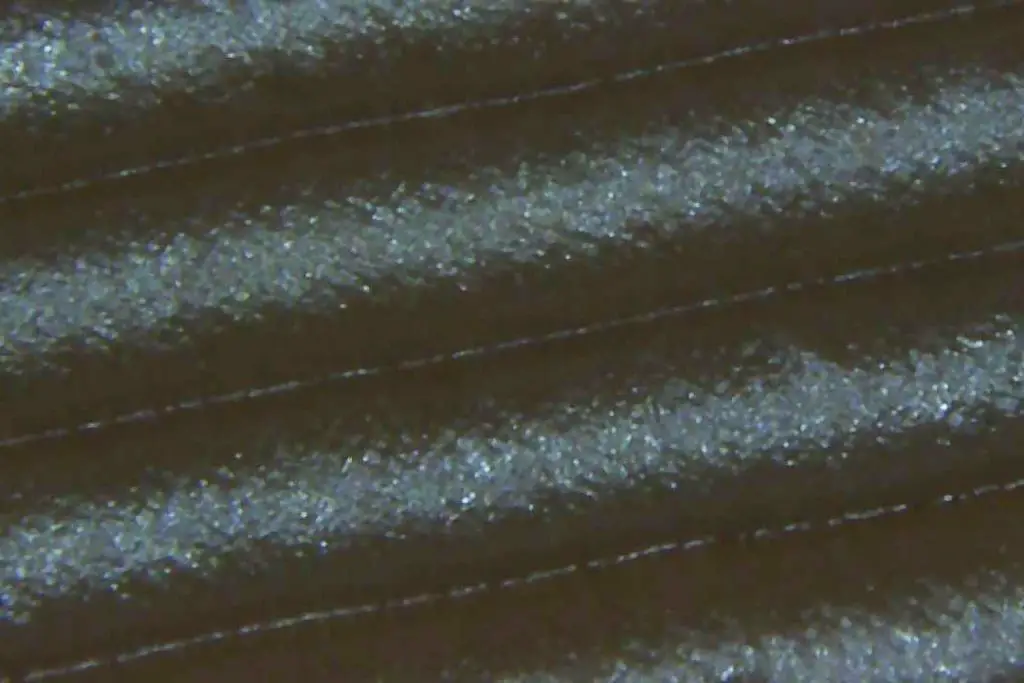
Moth At High Magnification
Arduino LED At High Magnification
3D Printed Object At High Magnification
What I Like And Dislike
I Like
The pairing to a phone or tablet is quick and easy to do. It worked first time and is very reliable.
The ability to connect it to a computer through the USB interface is also great for getting images and video directly onto your computer.
The picture quality is really good for such a cheap device. At the price point I wasn’t expecting much and it is actually quite impressive.
The LED ring helps keep your subject well lit for clear photos and videos at any magnification.
The internal battery makes it truly portable when paired with your phone. There is no need for external power banks or cables.
I Dislike
While the magnification is quoted as being up to 1000X, it is not quite as high as this. At 1000X you should be able to clearly see blood cells and this is definitely not possible with this microscope. Its great for looking at small insects, fibres and circuit boards etc..
The wireless connection is quite laggy. It reliably connects to your phone and it connects and works straight away but there is a delay between the movement of the microscope and the movement on the device you are connect to.
The plastic ball on the stand is too rough and it is difficult to precisely adjust it without the image completely jumping out of frame.
There is no battery status indicator on the device or in the app which makes if difficult to tell if it is fully charged or nearly empty.
The zoom wheel is actually a focus wheel. There is no optical zoom on the device.
Conclusion
The Skybasic Wireless Digital Microscope is a great starter tool for exploring macro photography and the microscopic world around you. It is inexpensive and gives you a good quality image and a reasonable amount of control over what you’re looking at. There are a couple of limitations and the quoted magnification level is a bit optimistic but all around it is a great hobbyist device. I’ve found it particularly useful for cellphone repairs and general work with small circuit boards and components.
If you’re thinking of buying one, it is available on Amazon for $44 – Buy Here.
Have you used the Skybasic Wireless Digital Microscope or a similar wireless or wired microscope? Let us know your thoughts and experiences in the comments section below.
Has your home button on your old iPhone 5S stopped working? Did you know that you can repair this problem at home for less than $10? This is a really easy repair to carry out yourself and you should be able to do it in 10-15 minutes. Get your old iPhone working again to use yourself or to sell for some extra cash.
The guide below will take you through the process of replacing your home button assembly step by step. Some suggested purchase links for replacement parts and tools are provided below.
While this repair restores the home button functionality, the touch ID sensor is paired to your iPhone’s logic board so you will lose the touch ID functionality. At this stage only Apple can replace the home button and retain the touch ID functionality.
If you’ve got any other problems with your old iPhone or you’ve got a different model, have a look at these other iPhone repair guides.
What You’ll Need To Replace Your iPhone 5S Home Button Assembly
How To Replace Your iPhone 5S Home Button Assembly
Find yourself a nice flat and well lit area to work on. You’ll need an area to lay down the screws you have removed. I like to keep a small sheet of paper nearby and lay the screws I’ve removed down on the paper and mark off where they were removed from. There are a number of different sized screws in your iPhone and it’s important that you put them back in the correct places.
The two most important parts of this repair are to keep your screws really well organised so that you know exactly which one came out of where and to be careful when working with the ribbon cables, especially when opening up your phone, they are extremely fragile.
If you enjoyed this guide, have a look at these other iPhone repairs you can do yourself. Most iPhone repairs can be done at home for a few dollars, so don’t replace your iPhone until you’ve had a look at whether you can repair it at home first.
Good luck with your repairs and let me know how it went in the comments section below.
Having a garden and being able to spend as much time there as you want is one of the best things in the world. If you’re lucky enough to have this space, try to make the most of it and turn it into the best garden in the world. If you still don’t know how to do that, here are five easy hacks you can use to upgrade your garden.
A Sustainable Vegetable Garden
If you’re a fan of cooking and preparing three healthy meals every single day, you probably already have a small garden in your back yard. Just a few sorts of vegetables, some herbs and spices will be quite enough, but even that requires a considerable amount of time and energy.
But, if you opt for a sustainable garden, your job will be much easier – you’ll invest less money and spend less time maintaining your veggies, but the results will still be extraordinary. A sustainable vegetable garden will improve your quality of life, but also spice up your back yard.
Minimise Pests Using Coffee
All gardeners
hate pests, but these come in all shapes and sizes,
and are more resilient and unpleasant than you can imagine. Almost all known
methods are flawed and ineffective, and pests can easily return no matter how
determined you are to get rid of them. Therefore, you need to think outside the
box and find new ways to repel them, and there’s an idea you should definitely
try.
Namely, simple coffee grounds can do wonders for your pest control, and mixing them together with your soil is a surprisingly effective way to solve your problems. Coffee repels slugs, snails and ants, and it gives your garden a more pleasant smell, so it’s certainly one of the best ways to protect your veggies. Have a look at how to use coffee grounds effectively to upgrade your garden.
Build A Deck
If you’re not into gardening, you can always try to find other uses for your outdoor area. Building a deck is one of the best ideas to upgrade your garden, and it’s an easy way to give yourself, your friends and family a cool hangout spot. Building a deck isn’t a project you should do on your own, though; contact experts with more experience, as these are the people who can build you a deck professionally and skillfully.
Once your deck is done, you can give it a purpose and start furnishing and decorating it. Get yourself a proper dining table and enough chairs for all your guests, but don’t forget some comfortable outside furniture either. Comfy sofas and armchairs are the only things you need to spend hours and hours outside, enjoying your new deck and breathing in fresh air.
Introduce A Fire Feature…
While most people prefer decorating their backyard with a water feature – a fountain, a small pond or a pool – others opt for fire features. Anything from a simple fire pit to a stylish fireplace on your deck is going to do the trick and add a dose of elegance and class to upgrade your garden and your backyard space. Still, picking the right feature is never easy, so give it some thought first.
Digging a hole in the ground and turning it into a fire pit is the easiest thing to do, but it’s still a cool way to introduce a focal point into your back yard. This can become your new hangout spot and a place where you can spend time talking to your friends or bonding with your family. Also, adding a fireplace to your deck will make it appear homelier and more inviting than it ever did, and this can even help you when you’re preparing your food, so take this idea into consideration too.
… Or a Water Feature
If you don’t
like being surrounded by fire, a proper water feature is just what you need.
Again, it can be as big or small as you want, which is why lots of people with
a tiny backyard pick a small fountain that still does the trick and looks quite
nice. Alternatively, you can build a brand new pool, and that’s something your
kids might like the most.
Though it seems quite hard, building a pool isn’t that big of a challenge, and anyone can complete this project on their own. This way, you’ll get a customised and personalised pool that’s unique and totally in accordance with your standards and wishes, but is also not that expensive at all. Ultimately, your kids are going to love this outdoor feature and start spending more time in the back yard than ever!
Spicing up your outdoor area isn’t as challenging and undo-able as people think, and all you need to do is find cool ideas and then make them your own. Don’t be afraid to experiment and try out something new, and your garden will be nicer than ever!
Have you managed to upgrade your garden? Let us know in the comments section below.