Home Blog Page 58

Reclaimed Whiskey Barrel Coffee Table

Whiskey barrels, wine barrels or beer kegs are popular home decor features. If you have an old whiskey barrel lying around, why not turn it into a functional coffee table for your lounge or beer table for your bar area. It will fit in perfectly with rustic cottage decor and is right at home in any bar or man cave.

What You Will Need To Build A Whiskey Barrel Table

  • Whiskey Barrel, Wine Barrel or Beer Keg
  • Pallet or Barn Distressed Wood (5cm x 15cm / 2″ x 6″)
  • About 100 2cm (3/4″) Self Tapping Wood Screws – Buy Here
  • 10 10cm (3 1/2″) Self Tapping Wood Screws – Buy Here
  • 4 5cm (2″) Self Tapping Wood Screws – Buy Here
  • Wood Glue – Buy Here
  • Staples – Buy Here
  • 80 Grit Sandpaper (Optional) – Buy Here
  • Clear Varnish – Buy Here
  • Jig Saw (With Steel and Wood Blades) – Buy Here
  • Screw Driver or Drill Driver – Buy Here
  • Staple Gun (Optional) – Buy Here
  • Sanding Block (Optional) – Buy Here

How To Build A Whiskey Barrel Table

Whiskey barrels or beer kegs are typically made with wood strips which are forced into place and held in position by three or five steel bands. To ensure that the barrel does not come apart when you cut it in half, you need to secure each wood strip to the steel band. To do this, drill a hole through the steel band in the centre of each strip on every band for each strip. Only drill through the steel and try to drill into the wood as little as possible. Now screw a 2cm (3/4″) wood screw through each hole and into the wood strip to secure them.

cutting barrel in half

You can now cut the barrel in half. Cut through the steel bands along the join between two wood strips. Do the same on the other side of the barrel. One half should then easily come away from the other half. Try and keep the two barrel ends in place on one of the halves as you pull the barrel apart.

securing barrel ends

Next secure the barrel ends. Cut a half circle of pine wood the same diameter as the inside of the barrel ends. Screw or staple this to the inside ends to provide the additional support. This piece keeps the wood strips which make up the barrel end in place while you cut it in half.

barrel end supports

Cut the barrel end in half along the line of the sides of the barrel so that you are left with a perfect half. The ends can be additionally supported by a pieces of pine screwed or glued in horizontally along the top straight edge.

The table top can now be cut. Use old pallet wood or distressed barn wood for the right texture. Cut enough lengths of the wood so that the edges overlap the wine barrel by about 15cm (6″) all around. Glue the planks together to make a continuous surface.

table top surface

The long edges of the table top can also be contoured to match the sides of the barrel. Turn it upside down onto the table top and trace the long edge onto the edge of the surface of the table top. You will need to extend the two far edges along the same curve to the ends of the table top surface. Cut along the traced line using a jig saw to create the profiled table top. If you are not confident with a jig saw, consider leaving the table top edges square.

Finally, the legs can be made. Cut four 50cm (20″) pieces from the same reclaimed wood you used for the table top. Glue two of these pieces together side by side. Next you need to decide how far from the edges you would like the legs to be positioned. Measure the radius of the barrel at this point, trace and cut the radius from the long edge of the legs. This may require some trial and error before the legs fit snugly along the whole edge of the barrel. For a more professional look, the edge of the leg which meets the outer edge needs to be cut at an angle to follow the contour of the barrel. This angle can be set on a jig saw when making the radius cut. If you are not able to achieve the correct angle cut, just cut it at 90 degrees, it is not noticeable unless you look really closely at the legs.

Screw the legs on from the inside, drilling a small pilot hole through the slats along the line where you would like to position the leg will assist you in getting the screws in the centre of the legs. Use three to five 10cm (3 1/2″) screws for each leg, evenly spaced from end to end.

Once you have screwed the legs on, the table top can either be placed on top of the half barrel or it can be screwed on so that it does not move around. A 5cm (2″) screw at each corner screwed through the underside of the barrel and into the table surface will hold it securely in place. Be sure to check the length of the screws beforehand as you want the screws to penetrate about 10mm (3/8″) into the table surface but not go right through the surface as they will then be visible on the table top.

epoxy top coating

Finally you need to varnish or polyurethane coat your table. The completed table can be rough sanded before varnishing however it is supposed to be a rustic looking piece of furniture and the rough wood finish completes this look. A clear wood varnish is the easiest option for a surface coating and will also be relatively hard wearing. For a smoother finish which can take a bit more abuse, consider using a two part epoxy table coating for the table top surface. Follow the directions on the product for application details.

barrel coffee table

Optional: You could add a hinge to the table top and use the space in the barrel for storage.

Have you turned an old whiskey or wine barrel into anything useful around the house? Let us know in the comments section below, we would love to see your projects.

This project by logant3030 has been shared under the Creative Commons license CC 2.5 BY-NC-SA.

6 Easy DIY Shelf Ideas

Shelves are a functional decor item in any room, they add character and provide a useful storage area. Why not add a shelf to one of your rooms this weekend with these easy DIY shelf ideas?

rope tie shelf

Use two hooks screwed into the wall to suspend a plank with some rope and create a rustic looking hanging shelf.

rope tie link shelf

Suspend multiple shelves by either using rope loops or some building wire to attached the lower levels. Multiple hanging shelves are perfect as a book shelf in a study or lounge.

copper and wood shelf

Use copper pipe fittings along with some wooden dowels to create a wall mountable shelf or a free standing shelf rack.

wood and hooks shelf

With some timber and moulded sections from your hardware store, you could create a robe hanger for a bedroom, coat hanger for an entrance or a towel hanger for a bathroom. The shelf on top could be used for keys and cellphones in your bedroom or entrance or to keep toilet rolls, air freshener or soap in the bathroom.

galvanised pipe shelf

Use some galvanised pipe fittings to create an industrial themed shelve for a bathroom or kitchen. Add a horizontal section underneath as a towel rail.

concrete block and wood s

Stacked concrete blocks and some wood planks make an elegant free standing shelf unit which can be used as a book shelf, radio stand or tv unit.

Change Your Vehicle’s Motor Oil

Changing your vehicles motor oil is surprisingly easy and saves you time and money. You no longer need to drop your vehicle off at a service center, arrange lifts to work and collect it in the afternoon, the whole job should take less than an hour. You should be changing your motor oil every 10000 – 15000km (6000-9000miles) depending on the age of the vehicle and the driving style.

There are typically three steps in changing your motor oil, drain the old oil, replace the oil filter, refill the sump with new oil.

What You Will Need:

  • Replacement Oil (Consult Your Owner’s Manual For The Type, Only Use Brand Name Oil)
  • Replacement Oil Filter (According To Your Vehicle Model)
  • Oil Drip Tray
  • Box Wrench/Allen Key For Sump Plug
  • Strap Oil Filter Wrench

Drain The Old Oil

Warning: Only attempt to drain the oil when your engine is cool, hot oil can cause severe burns.

oil drain plug

Firstly you will need to jack up your vehicle. This may not be necessary if you have an SUV or a vehicle with good ground clearance. You just need to be able to reach the sump drain plug on the bottom of the engine. Place an oil pan underneath the drain plug and then loosen and remove the drain plug with a box wrench or allen key (rotate the wrench/key counter-clockwise).

Allow all of the oil to drain out of the sump. When the oil stops dripping, replace the sump drain plug. Be careful when reinserting the plug, it should be finger tight almost all the way. If it is sticking then remove it and try again as you most likely have the threads misaligned and tightening it with a wrench will permanently damage the engine block.

Replace The Oil filter

oil filter

The oil filter is typically replaced from the top of the engine. Position the oil pan on the ground underneath the oil filter. Use a strap type oil filter wrench to loosen the filter, it will also screw off counter clockwise. Replace the oil filter with a new one, screw it on until it is hand tight, again making sure that the threads are properly aligned. Once the filter is hand tight, use the strap wrench to tighten it a further ¼ turn. It is important not to over tighten the filter. If you do over tighten the filter then next time you need to change it, you will not be able to remove it.

Replace The Oil

Remove the oil filler cap on top of the engine block. There are a number of reservoirs and caps on the engine so ensure that you remove the one labelled oil. It is easiest to refill the oil with an oil funnel, place the funnel into the filling hole and pour in the oil. Look in your car’s owners manual for details on how much oil to add, most cars take around 3.5 to 5 litres of oil (4 to 5 quarts). Rather add too little, check the level and add more as necessary. When the oil sump is full, replace the oil filler cap.

oil dipstick

To check the oil level, remove the oil dip stick, wipe it off with a paper towel or old rag and reinstall the dip stick. Allow it to stand for a few seconds and then remove it and see how far the stick is covered with oil. There should be indicator markings on the dip stick which tell you when it is full.

Lastly you need to dispose of the used motor oil. Pour the oil out of the drip dray and into the container which the new oil came from. Take the bottle to your nearest oil recycling centre or car service centre. Do not dispose of the oil in the trash or pour it down the drain, oil is a harsh environmental contaminant and causes severe damage to the environment when disposed of incorrectly.

Fix A Leaking Shower Head, Stop Dripping & Spraying

If your shower head is leaking, dripping or water is spraying out of the side while it is in use, the washer in the joint between the stem and the head is probably perished and needs to be replaced.

What You Will Need To Fix A Leaking Shower Head

  • Two Plumbing Pliers (One For The Head And One For The Stem)
  • Replacement Washer

How To Fix A Leaking Shower Head

Use a towel or cloth around the shower head and stem while using the pliers so that the teeth of the pliers do not mark or scratch the chrome finish. Grip the shower steam with one pliers and the ring on the head with the second, turn the shower head ring counter clockwise to loosen it and then remove it from the stem.

Remove the rubber washer and replace it with an identical one. This may require a special visit to your local hardware or plumbing store. Take the old sample with you to ensure that you get the exact replacement.

Lastly re-screw the shower head onto the stem. Wrapping some PTFE tape around the threads on the stem assists in lubricating the joint to allow the ring to be screwed on easier. With the washer replaced, there should be no water coming out anywhere around the joint. If it is still leaking, the thread is probably not seated correctly, unscrew the stem, replace the PTFE tape and try to screw it in again. When the thread is correctly seated, it should be easy to screw in and the ends will be flush and square.

If you shower head is loose or the nozzles are clogged by mineral deposits, follow this guide for securing a loose shower head and this guide for cleaning a clogged up shower head. Your shower will soon be as good as new.

Easy Roast Chicken

A roast chicken is an easy family dinner or weekend lunch. This recipe allows you to cook a delicious roast chicken, potatoes and a gravy all in one pan.

Serves 4-6. Preparation Time 30mins, Cooking Time About 1 Hour 20 Minutes.

You Will Need:

  • 1.5kg Whole Chicken (Cleaned & Trimmed)
  • 4-5 Large Potatoes
  • Olive oil
  • Chicken Spice
    • Alternately make you own with Salt, Pepper, Onion Power & Paprika
  • 1 Sachet White Onion Soup Powder
  • ½ Sachet Brown Onion Soup Powder

prepared potatoes

Firstly peel the potatoes and chop them into large chunks, quarters or sixths work best. Place them in the bottom of the roasting dish and drizzle with olive oil. Use a spoon or spatula to turn the potatoes so that they are evenly covered in the olive oil. Sprinkle the white onion soup powder over the potatoes.

prepared roast chicken

Now prepare the chicken. Rinse it out with cold water and allow the excess water to drain. Place it on the grid from the bottom of the roasting dish placed widthways over the dish as shown. If you are using a regular roasting pan, use a baking cooling rack to place the chicken on. Drizzle olive oil over the chicken and rub it out to ensure the whole chicken is covered on both sides. Now sprinkle the chicken spice all over the skin. You can make your own chicken spice by mixing equal parts of fine salt, fine ground pepper, brown onion powder and paprika.

Place the chicken and potatoes into a pre-heated oven at 180°C (350°F) and allow to roast for an hour and a half. Midway through cooking, remove the chicken from the oven and turn the potatoes over so that they cook evenly on both sides. Mix the juices which have dripped from the chicken into the oil and baste the potatoes while turning them. When the chicken is done, remove it from the oven and allow it to stand for 5 minutes before carving  it.

Remove the potatoes from the roasting dish and place them into a warmed serving dish, do not cover the dish as they will go soggy.

In the roasting dish, mix half of the sachet of brown onion soup powder with 1 Cup of cold water. Place the roasting dish over a high heat on the stove or gas hob and pour over the soup mixture. Cook the mixture until thickened, stirring continuously to pick up the flavour in the pan from the roasting juices and potatoes. Once thick, pour into a gravy server and allow to stand for 5 minutes before serving.

What spices do you usually put onto your roast chicken? Please share them with us in the comments section below.

Chicken Potjie

A potjie is the perfect meal for a family gathering or camping trip. It can be cooked over a gas job or fire and requires very little attention. Prepare and add all of the ingredients and then leave it to cook without opening or stirring until it is ready. The heavy cast iron pot ensures that heat is evenly distributed so that the food cooks evenly and doesn’t burn. The chicken in this recipe is marinaded in wine and yoghurt for tender and flavourful dish. This potjie is best served with white rice or mashed potato and a beer bread makes a delicious side.

Makes 8 servings. Preparation Time 30mins, Cooking Time About 3 Hours.

You Will Need:

  • 2kg Chicken Pieces (Thighs produce the best flavour)
  • 5 Large Potatoes
  • 5 Large Carrots
  • 1 Green Pepper
  • 1 Cup Green Beans
  • 1 Punnet Mushrooms
  • 10 Dried Apricot Halves

Marinade

  • 2 Cups of Plain Yoghurt
  • 2 Cups of White Wine
  • 1 Large Onion
  • 10 Black Peppercorns
  • 2 Bay Leaves
  • 2 Tsp Dried Thyme
  • 1 Tsp Lemon Zest

Peel and finely chop the onion. Mix in the remainder of the marinade ingredients and pour over the chicken. Marinade in the fridge for 8 hours or overnight.

Peel and chop the potatoes into quarters. Peel and slice the carrots and the green pepper. Slice the mushrooms,  top and tail the beans and slice them in half. Over a high heat, in the potjie pot, fry the chicken pieces (removed from the marinade) individually until brown on both sides. Once brown, place all of the chicken back into the pot. Add the vegetables in layers above the chicken in order, potatoes, carrots, green beans, green pepper, apricots and finally the mushrooms. Pour the marinade over the layered vegetables, cover with the lid and allow the pot to simmer for 2.5 hours without opening the lid or stirring the vegetables.

Just before serving, stir all of the vegetables together. If the marinade is too watery, mix a packet of mushroom or white onion soup with a half cup of warm water, pour this into the pot and stir together before allowing to simmer for a further 10 minutes to thicken.

Serve the potjie directly from the pot with a pot of white rice. The left overs keep well for up to three days in the refrigerator. It does not freeze well as the carrots and potatoes become soggy.

Improve Your Workshop With These 5 Projects

A tidy and well kitted out workshop is the key to successful DIY projects. Here are 5 clever projects you can start making to improve your workshop, ensure your equipment is easily accessible and make the most of the space available to you to work with.

lumber cutoff bin

Almost every DIY project you tackle will result in a few odd left over pieces of wood, dowels, piping, conduit etc. A mobile cutoff rack or bin is perfect to keep them all in an organised and easy to access place for when those smaller projects come along.

cordless drill storage shelf

A cordless drill shelf gives you a place to hang your drills and charge the batteries while they are not in use, keeping your counters and cupboard space free for other tools and materials. If you don’t have any wall space available then consider installing the rack into the door of a large cupboard.

power cord caddie

Power and extension cords always land up in a tangled mess on a shelf and it becomes a mission to use any of them. Make sure your cords are always ready and available for use with this power cord caddie.

workshop storage

If you are constrained to a small workshop, then maximising the available space is important to allow you to take on big projects. Work areas and cupboards quickly get cluttered with items that are hardly ever used. Make these convenient swing down storage boxes to make the most of your ceiling space and free up work surfaces and cupboards.

magnet strips

Magnet strips provide an easy storage location for drill and screw driver bits. Attach magnet strips underneath your cupboards or a shelf to hanging mason jars by their lid. These can then be used to store nails, screws, wall plugs and any other loose bits and pieces you have lying around which may come in handy.

Keep Your Vehicle Running Smoothly

Performing regular maintenance on your vehicle keeps it in good condition, saves you loads of money in the long run and also prevents breakdowns. There is quite a lot that the average DIY fan can do to keep their vehicle in the best running condition. Remember that eventually things will start to break on your vehicle but it is almost always cheaper to replace parts than to replace the entire vehicle. Be sure to look for any parts you may need at PMJ International.

When your vehicle is new, you should always follow the supplied service schedule. Most modern new vehicles are supplied with a 3 to 5 year maintenance plan which requires the vehicle to be brought in for a full service after a certain distance has been driven or every year. Be sure to follow these plans meticulously or the dealer will impose penalties on your plan or void it all together.

When your vehicle is outside of its warranty period and you are tasked with maintaining it yourself, it is still a good idea to have the car looked at by a professional service centre periodically as they will be able to open the engine up and inspect the hard to reach components, gaskets and seals. One of the best investments you can make when you are maintaining your own car outside of a factory warranty is a service manual. These books offer you valuable advice and step by step instructions on maintaining and replacing components specific to your vehicle model.

Here is a list of the things you should take care of periodically to keep your vehicle running smoothly.

Check the Fluid Levels

check fluid levels

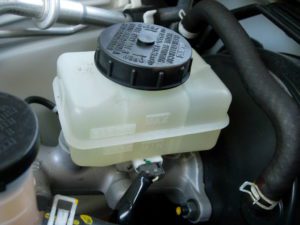
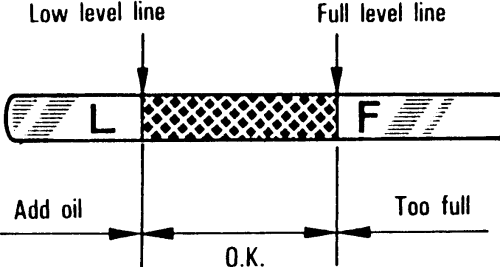
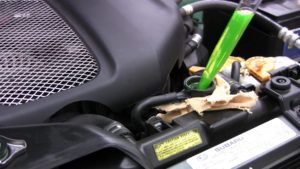
All of the fluid levels should be checked on a monthly basis. These include the power steering, brake fluid, coolant/antifreeze, windscreen washer fluid and transmission fluid reservoirs. All of these fluids, with the exception of the windscreen washer fluid, play a vital role in the operation of the car and may compromise the safety of the passengers or cause costly damage to the engine if they run dry.

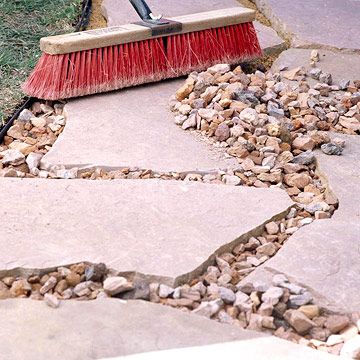
Replace the Air Filter

replace air filter

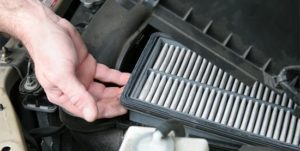
The air filter prevents dirt and dust from entering your car’s engine. If you live in a rural location or drive on dirt roads frequently then it is important to replace your air filter every six months to a year. A fresh air filter improves engine performance by not restricting the airflow and ensures that your engine is getting a clean supply of air. A broken air filter could allow dirt particles to enter the engine and clog the injectors which will be costly to repair.

Check Your Tyre Pressure

check tyre pressure

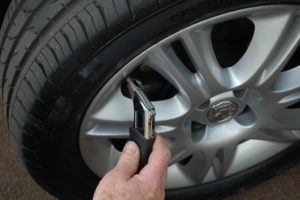
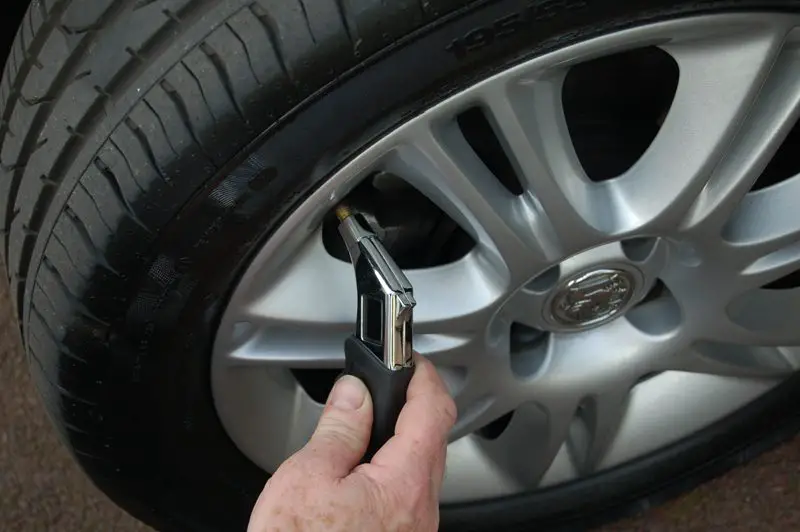
Your vehicles traction, fuel consumption and stability are affected by the air pressure in the tyres. Over inflation is often as bad an under inflation. As a general rule of thumb you should check your vehicles tyre pressure at least once a month and ensure that the pressure is in line with the manufacturer’s recommendation. This is usually found in the handbook or inside the door of the vehicle and can be done when you refuel or with a handheld tyre pressure gauge.
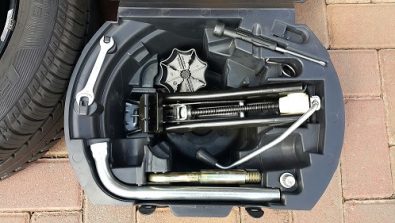
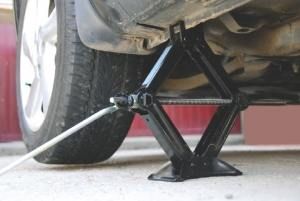
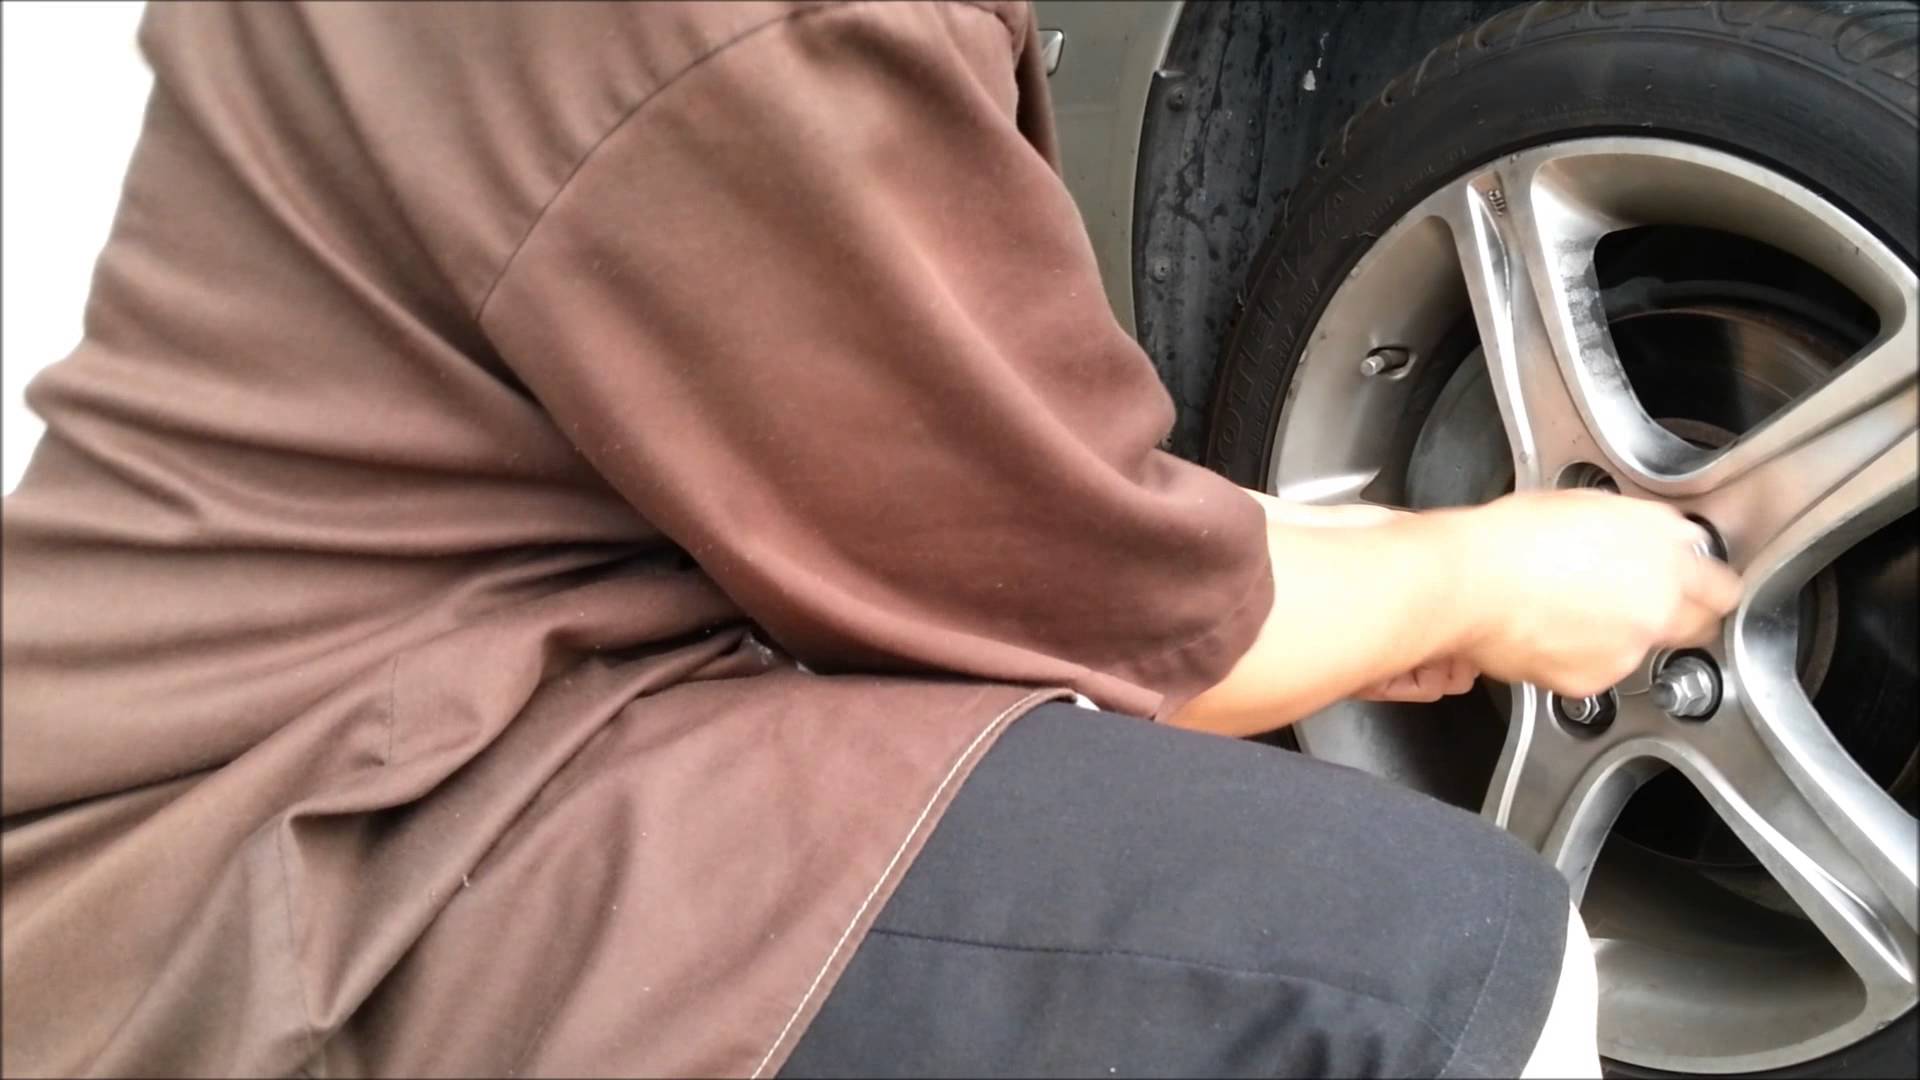
Rotate Your Tyres

tyre rotation

Your vehicle’s tyres never wear evenly, whether your vehicle is front or rear wheel drive, how the vehicle is loaded, the tyre pressure and wheel alignment all affect how the tyres wear on the road. Rotate you tyres regularly for your safety and to ensure that you get the maximum life out of each set. This can be done easily at home with the tool kit supplied with your vehicle or with your own workshop jack and wheel spanner. Jack stands are essential to keep the vehicle elevated while you swap two tyres around. Alternately most tyre dealerships offer a tyre rotation service relatively cheaply and will offer advice on worn out or damaged tyres.  Tyre should be rotated once every six months to get the maximum life out of them.
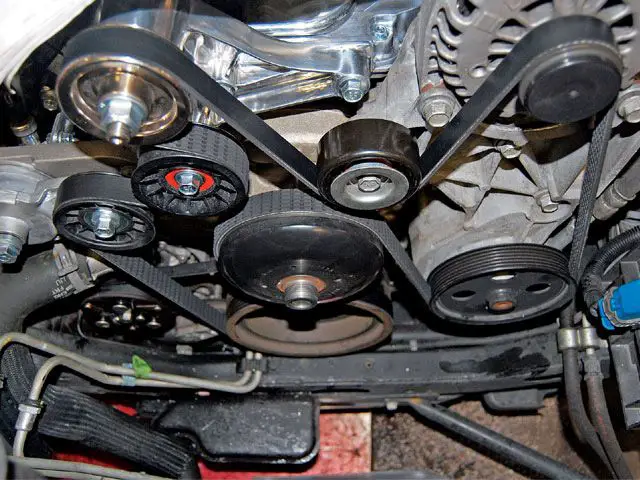
Serpentine Belt

serpentine belt

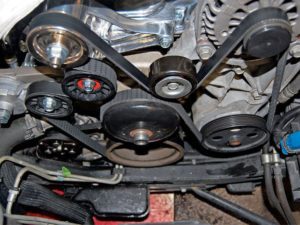
The serpentine belt keeps all of your vehicles auxiliaries running such as the alternator, air conditioner, power steering etc. The rubber in the belt perishes with time and should be periodically replaced. Small cracks in the surface of the belt around pulleys should be visible when the belt is perishing. Replace your belts every two to three years to keep them strong and flexible.

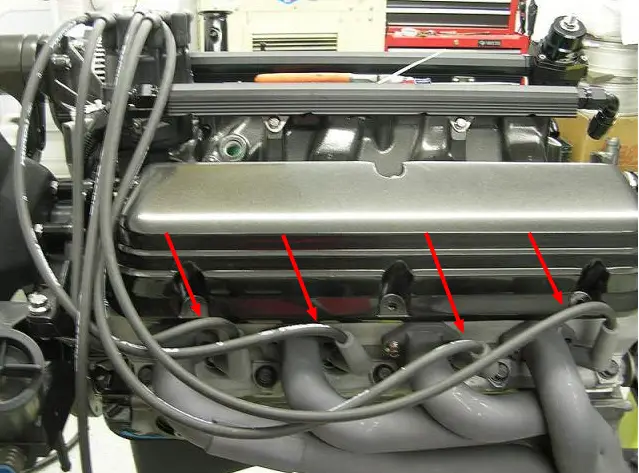
Replace Spark Plug Leads

spark plug leads

The continuous vibration and movement of the engine eventually causes the spark plug leads to fatigue and break down causing misfiring. It is a good idea to replace them every five years and usually only involves unplugging the two ends of each of the old ones and replacing them with new ones.
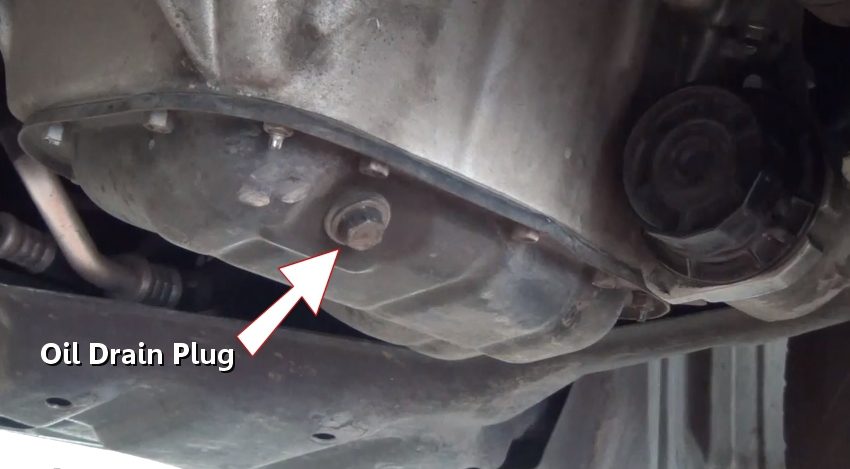
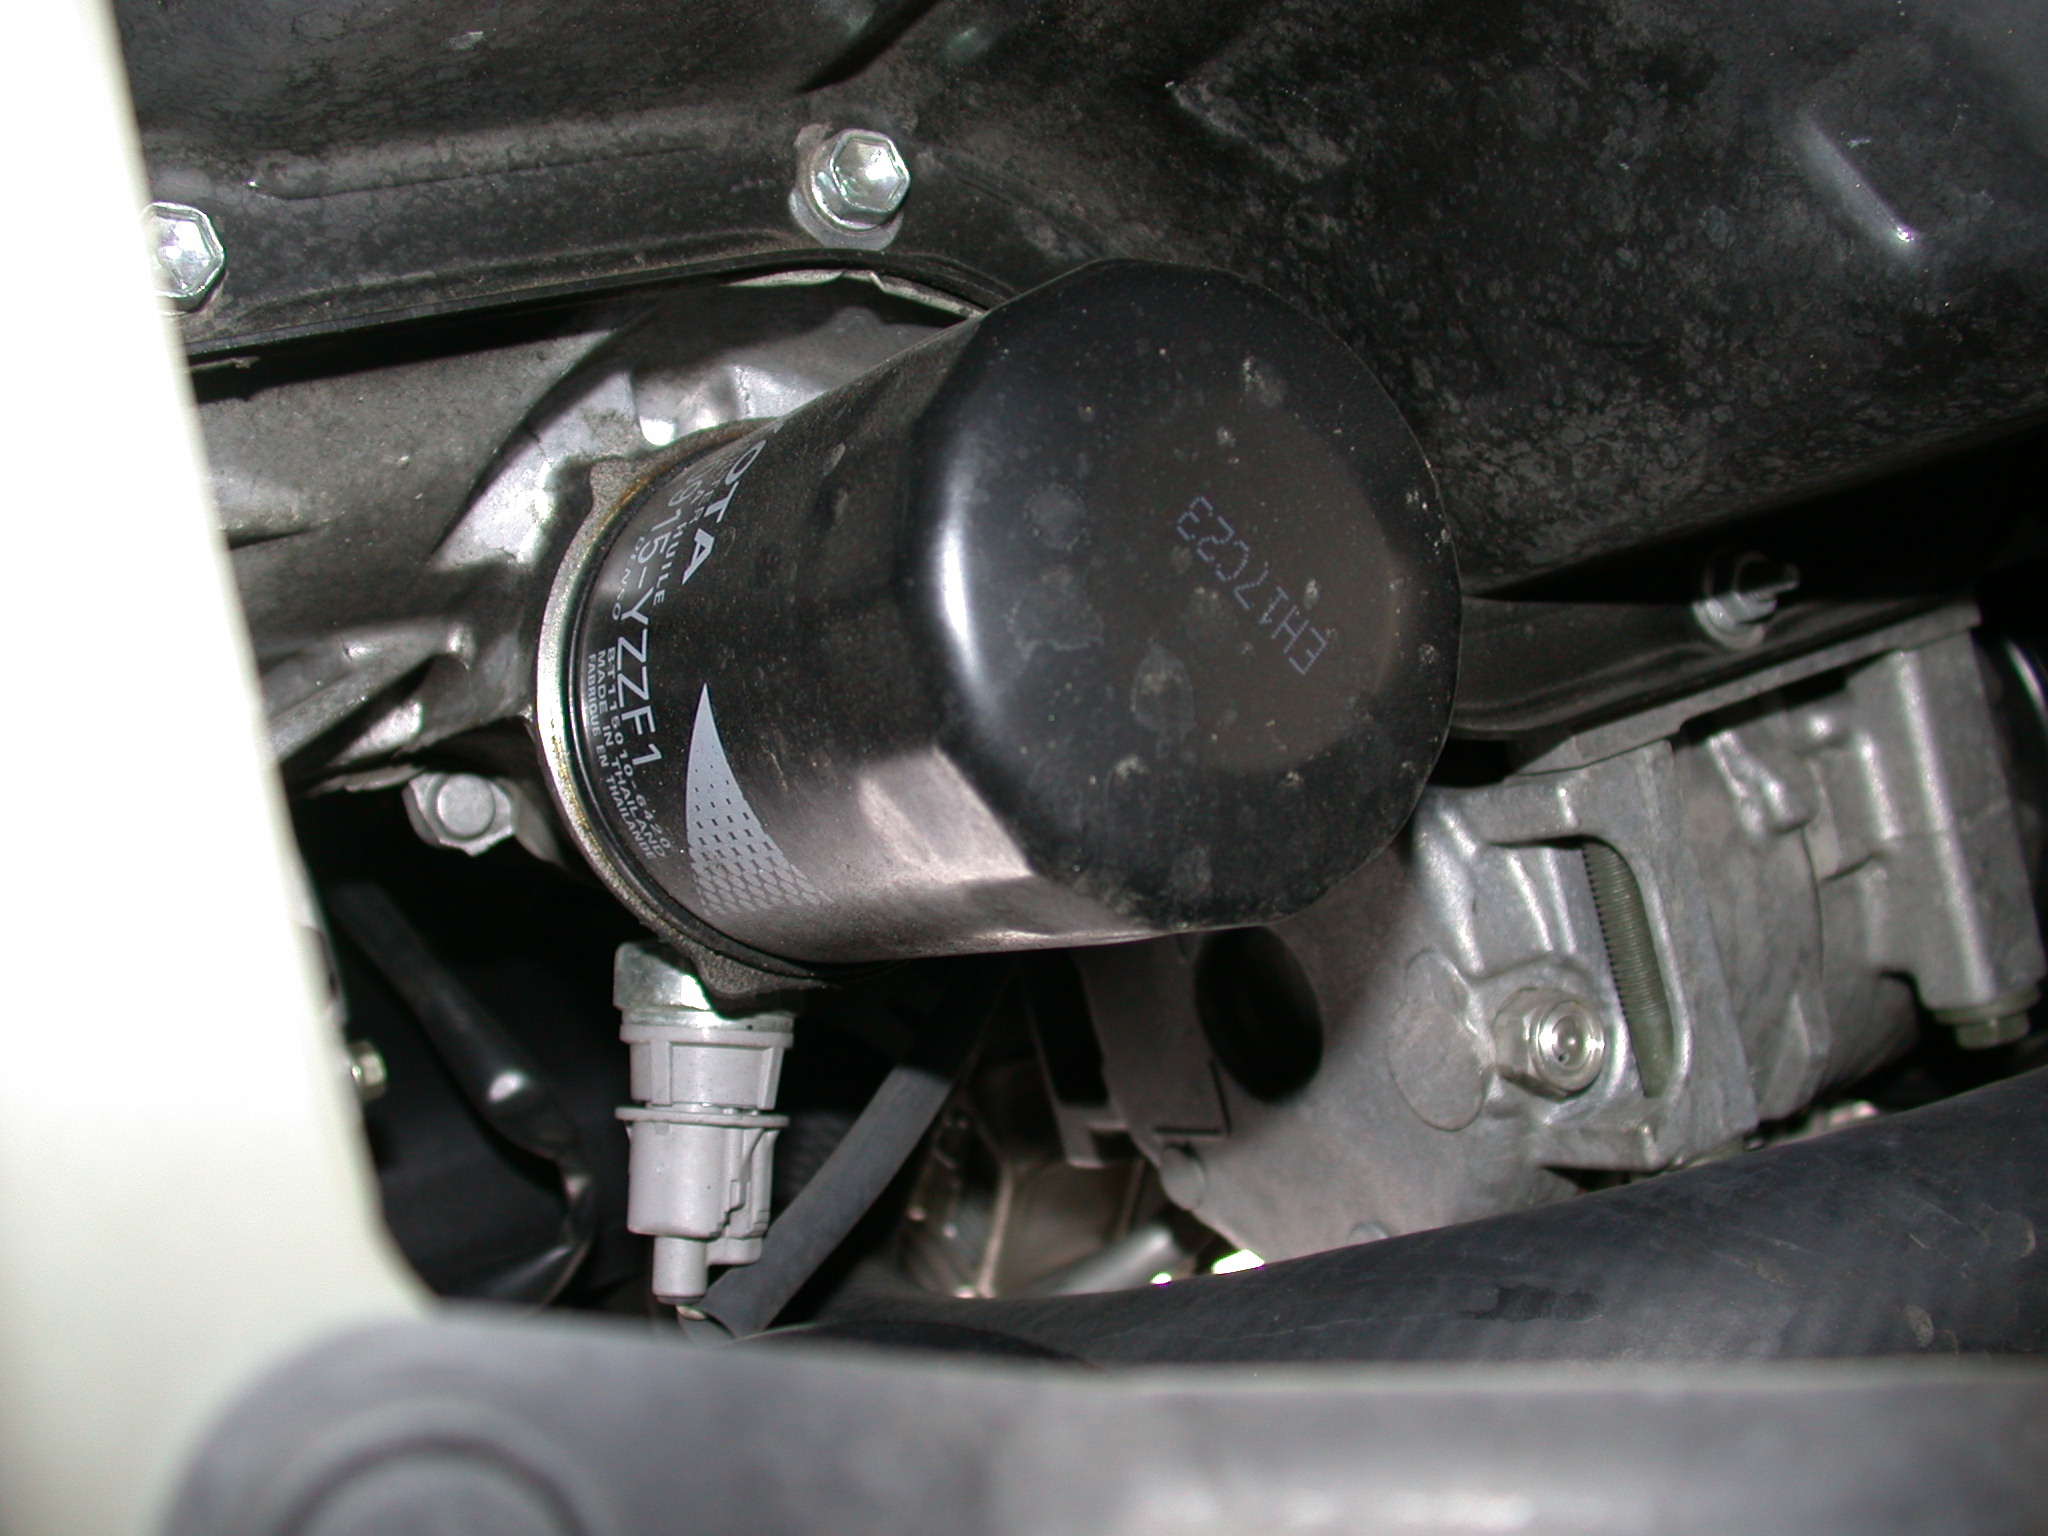
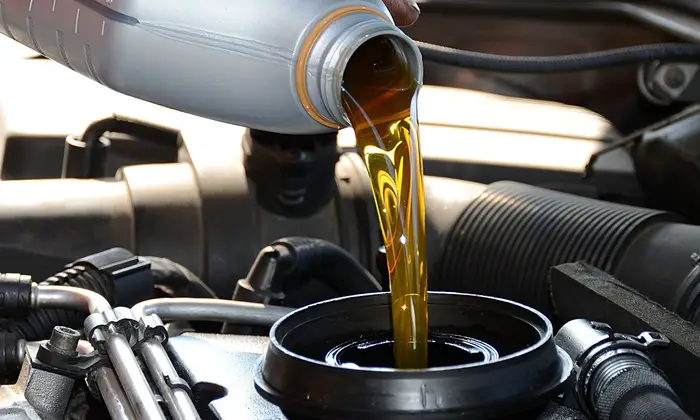
Change Your Oil

oil change

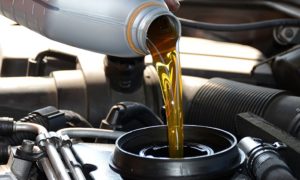
Changing your vehicles oil can be slightly messy but is one of the most effective maintenance tips. A good quality lubricant protects your engine components from wear. While you are changing the oil, be sure to change the oil filter as well, a good quality filter removes suspended particles form the oil and prevents them from damaging the engine components. The oil should be replaced annually or roughly every 15000 kilometres (5500 miles).
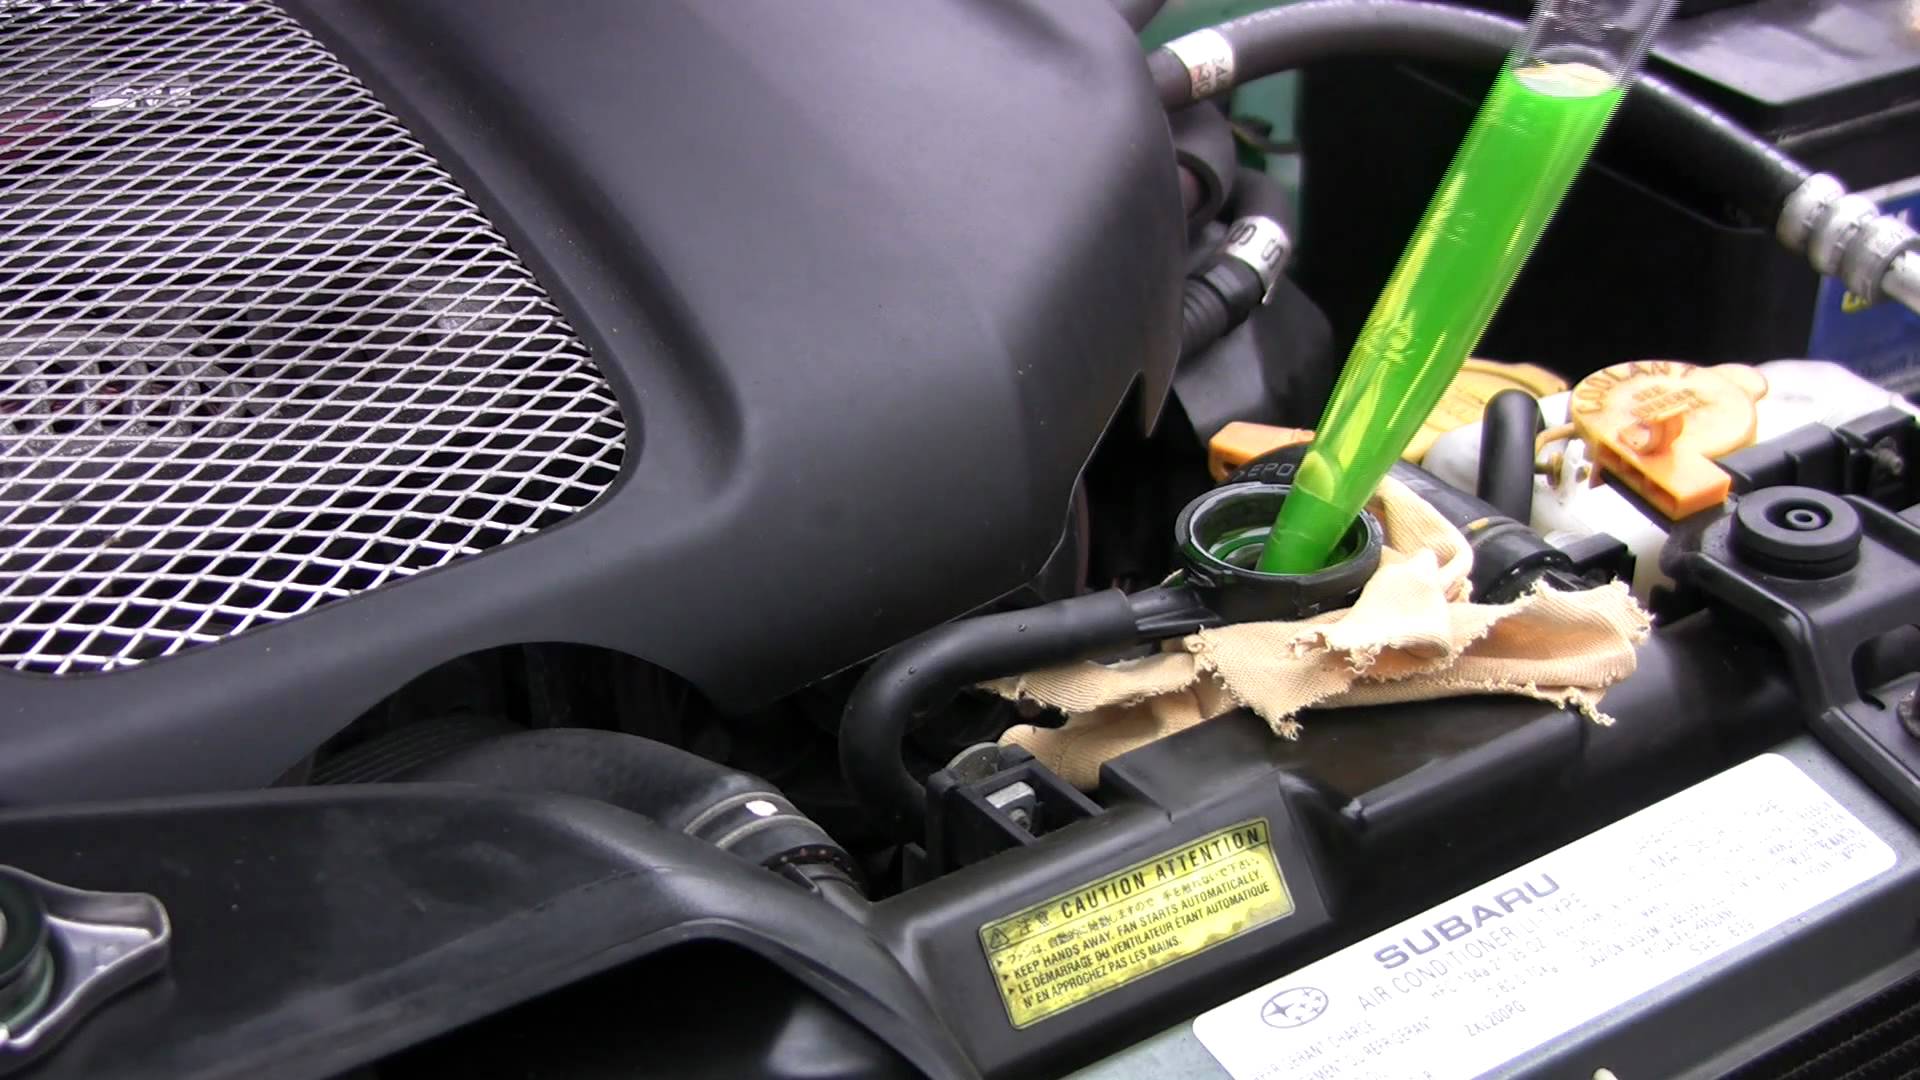
Flush Your Coolant

coolant flush

Over time, your vehicles coolant system becomes contaminated with particles and corrosion. If not cleaned out, these particles can get trapped in the radiator, pump or thermostat which reduces the efficiency of the cooling system and may result in overheating. The coolant system should be flushed out and replaced with clean coolant every year.

Listen For Strange Noises

brake noises

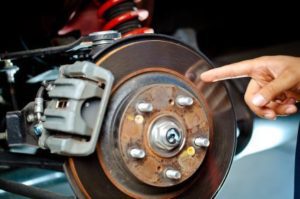
Once a month, turn the radio and air conditioner off for a few minutes and listen out for any unusual noises both while the engine is idling and while driving. Some common sounds include metallic noises when braking which indicates worn out brake pads, a ticking noise while moving which could be a nail stuck in a tyre, a scrapping noise may indicate that something is hanging off the vehicle and making contact with the road. It is always best to detect and fix problems early before they become a costly repair.

Which Lubricant To Use

In the past there was a choice between grease and oil, however, nowadays there is a whole aisle at the hardware store dedicated to lubricants, there are greases, oils, spray oils, lubrication sprays and finally, application specific lubricants. While a general purpose lubricant may get the job done temporarily, it is almost always better to use an application specific lubricant to provide better wear resistance and longer lasting performance. Use this guide to assist you in selecting your next lubricant. Download and print our free workshop lubrication pinup shown at the bottom of this post as a handy guide to the applications, advantages and disadvantages of each lubricant.

It is important to remember that fresh lubricant only works well if it is free from dirt and contaminants. Use a brush or rag and a liquid or spray on solvent to clean the part before applying the new lubricant.

All Purpose Spray

all purpose oil spray

All-purpose spray is designed to perform a range of functions all to some degree of success. It primarily lubricates light duty joints and sliders and dissolves light rust. It is designed for use on wood, metal and some plastics and because it is a light oil it acts quickly and flows into tight joints. Its main disadvantage is that it doesn’t last very long, because it is designed to be a thin penetrating oil, it is expelled from the joint quickly and it collects dirt and dust.


Silicone Spray

silicone spraySilicone spray is increasing in popularity as it works well as a sliding lubricant for metal, wood, rubber and plastic. Silicone spray also repels water and is therefore often used to push water out of electrical components.  Like with most oil based lubricants, dust and dirt particles stick to it and therefore the spray does not do well in dirty environments although a “dry” spray silicone lubricant is also available for these applications. The downside of silicone lubricant is that it is extremely difficult to get off of anything after it has been sprayed on. It easily contaminates walls and floors and makes the surfaces unpaintable in future.


Penetrating Oil Spray

penetrating oil sprayRust penetrating oil is perfect for loosening rust locked nuts and bolts. The oil is a low viscosity thin lubricating oil which easily runs into cracks and tiny gaps, it also usually contains a solvent which works to break down the rust. Penetrating oil spray should only be used to loosen stuck joints, once they are loose, if they need to be kept lubricated then silicone lubrication spray should be used as penetrating oil does a poor job of keeping things lubricated because it is so thin.


Chain Lube

chain lubeAs the name suggests, chain lube is specifically designed for lubricating roller chains such as those on motorcycles, scooters, quad bikes and bicycles although it also works well on automatic garage door openers and garage door wheels. The lubrication works its way into the rollers and is thick enough to not come off when the chain is in motion. The lubricant should only be applied to a clean and dirt free chain so be sure to clean the chain first with a paint brush and a cup of solvent.


Garage Door Spray

garage door sprayLike chain lube, garage door lubricant is designed to penetrate deep into the rollers, wheels and hinges to provide long lasting lubrication. The additional benefit is that the lubricant is designed to dry up to a non-sticky finish which reduces dust and dirt build up and resists rust.


PTFE Dry Spray

ptfe dry sprayPTFE dry spray is a spray on lubricant which dries out to leave a thin PTFE based film which lubricates well but doesn’t collect dust. Because it forms a thin film, it is not particularly hard wearing  and is therefore only suitable for light applications. It is ideal for parts subjected to light loads in dusty environments.


Synthetic Grease

synthetic greaseSynthetic grease is the best lubricant for more industrial applications and joints, gears, bearings or axles which are subjected to heavy loads. Synthetic grease has better lubrication properties than petroleum based grease and has a longer life as it resists thermal breakdown and shear. Unfortunately, grease is sticky and collects dust and dirt so the lubricated joint or part should be kept clean as far as possible.


Lithium Grease

lithium greaseLithium grease, like synthetic grease is better suited for high load axles, gears and bearings and provides good lubrication to medium load power tools and garden equipment. It provides some benfit over synthetic grease for this purpose in that it often comes in an aerosol spray form where a solvent assists in penetrating the joint and then dries off leaving the grease behind.


Marine Grease

marine greaseMarine grease is similar to synthetic grease however it is water resistant and contains a rust inhibiter to prevent metal parts from fusing together due to rust build up. Marine grease is the best choice for items which are continuously submerged in water or exposed to the elements.


Download and print our free lubrication pinup below to put up in your workshop as a handy guide to the applications, advantages and disadvantages of each lubricant.

lubricant printable thumbnail


Which Lubricant To Use Printable


What is your experience when working with lubricants? Please share your thoughts, tips and favorite products with us in the comments section, we would love to hear from you.

Traditional Tomato Bredie

A South African classic made with ripe tomatoes, a rich and hearty bredie is perfect for a winter dinner. Serve with rice and a crispy fresh baked bread.

Makes 8 servings. Preparation Time 30 mins, Cooking Time About 12 Hours (In A Crock Pot)

You Will Need:

  • 1kg (35oz) Lamb Neck (Cut For Stewing)
  • 5 Large Potatoes
  • 2 Large Onions
  • 3kg (100oz) Tomatos (The riper the better)
  • 2 Beef Stock Cubes (Or 1 litre Liquid Stock)
  • 15 Cloves
  • 2 Bay Leaves
  • 8 Peppercorns
  • 1 Tbsp Salt
  • 1Tbsp Olive Oil (Or Vegetable Oil)

Peel and finely chop the onions. Fry the onions in the olive oil over a high heat until golden brown then place in a single layer at the bottom of the crock pot (slow cooker). Now brown the lamb in the same pot, fry over a high heat until the edges are sealed, place the lamb in the crock pot in a second layer above the onion. Finally pour one litre (34 fl oz) of water and the two stock cubes into the pot used to fry the lamb and bring to the boil. You do this in the same pot so that some of the flavour from the lamb is lifted into the stock. If you are using liquid stock then do not add additional water. Pour the stock over the lamb and onion layer, drop the pepper corns in around the lamb and sprinkle over the salt. Set the crock pot on auto (medium) and leave for 6 hours or overnight to cook.

Peel and chop the potatoes into large chunks (quarters or eighths). Peel the tomatoes, remove the stems and slice them in half. After the lamb has cooked for 6 hours, stir the mixture and then add the remaining ingredients. Add a layer of the potatoes first, sprinkle the cloves and bay leaves and finally the tomatoes on the top. Cook on auto (medium) for an additional 6 hours until the tomatoes fall apart.

If the bredie is too runny and needs to be thickened, mix a few tablespoons of cornflour in cold water and mix it into the bredie well. Cook on high for a further five minutes until thick.

Serve with fluffy white rice and a freshly baked bread.