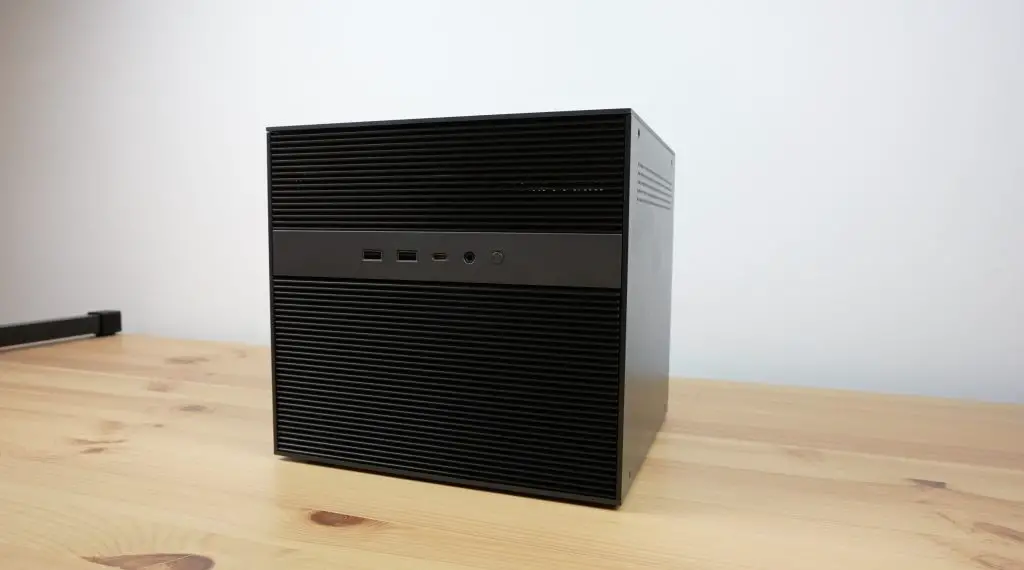
Today we’re going to be taking a look at the ZimaCube Pro. This is a new device from IceWhale, the company that have already brought us the Zimaboard and Zimablade that I’ve reviewed previously.
The Zimacube Pro is the second device from their Kickstarter crowdfunding campaign that was successfully funded in December last year. It is marketed as being a personal cloud server with easy-to-use software and has more powerful hardware than the standard Zimacube from the same campaign.
Here’s my video review of the ZimaCube Pro, read on for the written review;
Where To Buy The ZimaCube Pro
Tool & Equipment Used
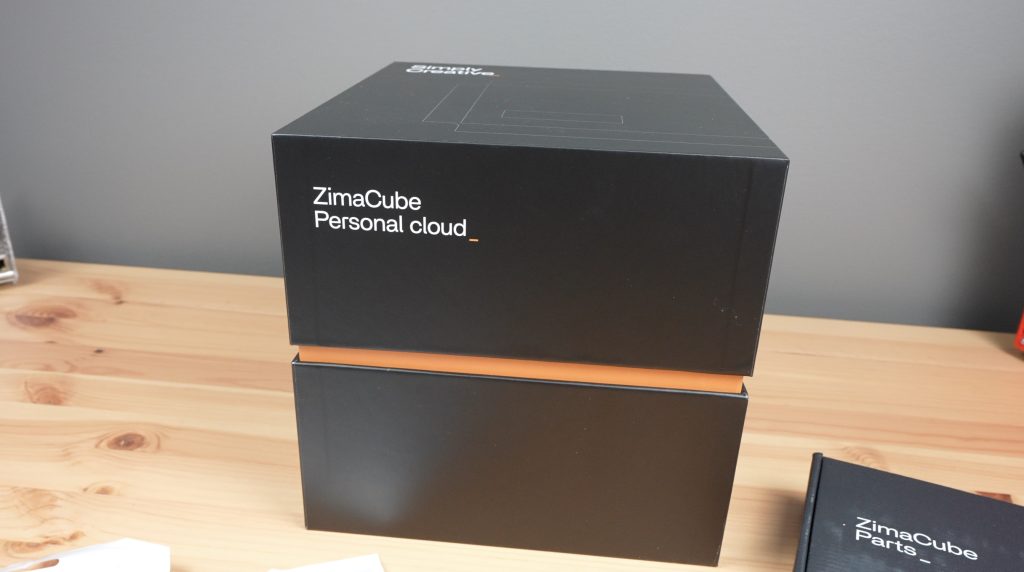
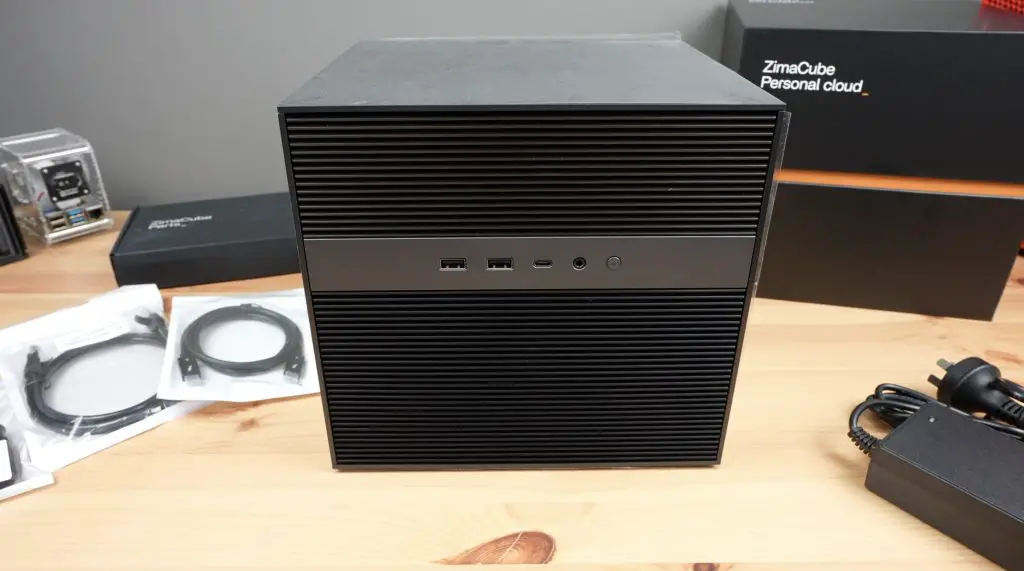
Unboxing and First Look At The ZimaCube Pro
The ZimaCube Pro has a 12th generation Intel i5 processor instead of the Intel N100 processor in the standard cube. This allows for faster RAM, better PCIe expansion, faster M.2 ports and significantly better connectivity. It comes a price though, the Pro version currently retails for $1099.00, which is a significant step up of $450 from the standard version that retails for $649.00.
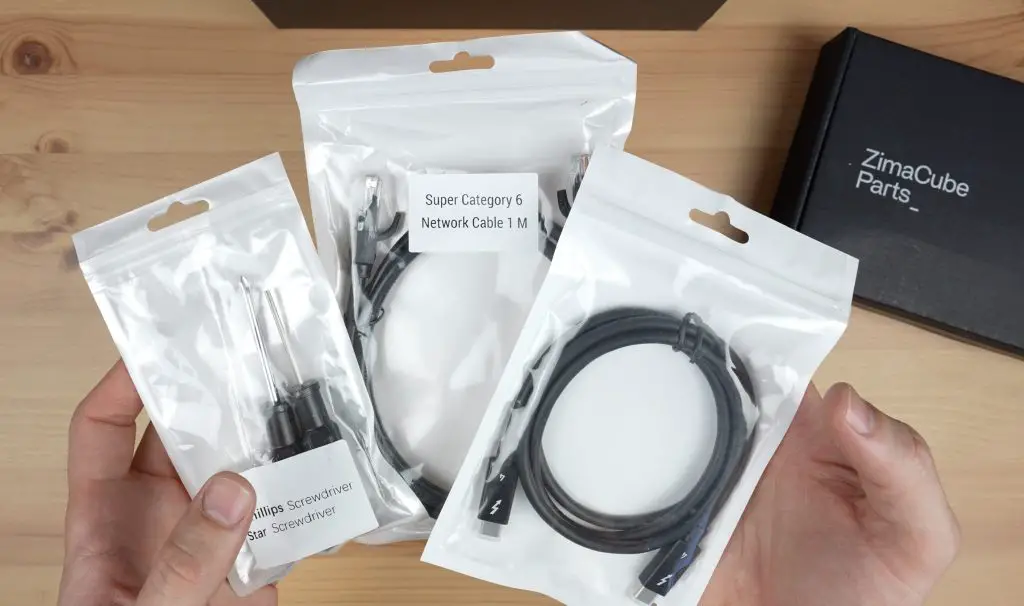
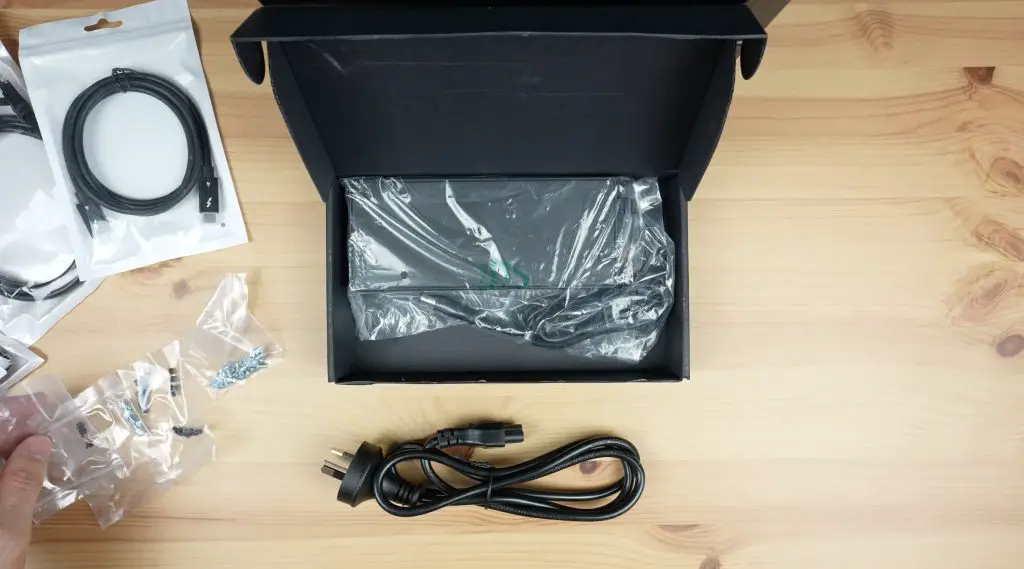
Included in the box are some basic tools, a Cat6a network cable, a Thunderbolt 4 cable, a power adaptor and some screws for mounting the drives into the drive bays.
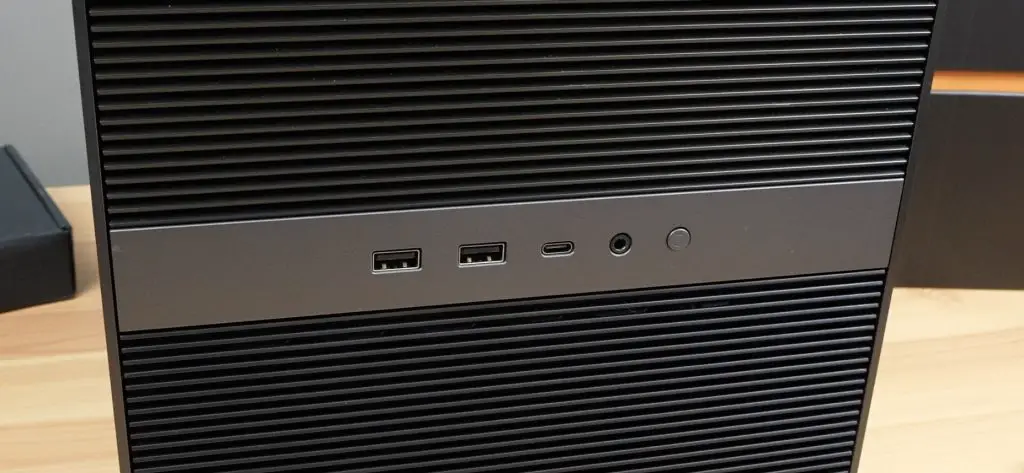
Ports and Interfaces on the ZimaCube Pro
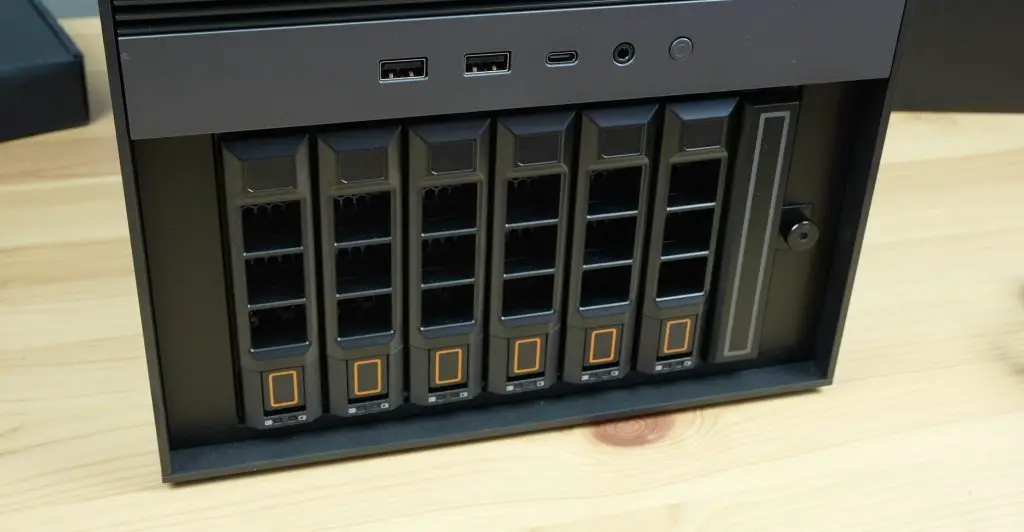
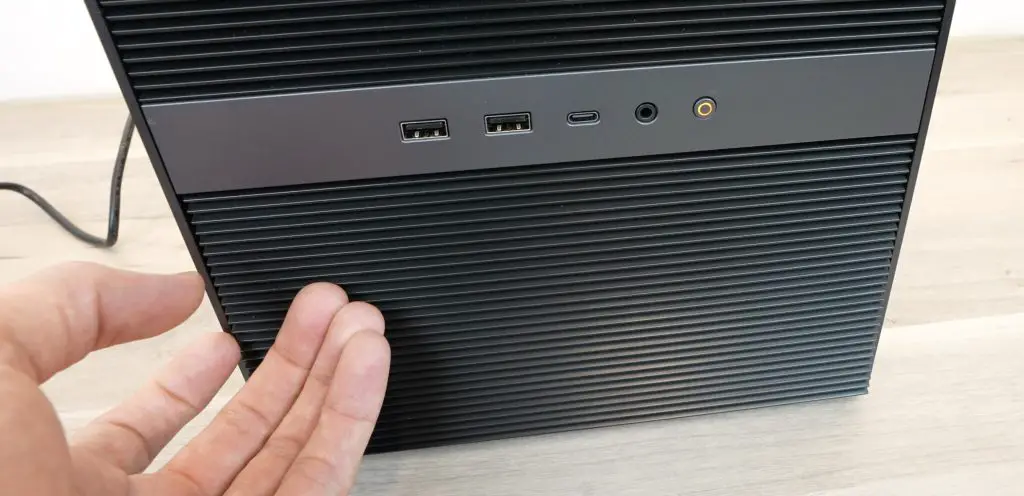
Taking a look around the Zimacube Pro. On the front, we’ve got two USB 3.0 ports, a USB type C port, a 3.5mm audio jack and the power button.
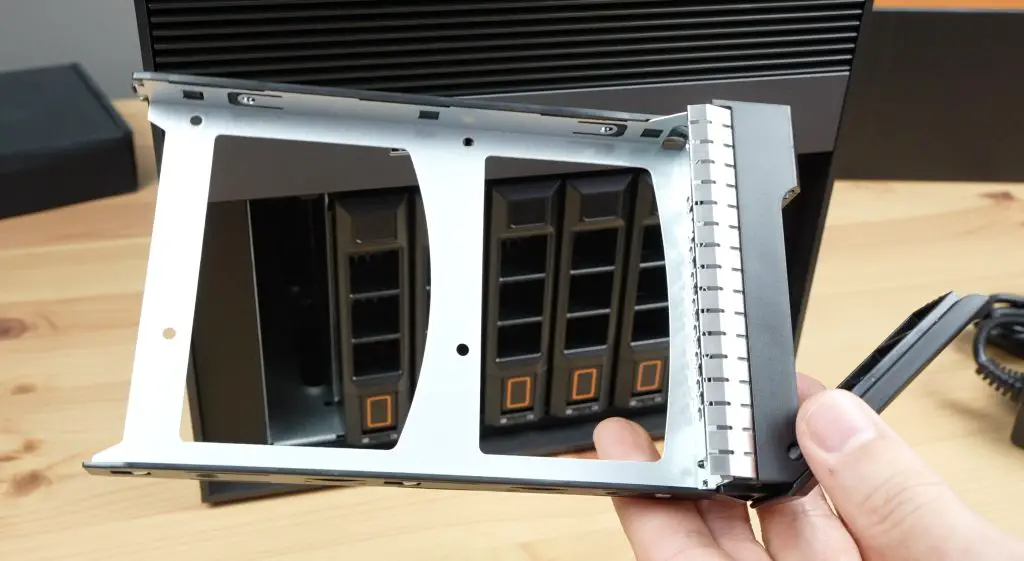
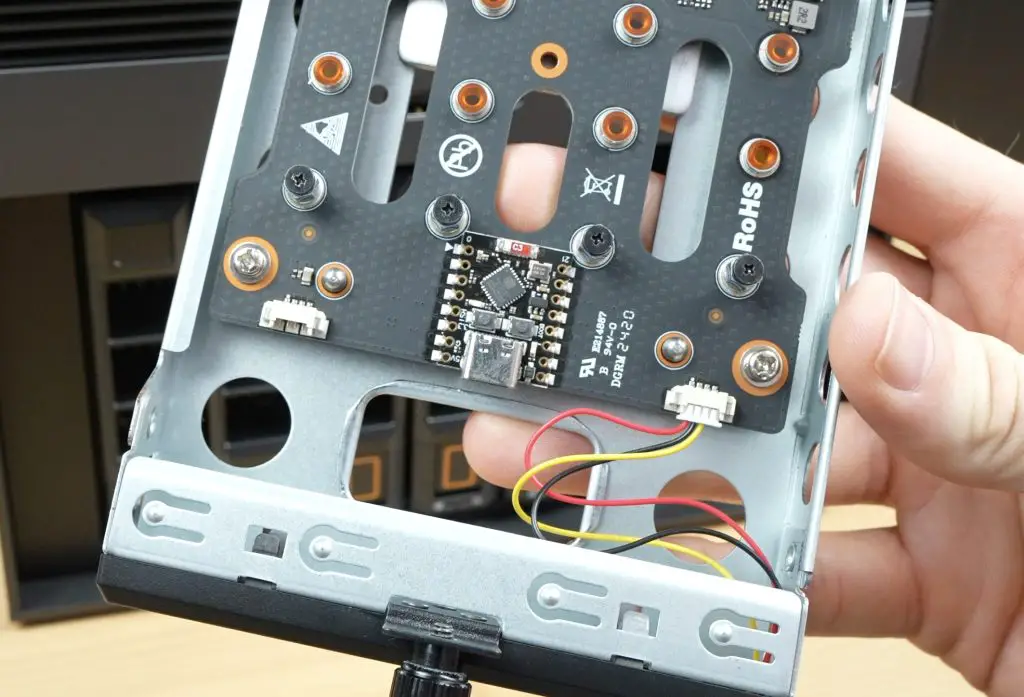
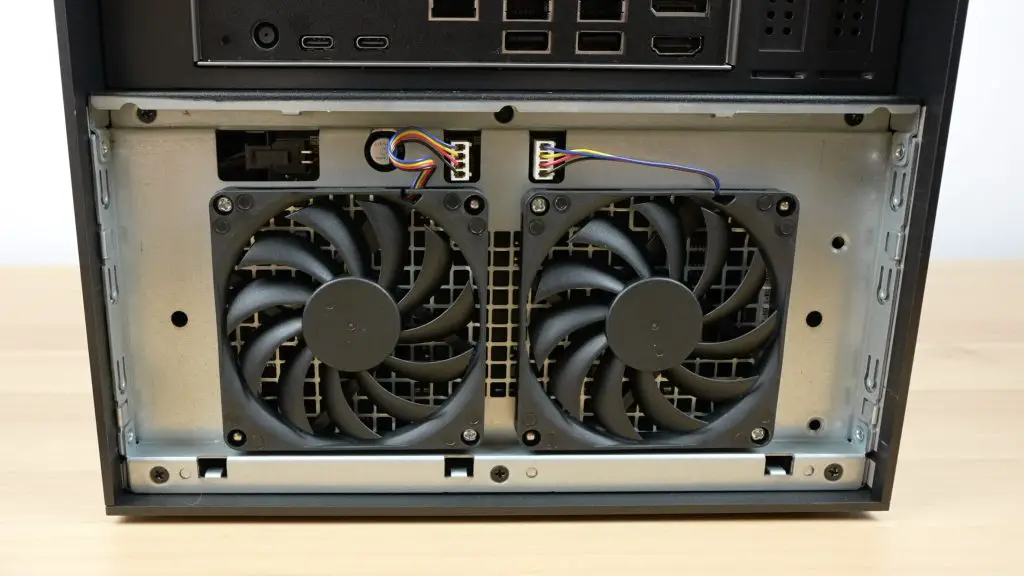
Below that, under the ventilation grill, it’s got six SATA drive bays which can take 2.5” or 3.5” drives and a 7th tray that has four M.2 ports for NVMe drives.

The 7th tray also has customisable and programmable RGB lighting with an onboard controller that you can load custom firmware onto.
The ZimaCube Pro also has two internal M.2 ports – one of these being for the OS storage drive. So that’s a total of 6 SATA ports and 6 M.2 ports, which allow up to 164TB of connected storage.
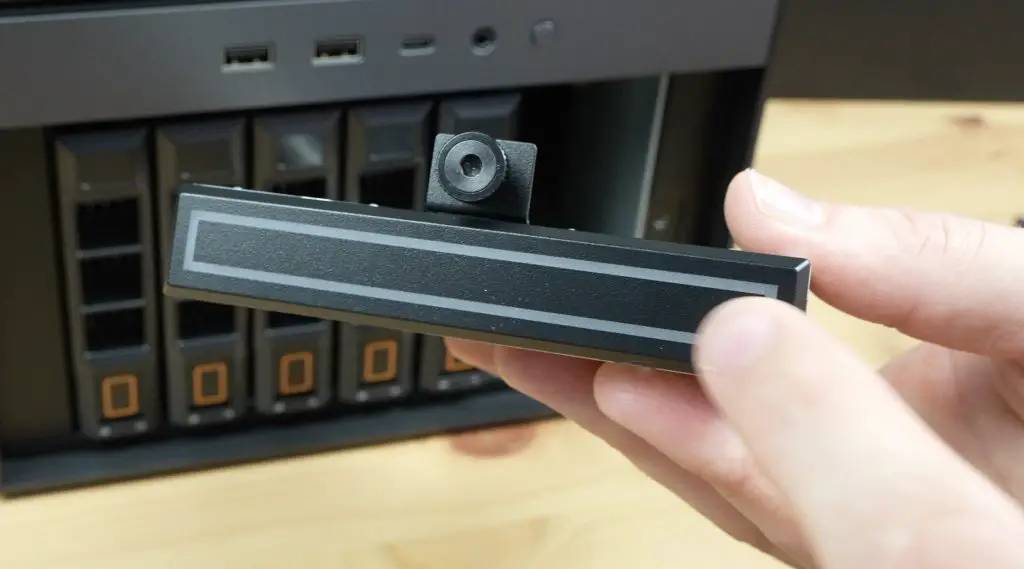
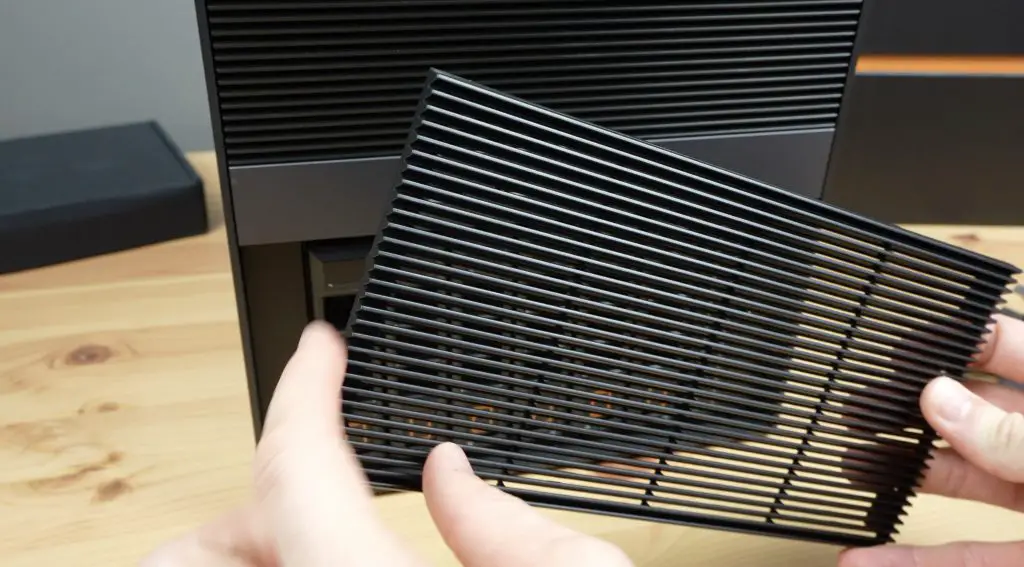
This ventilation screen that covers the bays looks great when it’s installed but could really do with a small tab or recess on the edges to make it easier to remove.
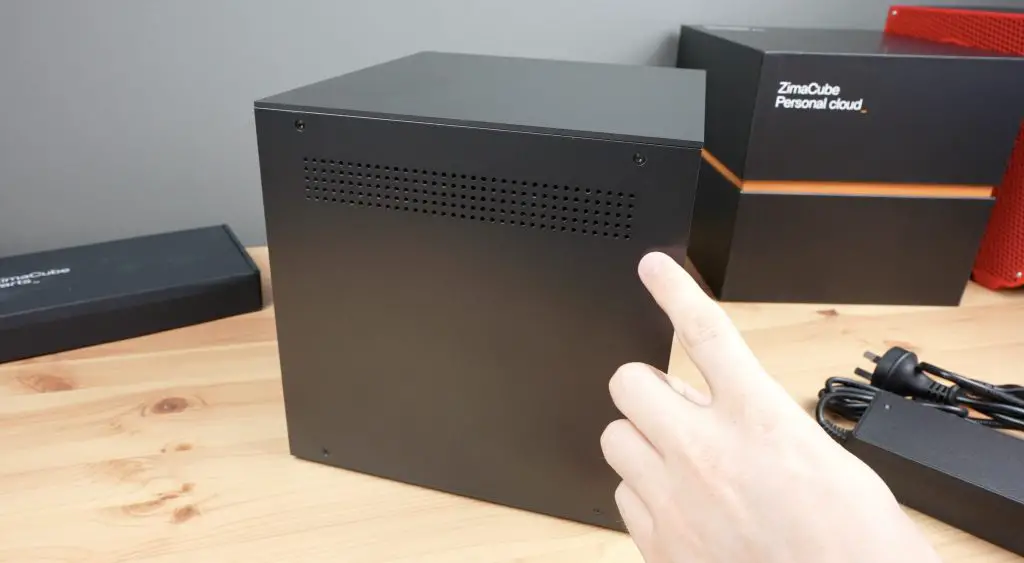
The sides each have ventilation holes at the top and four screws holding the top and bottom covers in place.
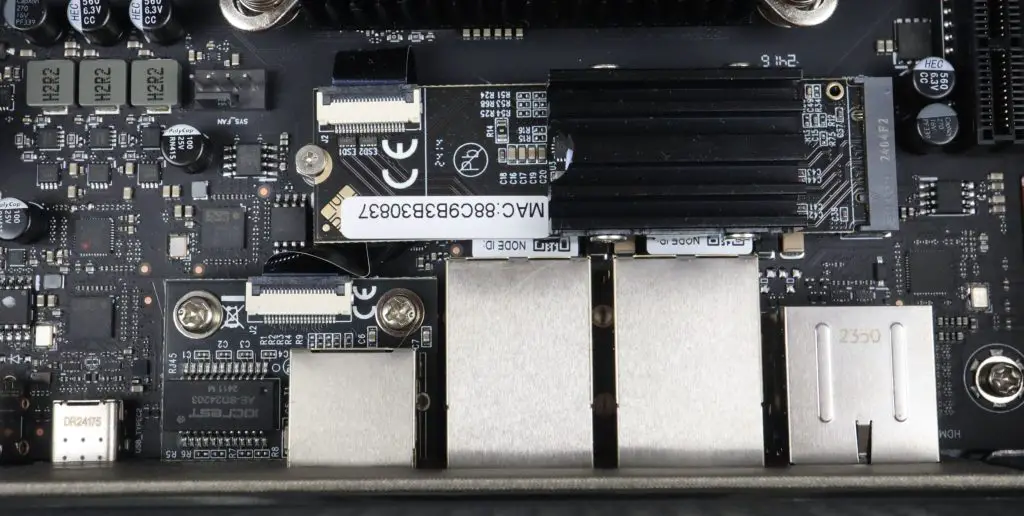
On the back of the ZimaCube Pro, we’ve got a reset button, the power input, two Thunderbolt 4 ports, a 10Gb Ethernet port, two 2.5Gb Ethernet ports, two more USB 3.0 ports, a DisplayPort 1.4 and an HDMI port.
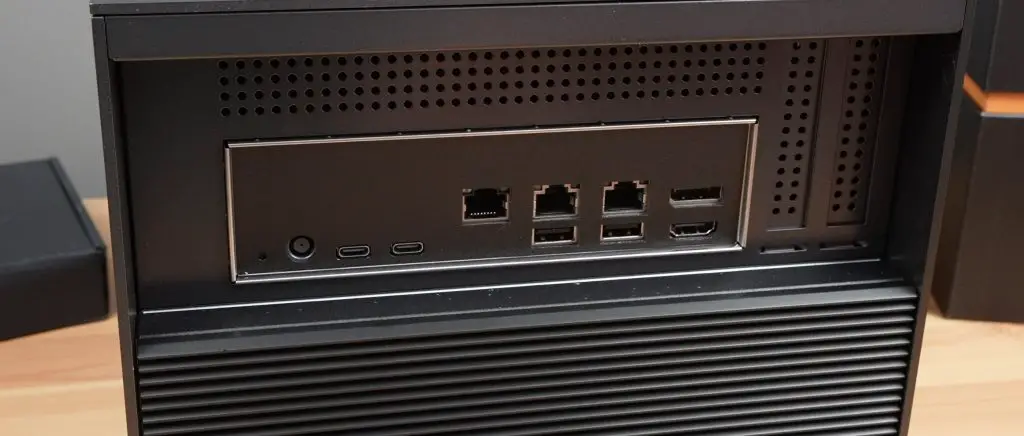
The Thunderbolt 4 ports allow the Zimacube to be used as a DAS (Direct Attached Storage) device. This is a feature that is not commonly found on consumer-level products, so I’m interested to see how well this works. They claim that you can get up to 2GB/s transfer speeds through this port, so we’ll definitely be testing that out!
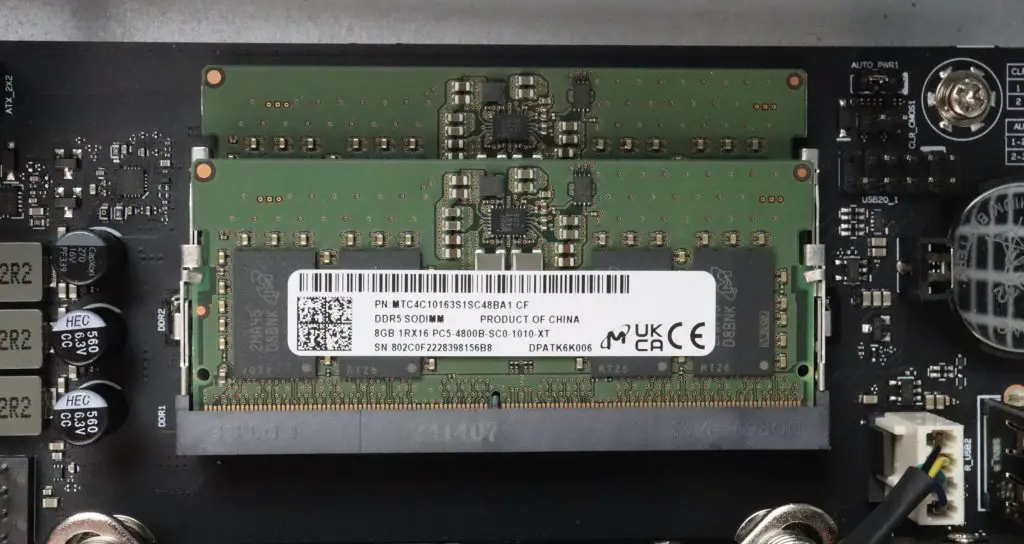
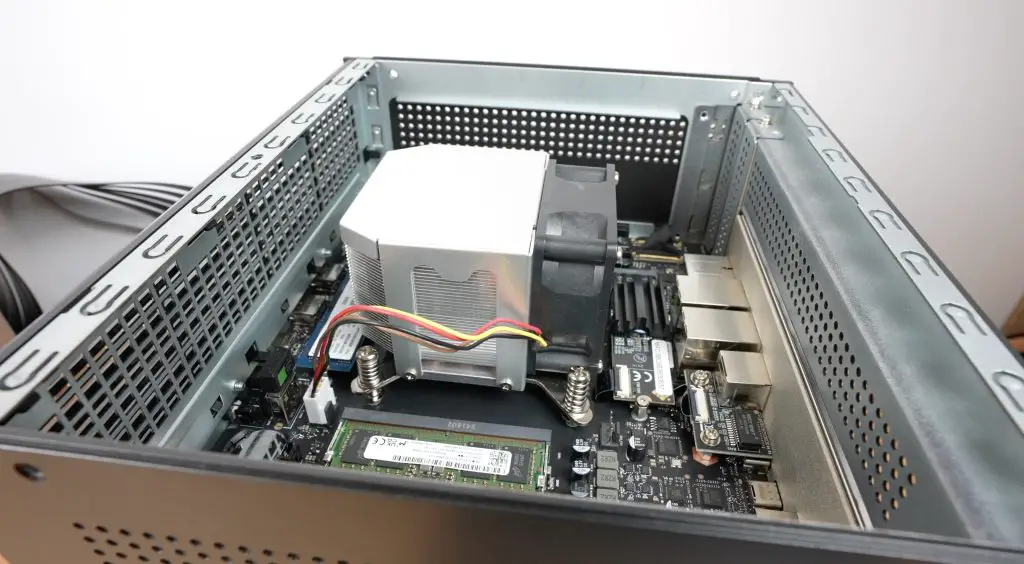
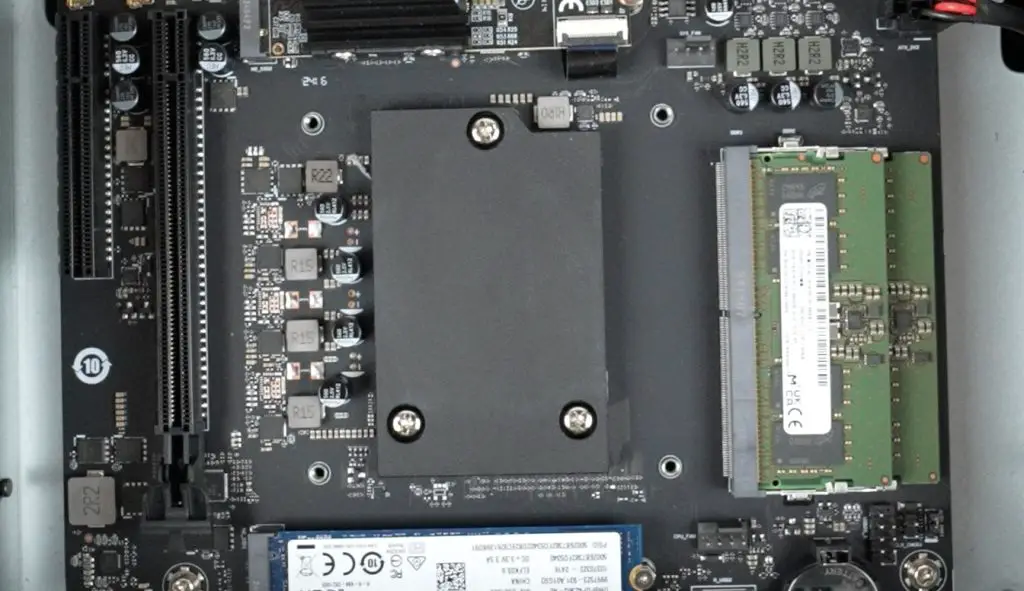
Internally, as mentioned earlier, powering the Zimacube Pro is a 12th gen Intel Core i5 processor, it is the 1235U version with 10 cores running up to 4.4GHz. This particular one has 16GB of DDR5 RAM, but this can be expanded up to 64GB.
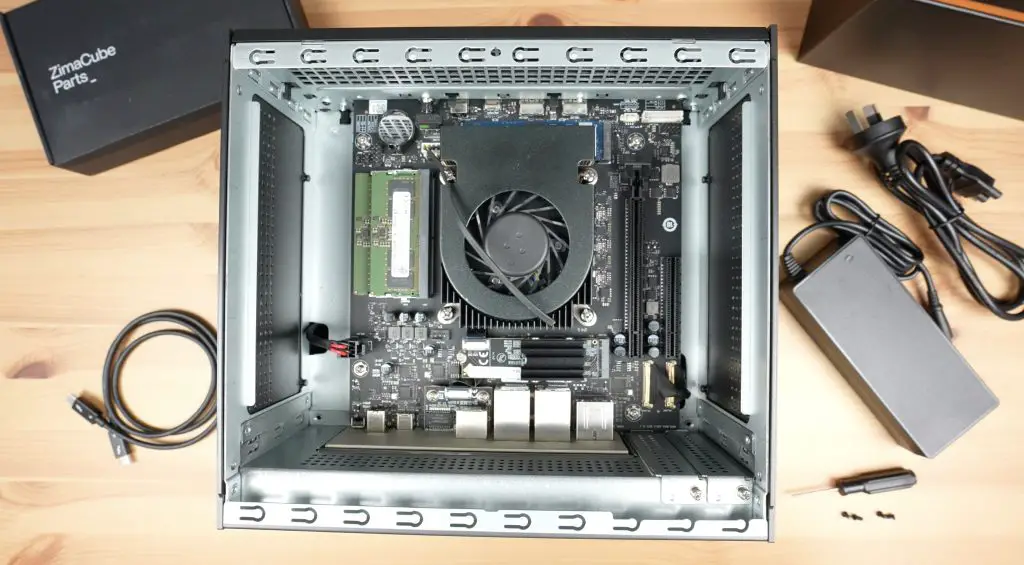
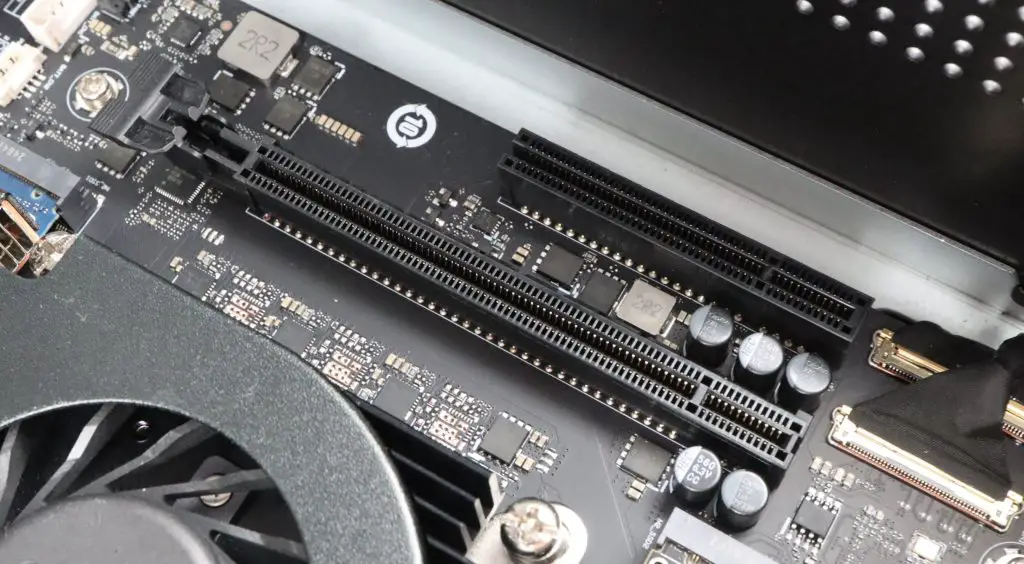
We’ve got dual PCIe slots, one being PCIe 4.0 x 4 and the other PCIe 3.0 x 2. These allow you to add expansion cards like a GPU, an AI acceleration card or a transcoding card to improve the Zimacube’s performance for your particular workflow.
Our 256GB M.2 NVMe OS drive is partially hidden by the cooler.
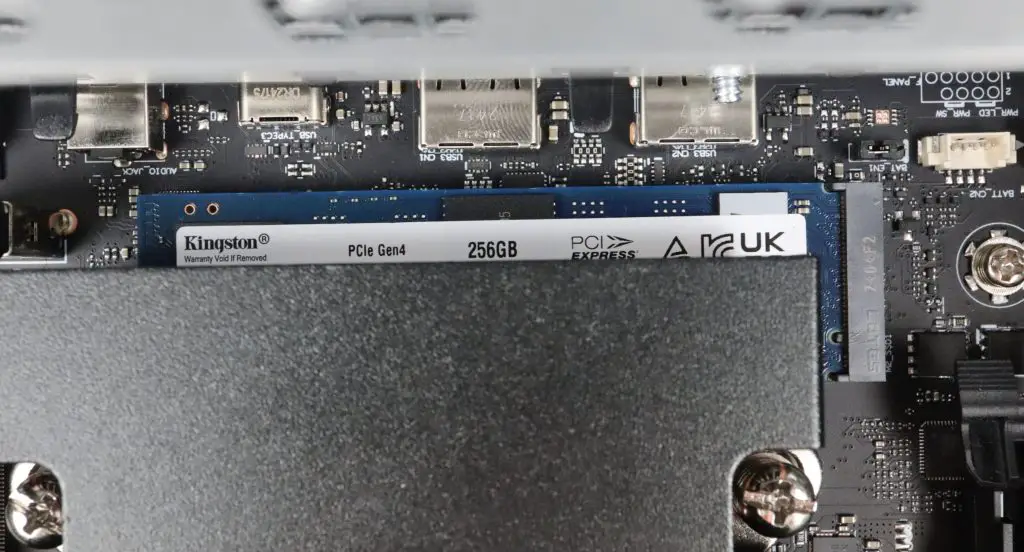
The M.2 port near the back is populated with the 10GB Ethernet adaptor and a short tail to a daughterboard with the physical port on it.
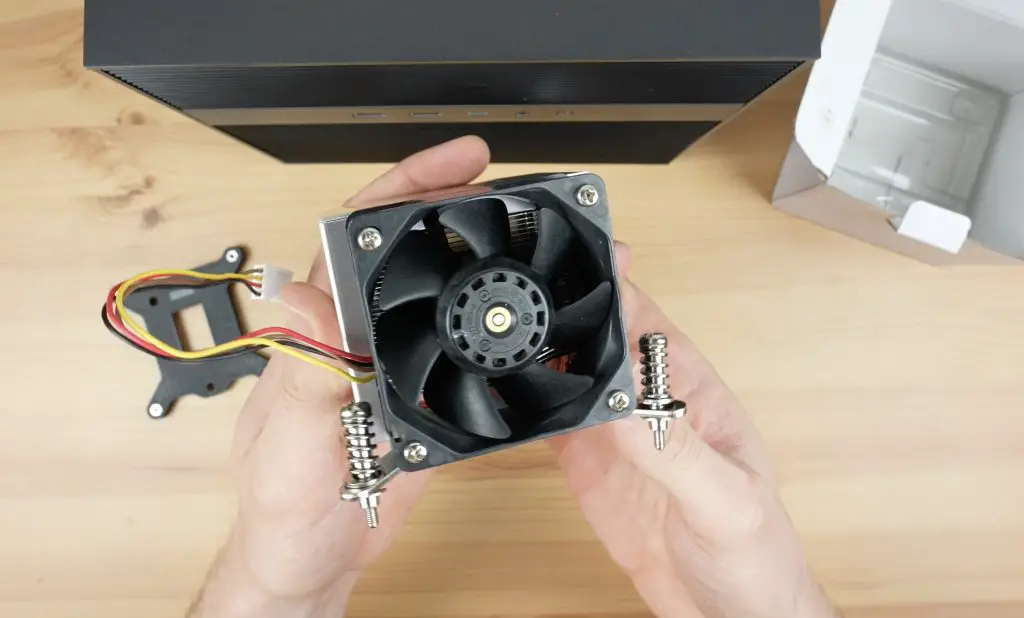
One of the main complaints early users have had is with the ZimaCube Pro’s cooling solution. It is claimed to be quite loud and not very effective. IceWhale have responded to concerns by providing a free issue improved cooling solution for backers – which is supposedly quite easy to swap out. We’ll test this against the currently installed cooler to compare the results.
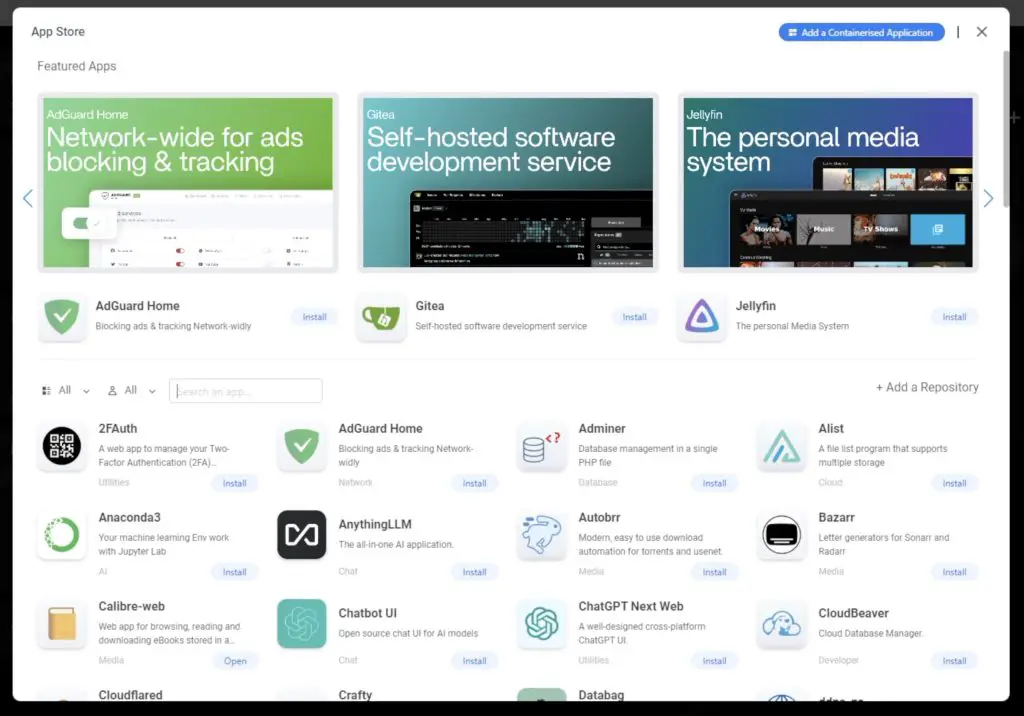
ZimaOS – The Intended Operating System
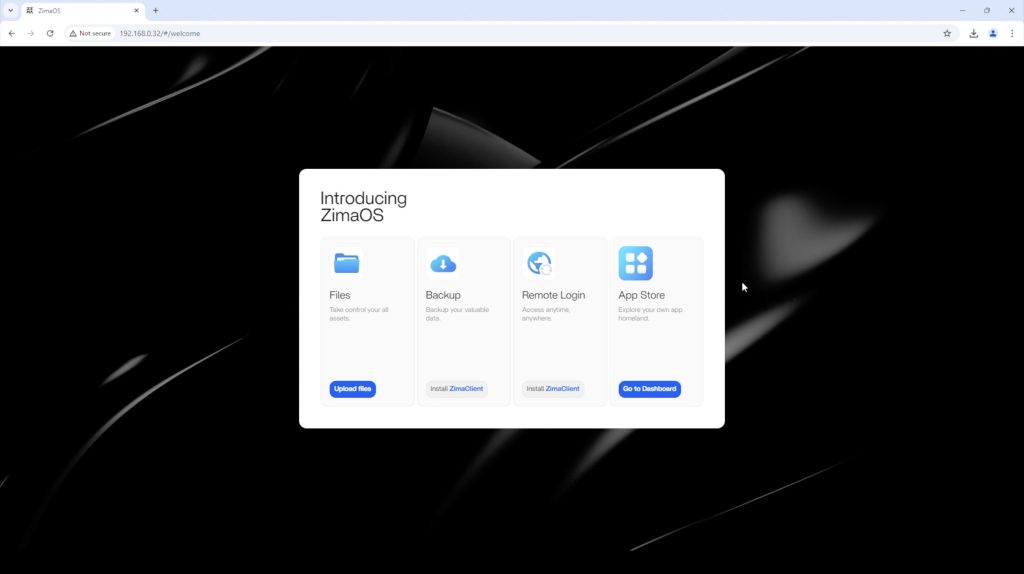
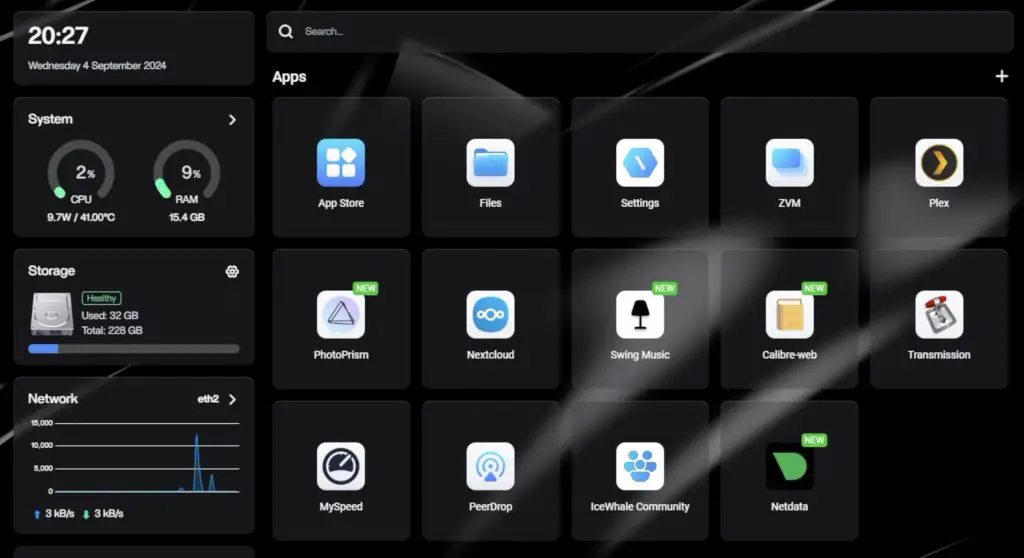
As with other IceWhale products, it is intended to be used with their own operating system. In this case, it comes preloaded with ZimaOS. This is very similar to CasaOS which is loaded onto the ZimaBoard and ZimaBlade, with a few features tailored to the ZimaCube like RAID support and remote access functionality.
You’re not locked into using their software though. You can fairly easily install other operating systems like OpenWRT, pfSense, TrueNAS or Unraid.
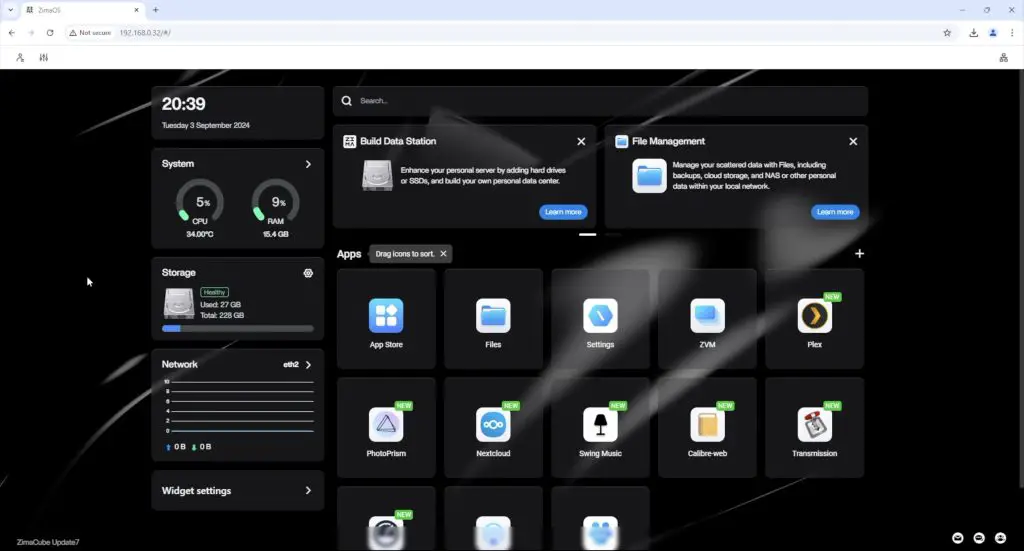
ZimaOS is effectively a skin for docker with a bit of additional functionality and a good support community. It’s got a range of preconfigured apps that are very easy to set up and you can configure your own apps through the web dashboard or by loading your own .yaml files.
Testing The Cooling Solution
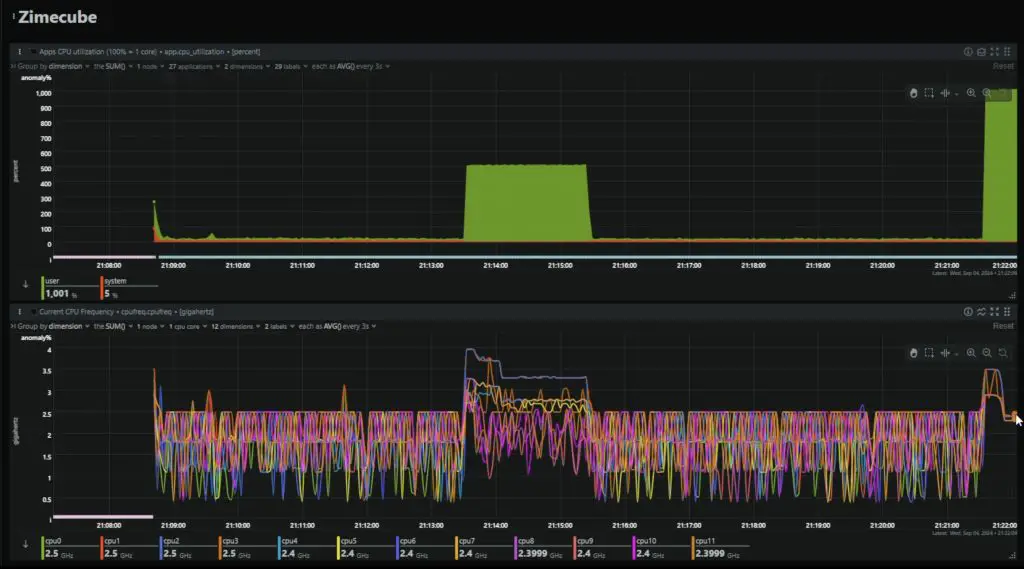
Let’s start by testing the old and new CPU cooling solutions. I haven’t done anything to the stock cooler, I’ve left it as it arrived. Some users reported having their CPU cooler installed with the plastic protector left in place on the contact surface. To test the thermals, I’m going to first try a 50% load on the CPU and see what the does to the CPU temperature and then I’ll try a 100% load.
Old Cooling Solution
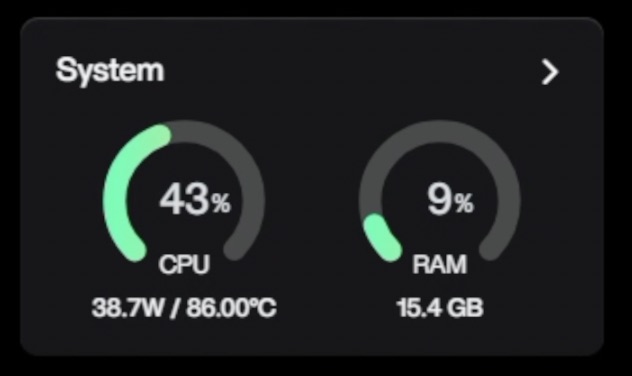
The temperature is already sitting quite high at idle. We’re at 2% CPU utilisation and are already running at over 40°C in a 20°C room.
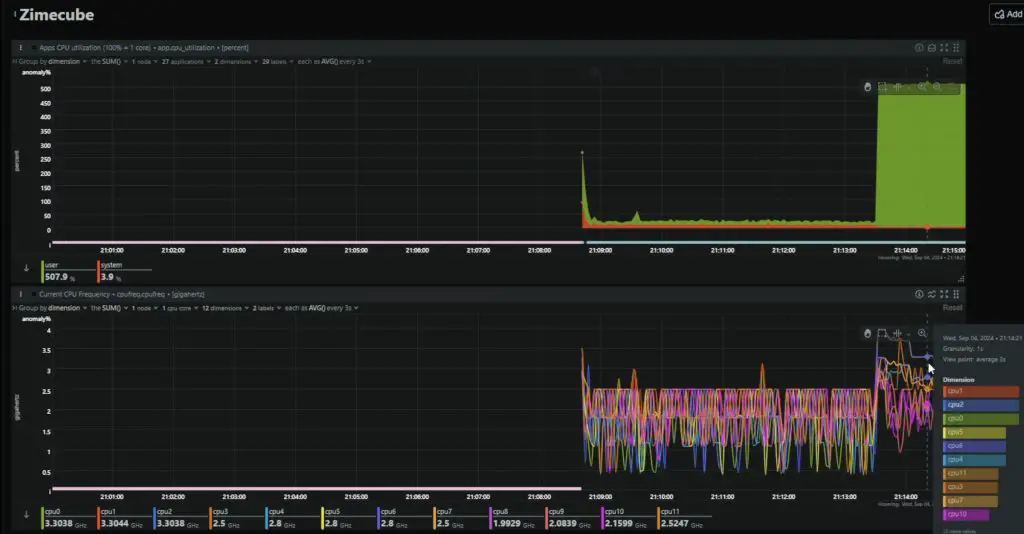
At 50% load, the temperature spikes to over 90°C in about 2 seconds, which is really quite poor. The CPU starts thermal throttling almost instantly, dropping the clock frequency down to 3.5GHz and then further to 3.3GHz about 45 seconds later. This brings the temperature down a bit but obviously comes at the expense of performance.
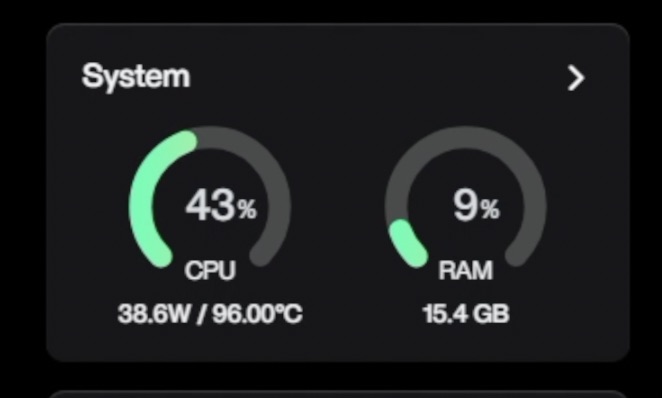
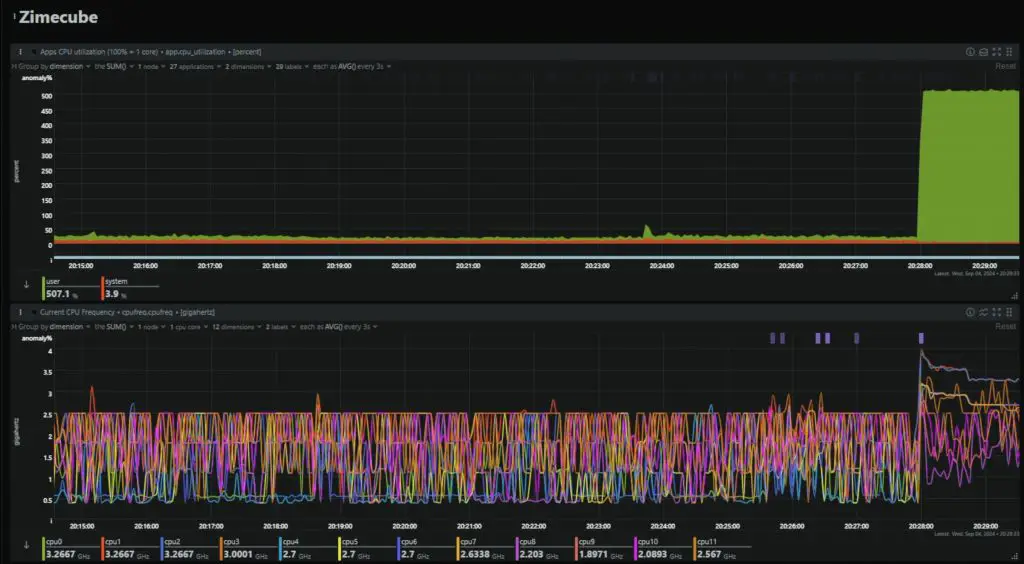
At 100% load, it’s practically useless for sustained use. The CPU temperature spikes to 100°C before the utilisation gauge can even increase and again is significantly thermally throttling, this time down to just 2.4GHz.
So this cooler is really undersized or just doesn’t work effectively – confirming other users concerns.
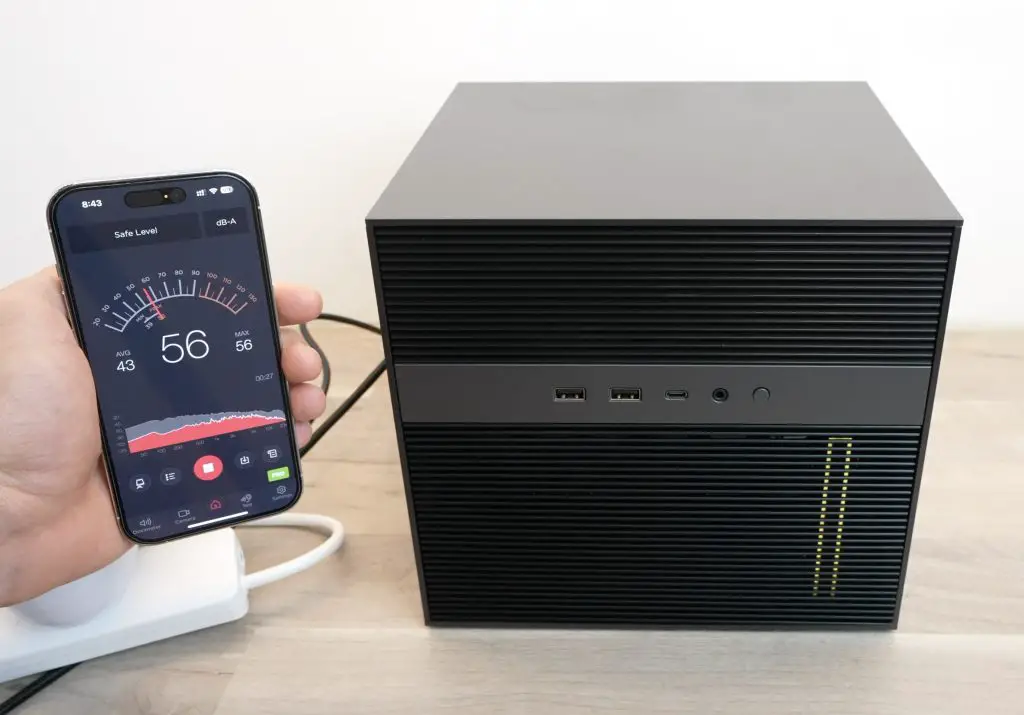
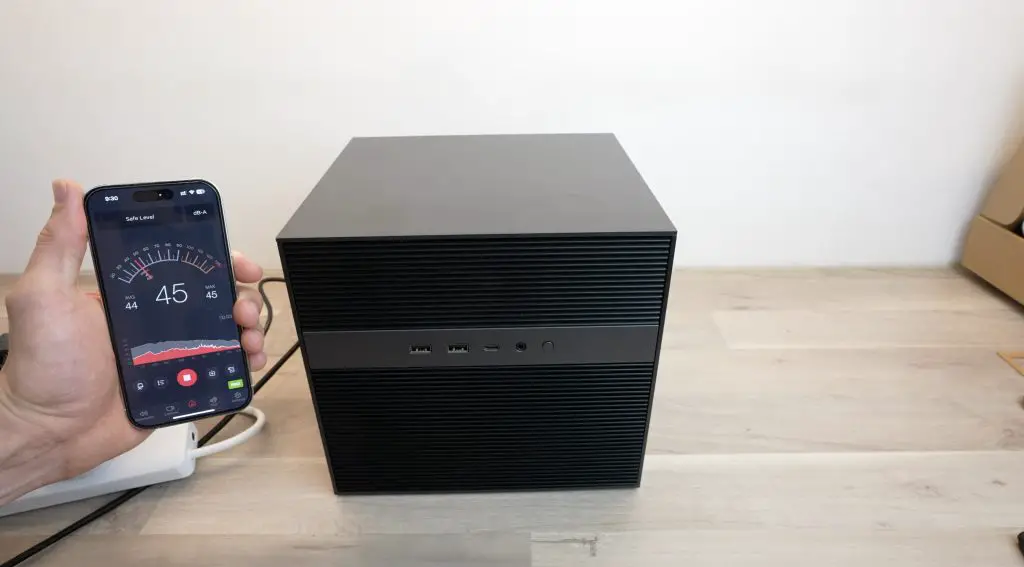
I have to also mention that the fans for the drive bay of the Zimacube are quite loud. I haven’t installed any drives into the bays, and I’m in an air-conditioned room, and the drive bay fans already spin up occasionally. So their curves must be set very low. That’s not necessarily a bad thing and you can adjust them in the BIOS. It’s just not great if you’re going to have the ZimaCube Pro near where you’re working.
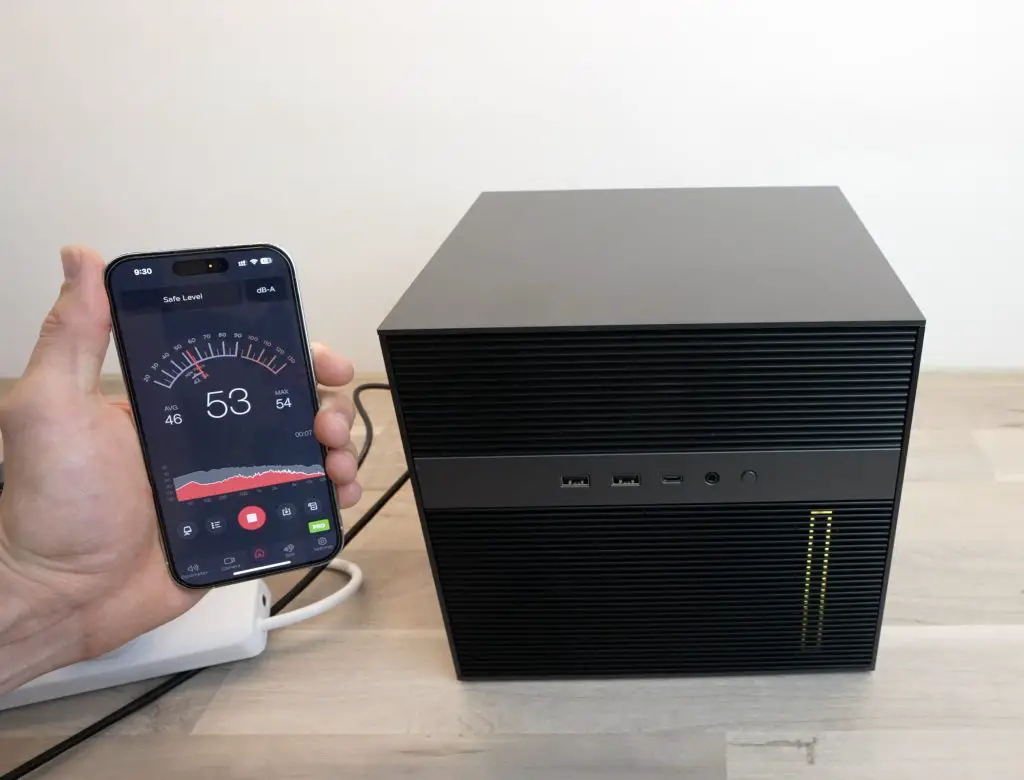
The CPU cooler is audible but isn’t that loud when idle. When it spins up under any sort of load then it is quite load.

New Cooling Solution
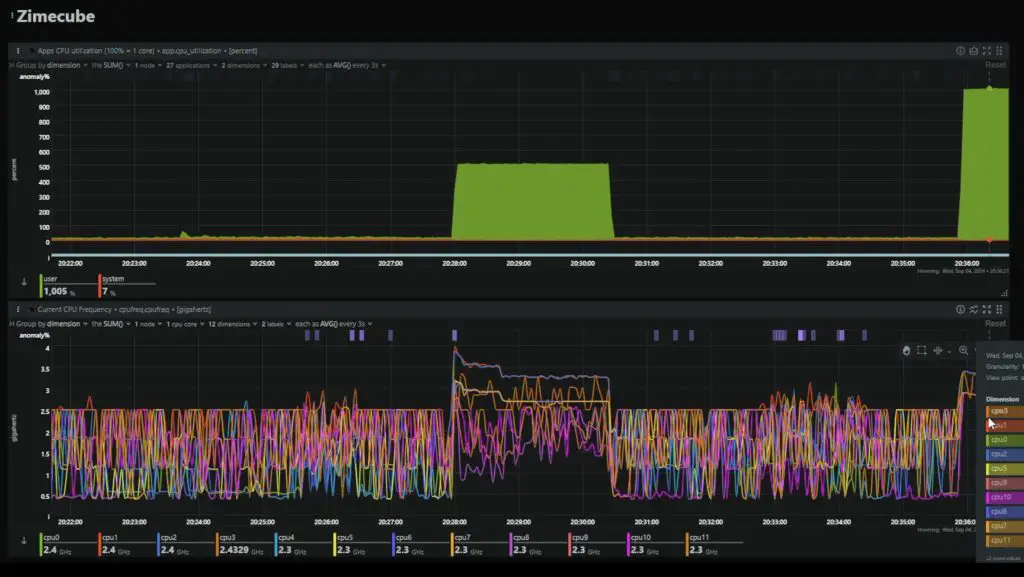
Now let’s get the new cooler fitted. The cooler comes with a bracket for the underside of the motherboard but I believe it uses the same pattern and screws so we shouldn’t need to use this.
The old cooler is quite easy to remove. You just need to remove the four screws holding it in place and unplug the fan.
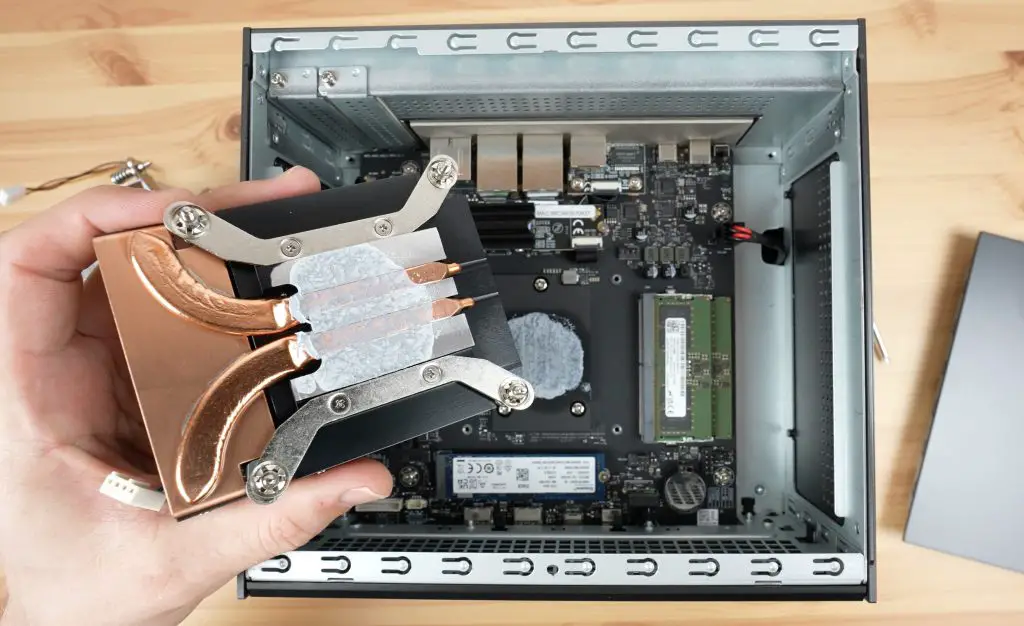
The new cooler has a preapplied phase change thermal pad on it so we don’t need to reapply the thermal paste. I cleaned the old thermal past off of the heat spreader to give it the best chance of success.
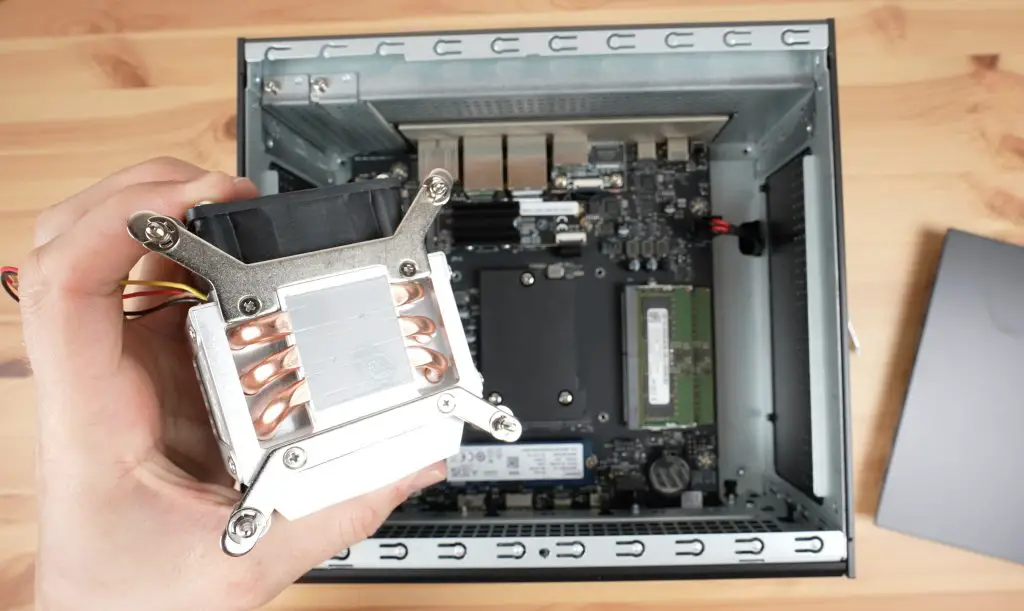
They say that it should be installed with the fan at the back of the Zimacube, directed towards the front, which I’ve done.
Now let’s boot it up and see if it performs any better.
At idle after booting up, we’re now running about 8-9°C cooler at 33-34°C.
Again starting with a 50% load, it now takes about 10 seconds to run over 90°C. This is a significant improvement over the previous cooler, but it still starts thermal throttling under sustained load.
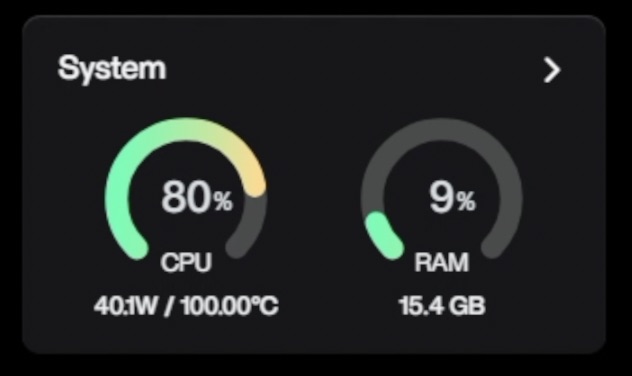
With a 100% load, we again hit 100°C and started thermal throttling almost instantly. It sustains a slightly higher CPU frequency for a short while longer, but not that significantly.
In terms of fan noise. The new cooler runs a little louder at idle but is a little quieter under full load. So not a significant difference.
The new cooling solution makes some improvements to the thermals but if you plan on doing CPU intensive tasks for long periods of time then you’ll probably still want to upgrade the cooling solution.
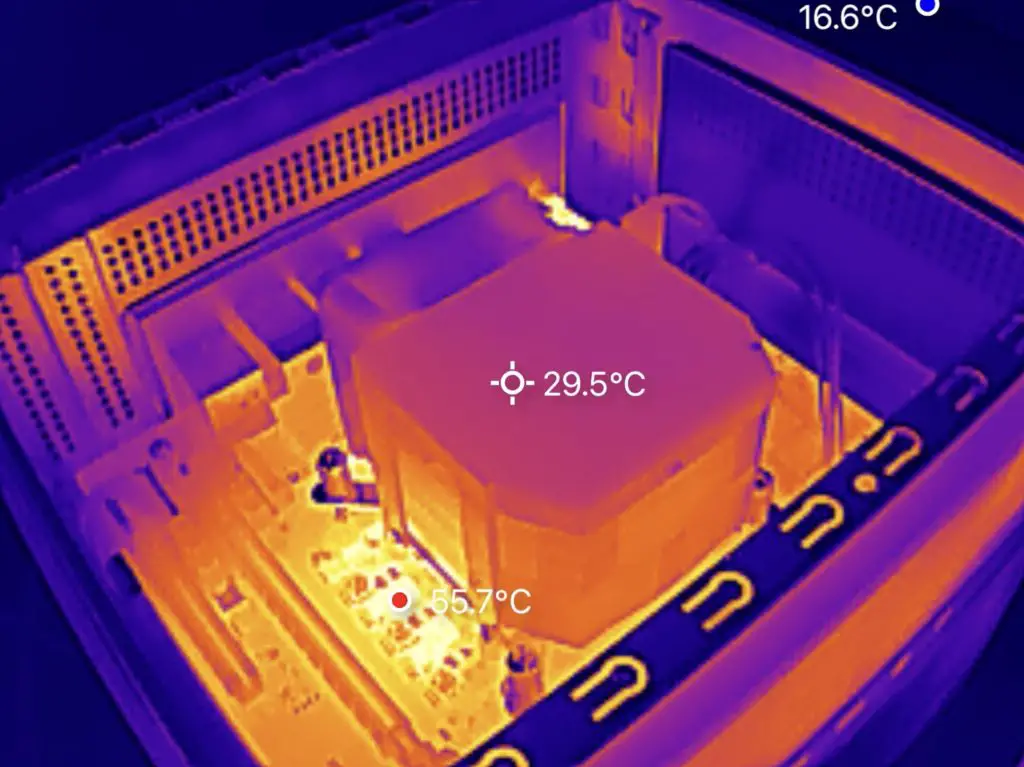
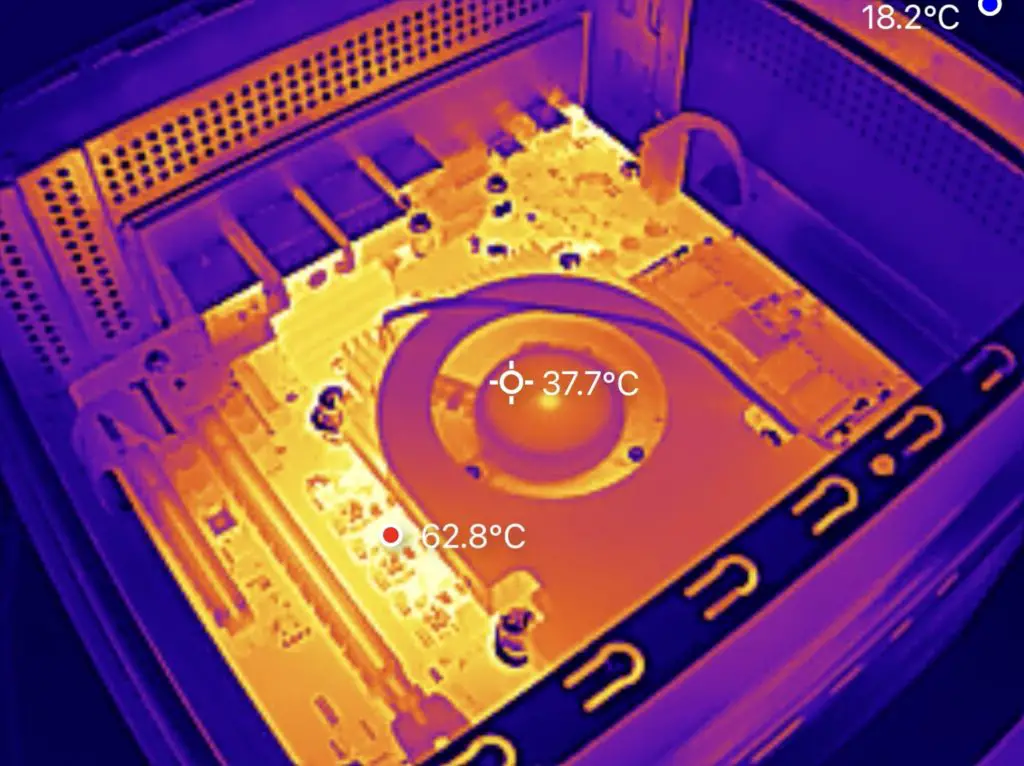
Given how quickly the temperature spikes under full load, I think some of the limitation might actually be with the heat spreader as it’s a painted surface. There may also be issues with the way the heat spreader is interfaced to the CPU.
Testing NAS Transfer Speeds
Now let’s get some drives installed into the ZimaCube Pro and do some transfer speed tests on it.
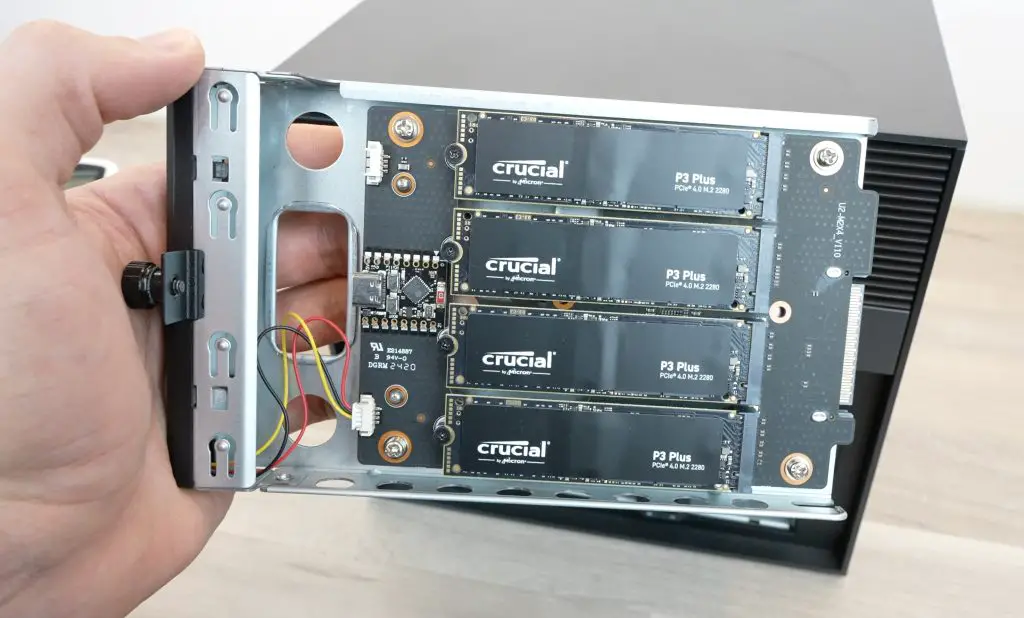
I’m going to install four 2.5” Crucial BX500 SSDs in the main bays and four Crucial P3 Plus NVMe drives in the M.2 bay.
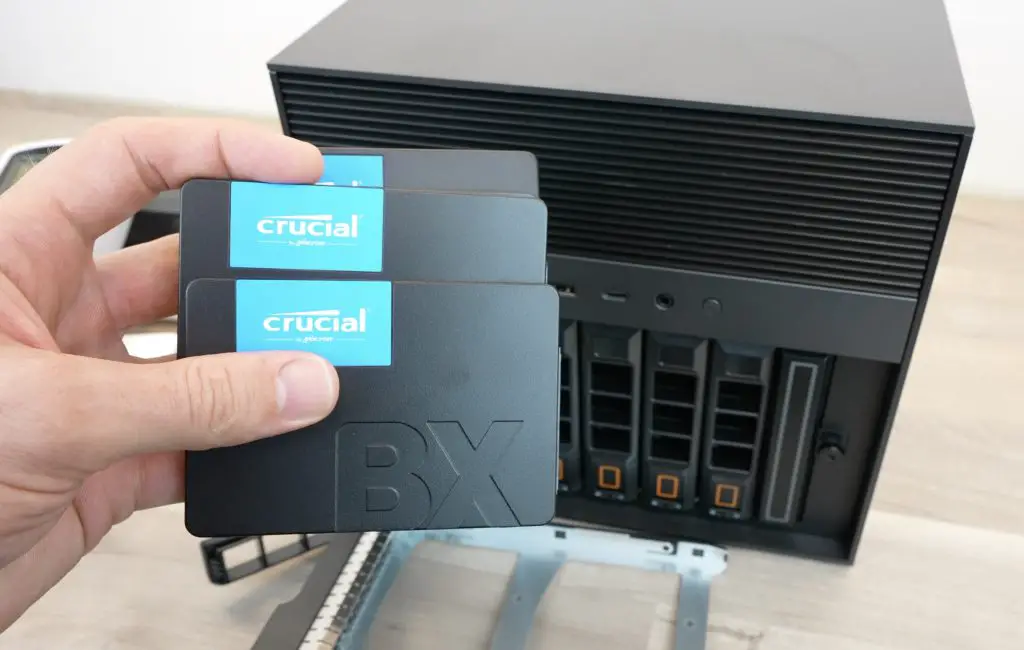
These aren’t ideal for a NAS but they’re what I have available for testing. If you’re going to be using drives in a NAS long term then make sure that you use NAS grade drives and preferably ones with DRAM cache.
Our drives now show up in our dashboard and we can set them up as individual drives or in a RAID configuration.
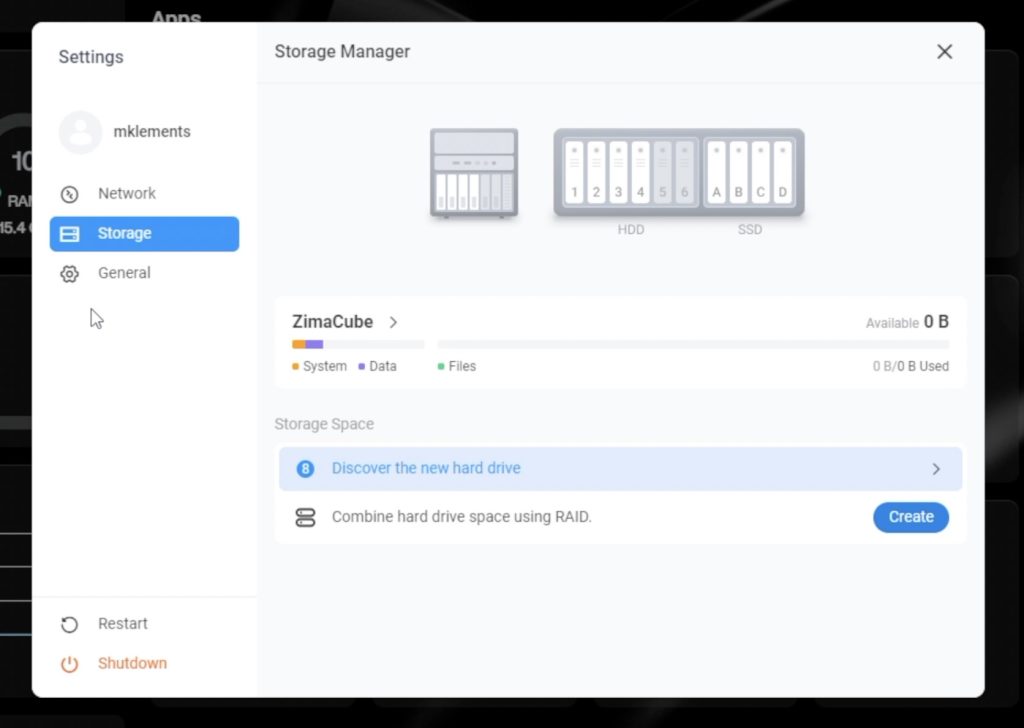
I’m going to go with RAID 5 and I’ll set up the NVMe drives in one pool and the SATA drives in a second pool.
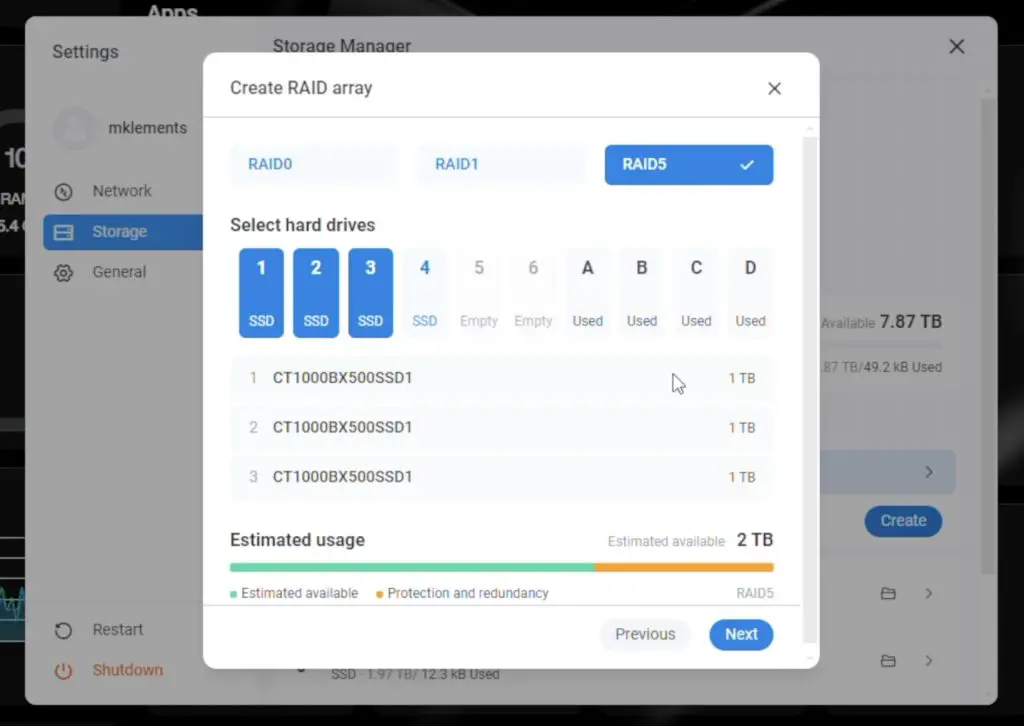
I had to reformat the SATA drives as I used them for my Pi NAS and they were already in a RAID configuration that the ZimaCube Pro didn’t like.
NVMe Storage Volume Test
Using AJA System Test, and starting with a small 256MB file on the NVMe storage volume. We get writes of around 700MB/s and reads around 900MB/s. So writes are a little under saturating the 10Gb Ethernet connection but reads are very close. I haven’t done any optimisation or tweaked any settings on the NAS so this is straight out of the box with very little setup. With a 1GB test file we get similar results.
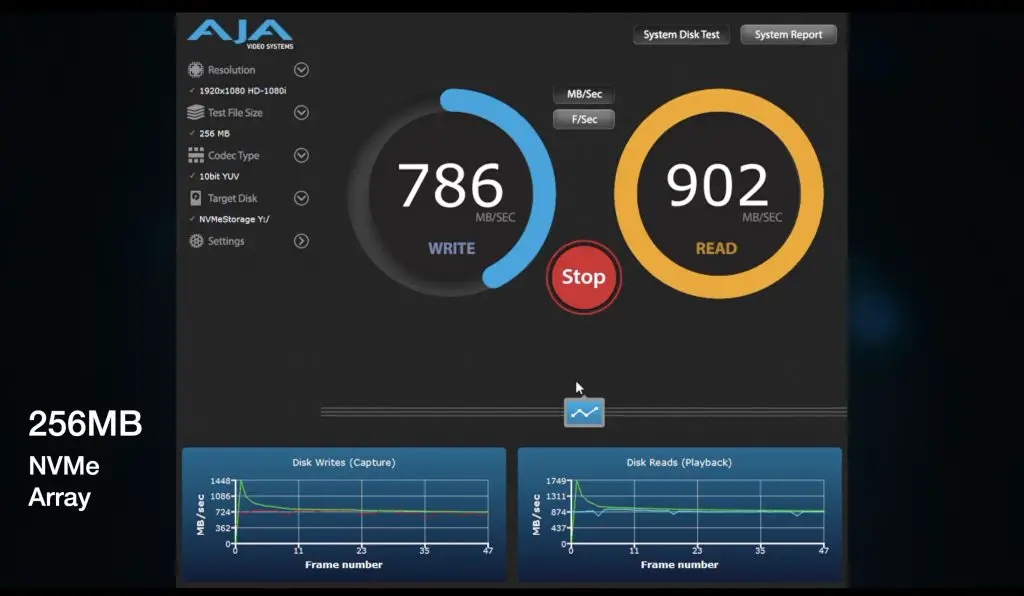
Going up to a large 64Gb test file, we get a similar write speeds but our read speed drop off quite a bit, down to 750MB/s.
I’ll have to do some digging to figure out why, but it seems like it likely has to do with the ZimaCubes Pro’s available RAM. The ZimaCube Pro is probably not able to write to the NVMe drives fast enough to keep up with the network adaptor, so the RAM fills up and then the drive’s write speed becomes the bottleneck.
NVME Volume Results Summary:
- 256MB: 700MB/s Writes, 900MB/s Reads
- 1GB: 700MB/s Writes, 900MB/s Reads
- 64GB: 700MB/s Writes, 750MB/s Reads
SATA Storage Volume Test
Switching over to the SATA storage volume.
For the 256MB and 1GB test files we get very similar results to the NVMe drives.
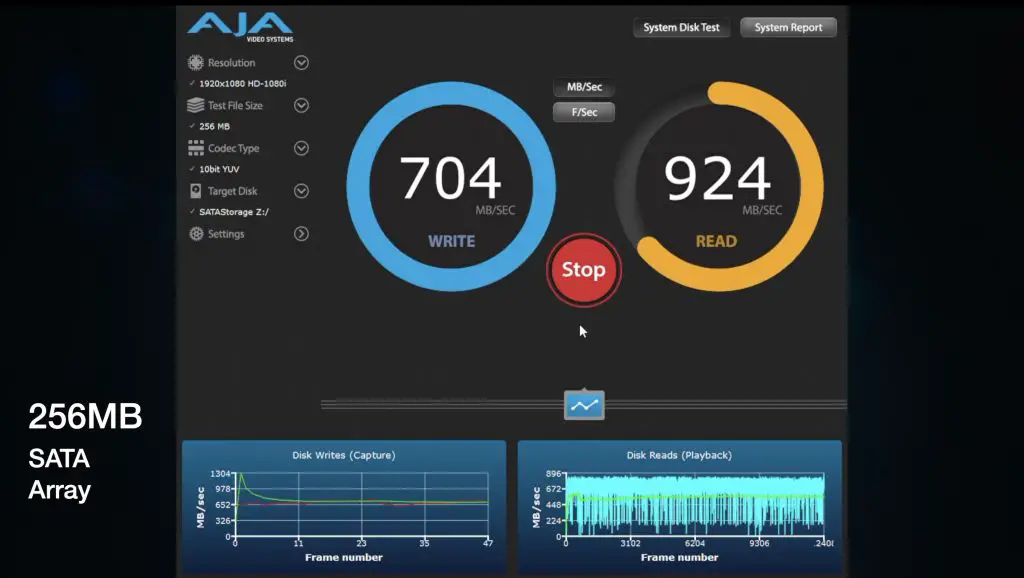
When we go up to the 64GB test file, writes start off well but then drop quite considerably. We get about a third of what we got with the NVMe volume. Again this seems to be related to RAM filling up because the drives can’t keep up with the write speed.
Reading the 64GB test file from the SATA volume we get similar results to the smaller files so there are no issues here.
SATA Volume Results Summary:
- 256MB: 700MB/s Writes, 900MB/s Reads
- 1GB: 700MB/s Writes, 900MB/s Reads
- 64GB: 250MB/s Writes, 750MB/s Reads
Real-world Window’s 11 File Transfer Test
Running some real world file transfer tests in Windows 11, we get good results.
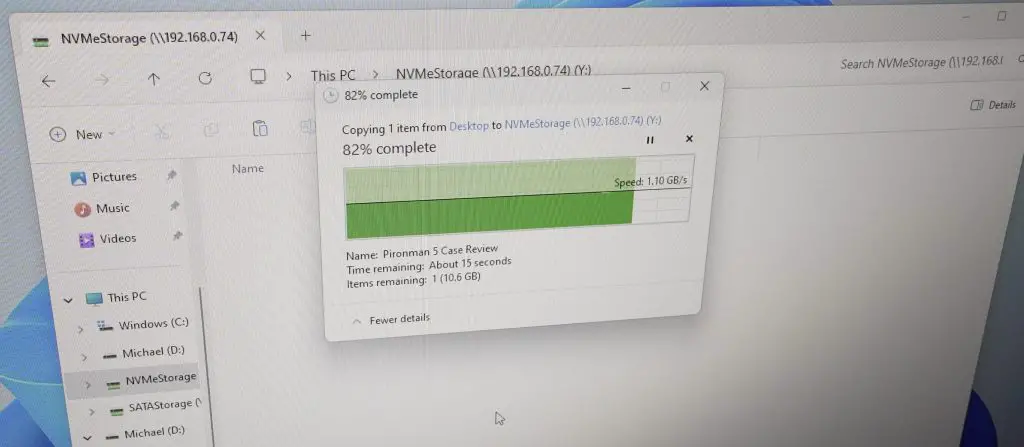
Copying a 60GB video file to the NVMe storage volume, we get a very stable sustained 1.1GB/s.
Copying the same file from the NVMe storage volume, we again get a fairly stable 1.1GB/s. There were two occasions where the transfer speed dipped significantly, but it picked up again fairly quickly.
Thunderbolt 4 Transfer Test
When directly connected to my Mac over Thunderbolt, I tried that same three file size transfer tests.
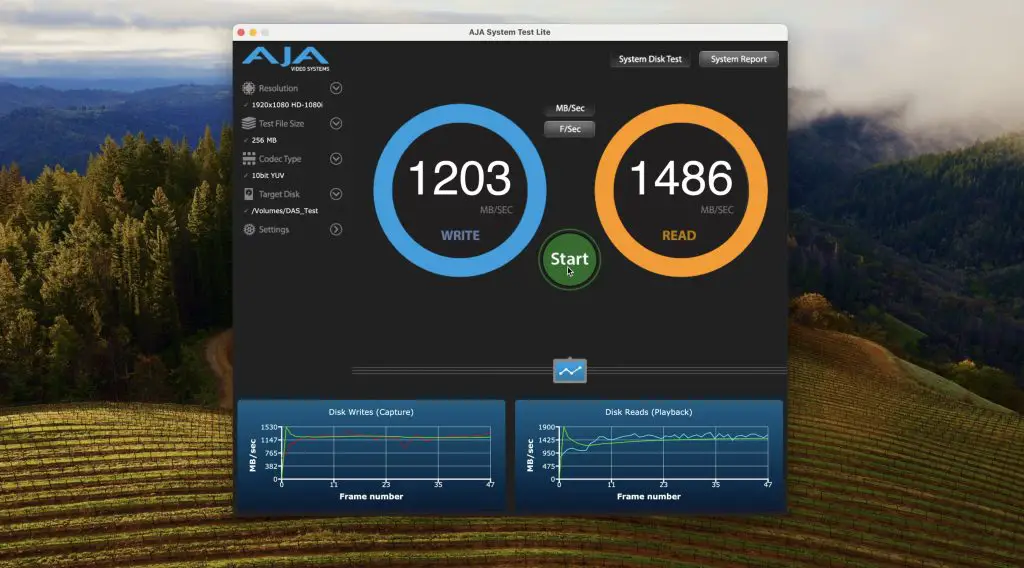
- The 256MB test file averaged around 1200MB/s writes and 1500MB/s reads but results were quite erratic.
- The 1GB test achieved very similar results to the 256MB test file.
- The 64GB file started off writing quite slowly but ramped up to 1000MB/s write. It then achieved faster reads than the previous file sizes, getting up to 1700MB/s – fairly close to the claimed 2000MB/s.
Other ZimeCube Pro Features
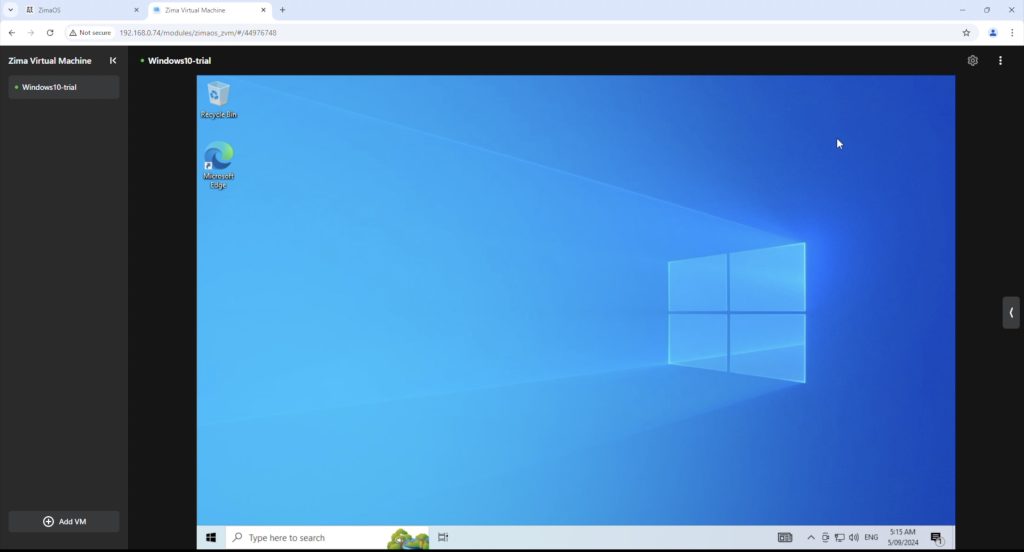
The ZimaCube Pro can also run virtual machines, so you can run multiple operating systems to support different applications and utilities.
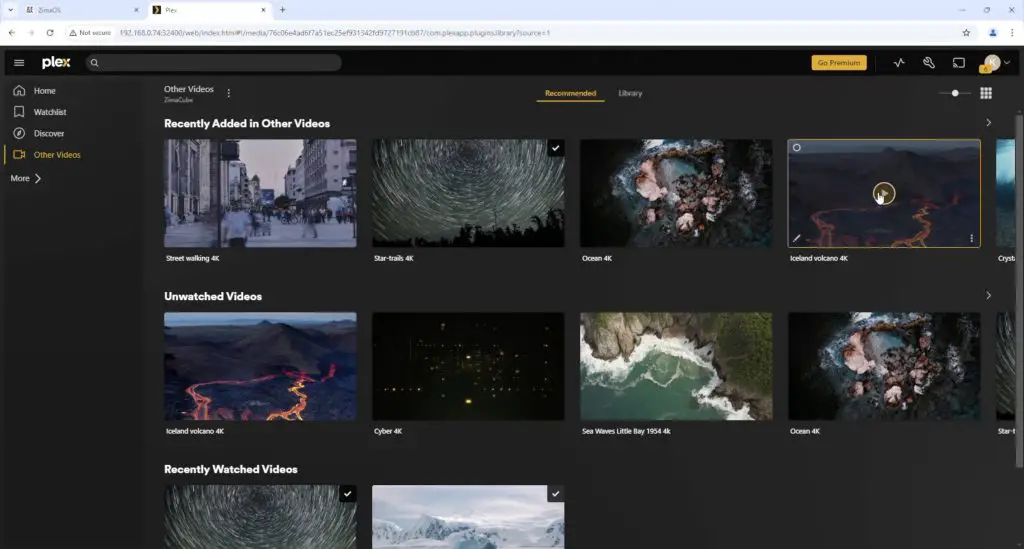
Plex running on the ZimaCube Pro handles 4K video playback really well. This obviously depends on how much transcoding is taking place, which is minimal for these sample videos, but they barely register on the CPU.
Some early users have already developed their own software for the RGB lighting in the 7th tray. It’s fully programmable through the onboard ESP32 module and each of the LEDs are individually addressable, which gives you a lot of options.
Power Consumption Tests
In terms of power consumption, the ZimaCube Pro is rated for up to 220W.
I did two tests as the total power draw will likely be quite dependent on the type and number of drives you’ve got running.
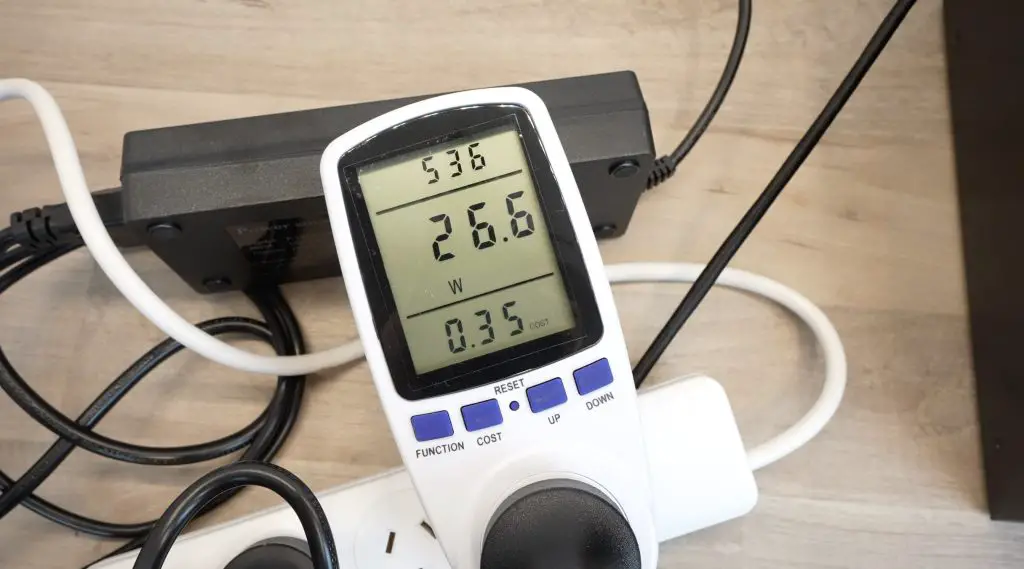
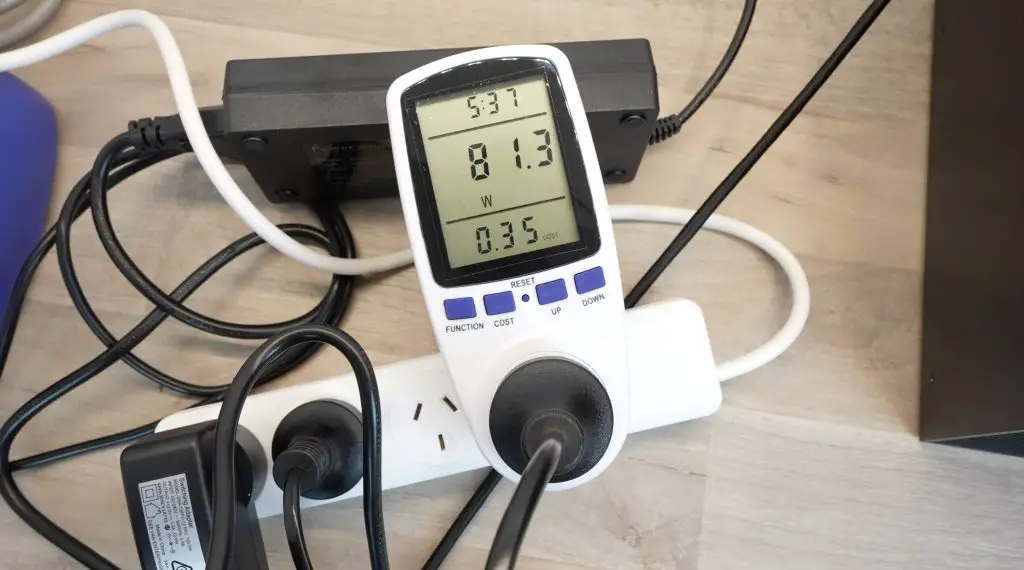
The first test was without any storage drives installed. With this setup I got a power draw of 27W when idle and it peaked to 81W when under full CPU load.
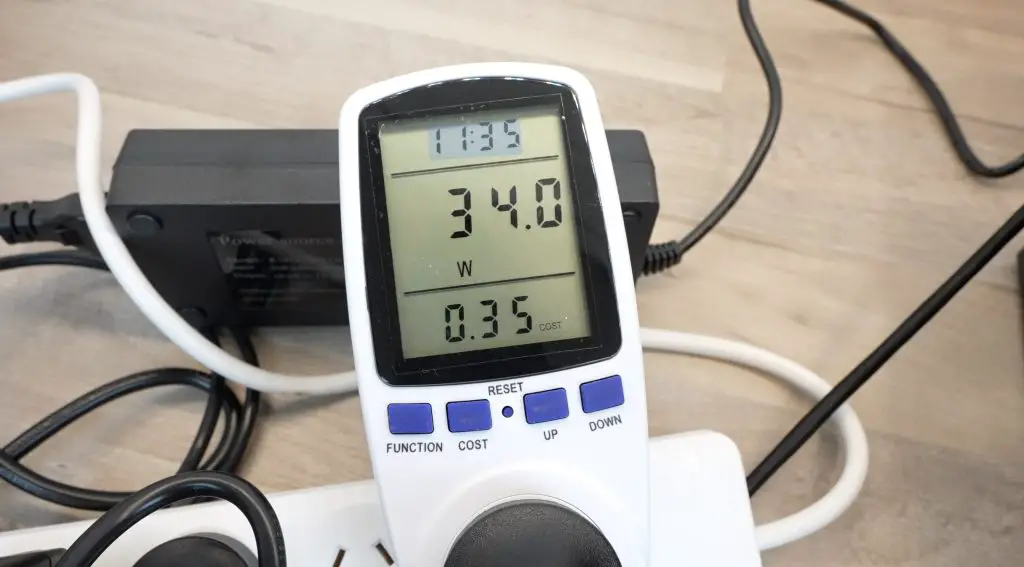
With four SSDs and four NVMe drives installed, I got an average idle power draw of 34W. This isn’t much of an increase from the 27W without drives, but SSDs are obviously a lot more power-efficient than physical disk drives.
With the 3.5” bays all populated with physical 3.5” drives, other users have measured around 50-60W with low CPU utilisation and 70-80W with high CPU utilisation. So still well under the rated consumption, but its going to cost a bit to have this running in your home 24/7. Here in Australia I’d be looking at about $8-10 a month to keep the ZimaCube Pro running with my current configuration.
Final Thoughts On The ZimaCube Pro
Overall I think the ZimaCube Pro is a great way to get started with running your own Personal Server in your home or small office. ZimaOS as it currently stands is a bit limited but they’re constantly adding new features to it and it’s simplicity makes it really easy to get a basic setup running, especially if you’re new to running a NAS or home server.
If you outgrow ZimaOS you can also easily transition to a more powerful NAS operating system like TrueNAS or Unraid.
There are a couple of things that I think they need to work on.
While the new CPU cooler is better than the original, there is still a lot of room for improvement. As I’ve said earlier, this may not even just be the cooler, it’s likely the CPUs heat spreader as well. The drive bay fans are also quite noisy and their curves are set a bit too low.
The removable front panel is great for aesthetics but could also do with some tabs to make it easier to remove. You have to sort of hook your fingernails in under the vents to pull it off. It’s not difficult to do but just feels clumsy.
Let me know what you think of the ZimaCube Pro in the comments section below and let me know if there is anything else you’d like to see me test or run on it.