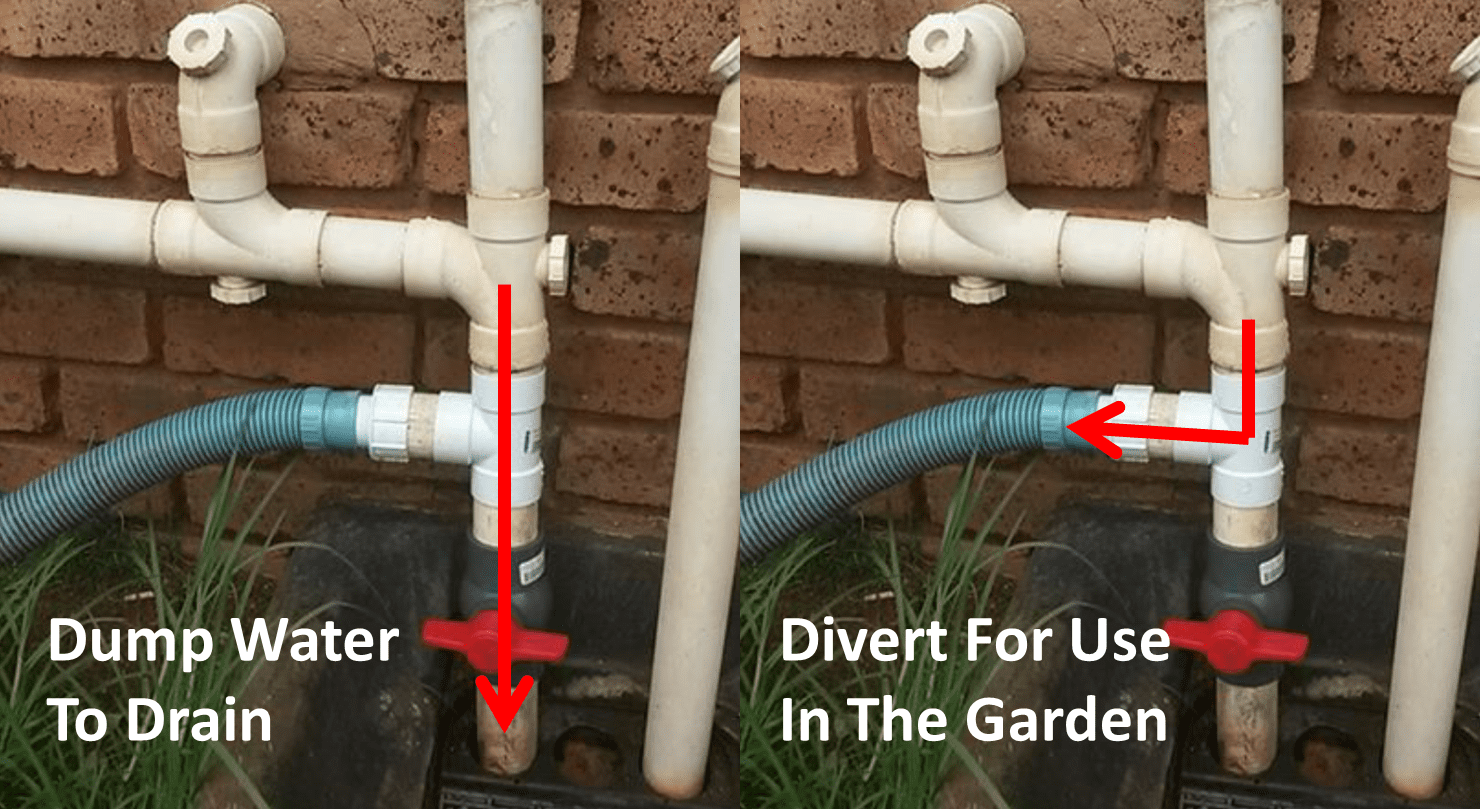
Every time you pull the plug on your sink or bath or you take a shower, the water running down the drain goes to waste. Most of the time, that water isn’t really that dirty and can be put to good use in the garden to water the plants and grass or it can be used to clean your car or the porch etc. Adding a simple diverter valve onto your existing drain pipe near your bath or sink can save this water so that you can use it straight away or store it for use at a later stage.
What You Will Need To Add A Diverter Valve
- Hacksaw (To Cut Existing Drain)
- 50mm (2″) PVC Pipe T Piece
- 50mm (2″) Shutoff Valve
- 50mm (2″) Reducer To The Size Of Your Pipe To Tank Or Garden
- PVC Cement/Glue
How To Install The Diverter Valve
The first step in this conversion is to find a suitable drain pipe, chances are that your drains do not all go to one place, there are numerous drains around your house for different purposes. Find one of the drains which are fed by your bath tub, shower and your bathroom sink as this is usually where the most usable water is lost. Other alternatives are the kitchen sink or washing machine drain, the toilet drain is off limits obviously but these are usually much larger 100mm (4″) drain pipes so they are easily recognisable.
Once you have decided on a drain, you need to cut a small section off a little higher than the ground level where the valve and T piece will be inserted. About 30cm (1′) from the drain cover is ideal. Cut into the drain with the hack saw trying to make a clean and square cut.
You need to cut two straight sections from the off cut to be used as the joiners between the T and valve and the T and the reducer. These should also be cut clean and square, 6cm (2.5″) long will be ideal.
Use the PVC glue/cement as directed on the packaging, all that is usually required is to coat the outside of the smaller surface and insert it into the larger one. Make sure that you have coated it the whole way around so that there are no leaks. Glue the pieces together as shown in the picture. Start by assembling the valve, T piece and reducer with the joining pieces. Once you have done this then glue the whole assembly onto the drain pipe so that you give yourself place to work.
The PVC glue/cement usually takes a couple of hours to cure properly so avoid using the associated drains for a while after installing the valve.
The reducer can not be connected to your pipe for the garden. You can either connect it straight up for watering the garden each time you drain the tub or sink or you can further pipe that water into a collection barrel or storage tank to be used at a later stage. Just make sure that the tank is lower than the bath/sink or the water will not drain into the tank. Also make sure that you use quite large piping as there is no water pressure on the drain line to force the water through.
You can now start using your diverter valve to reuse the water in your garden. Simply turn the valve in one direction to allow the water directly into the drain or turn it the other direction (close it off) to divert the water to use in the garden.
Have you done something similar on your home to save water? Let us know in the comments section below, we would love to hear your ideas.


Where can I buy.