I tried running a ChatGPT-style AI model locally on a Raspberry Pi… and the results were not what I expected.
When you use an online or cloud-based service like ChatGPT, you’re obviously sharing your data with another company. This may be ok in some cases, but there are a lot of instances where you might not want to do this. So running a model locally is a way to still make use of the features or benefits of something like ChatGPT, but keeping it all local, so no private or sensitive information is shared with another party.
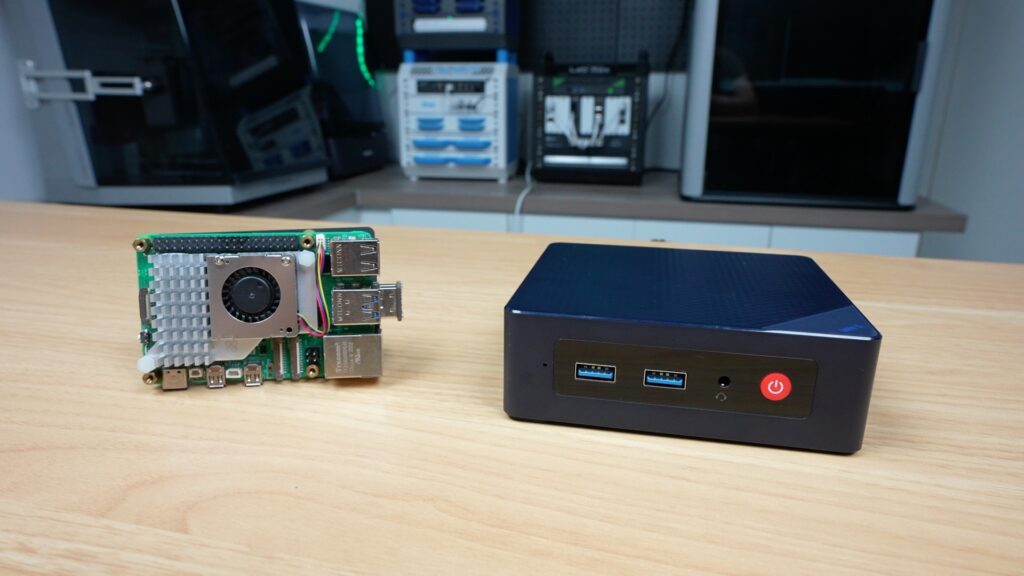
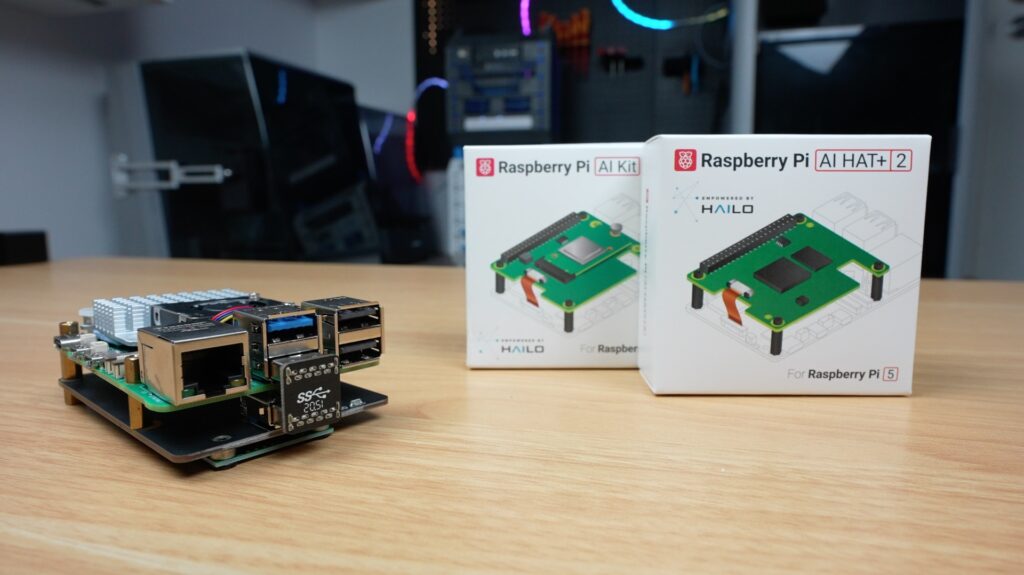
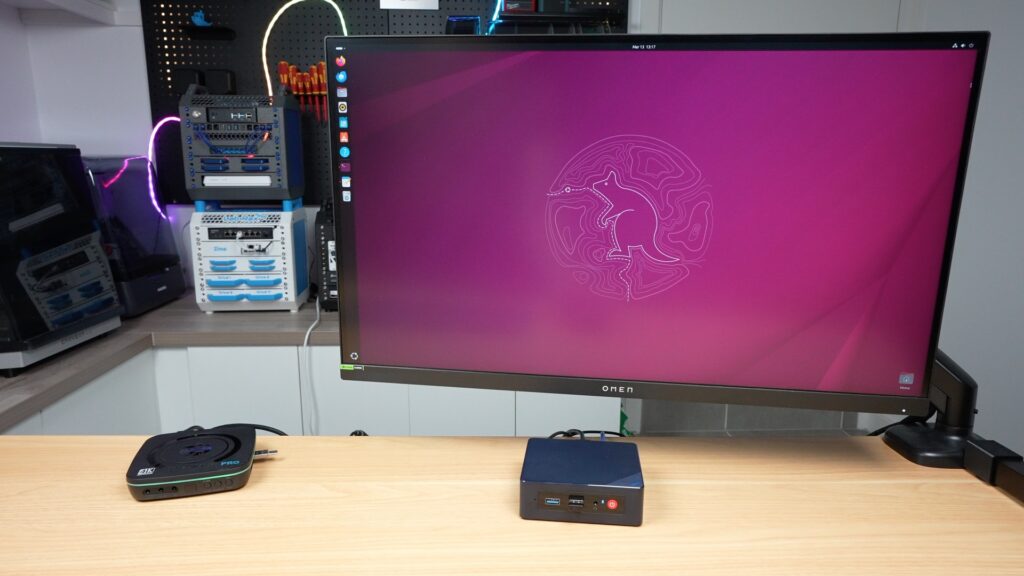
This brought me to the question of what hardware you can run it on, so I ended up trying a few models out on a Raspberry Pi. Now a Raspberry Pi is obviously not going to be able to run models like a high-end PC with the latest GPU, but it actually performed a bit better than I expected, and there are some accessories like the AI Accelerator hat that I tried out too. For comparison, I also ran the same model on an N100-based mini PC that comes in at a similar price to the Pi 5 setup.
Here’s my video of my testing. Read on for the write-up:
Hardware Used For Testing LLMs On A Pi 5
- Raspberry Pi 5 – Buy Here
- Pi 5 Active Cooler – Buy Here
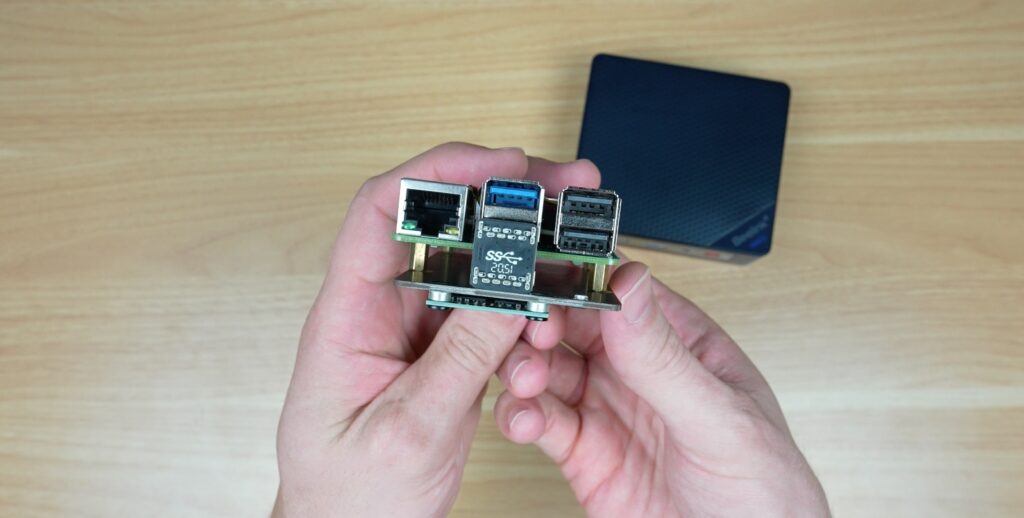
- Pi AI HAT+ 2 Accelerator – Buy Here
- Beelink S12 N100 Mini PC – Buy Here
Tools & Equipment Used:
Some of the above parts are affiliate links. By purchasing products through the above links, you’ll be supporting this channel, at no additional cost to you.
How I’m Going To Be Testing The Different AI Hardware Setups
I’m going to be running the test on three different hardware configurations, first up a 16GB Pi 5 by itself, then a Pi 5 running the Hailo AI Hat+ 2 accelerator and finally an N100-based mini PC.
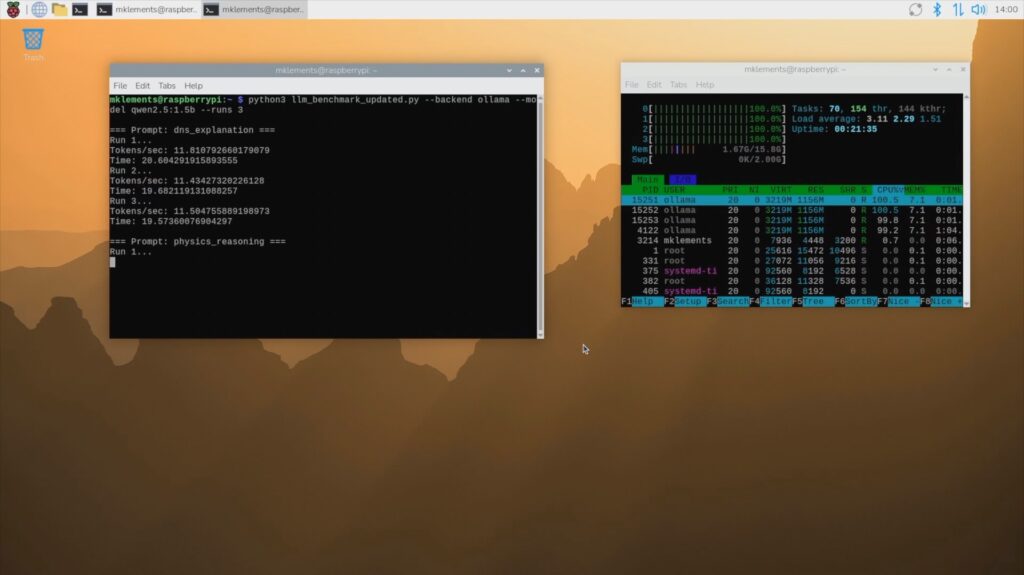
To keep testing fair, I’m running the same Qwen2.5:1.5b language model on each setup, and I’ll be using the same prompt, setting the temperature to zero and using a fixed seed. I’m also pulling the timing stats directly from Ollama’s API so we can calculate actual tokens per second rather than guessing from how fast text appears on screen. I chose the Qwen2.5:1.5b model since it’s the most complex model that will reliably run on all three sets of hardware.
I’m going to run a series of three prompts on each, and for the performance testing phase, I’ll run each test three times as well.
These are the three prompts I’m going to be using:
- Explain how DNS works in exactly 200 words. Use plain English and include recursive resolver, authoritative server, cache, and TTL.
- A ball is thrown straight up from ground level at 14 m/s. Ignore air resistance and use g = 9.8 m/s^2.
- How long until it reaches the top?
- What maximum height does it reach?
- How long until it returns to the ground?
- Show the equations and the final answers clearly.
- Write a 120-word intro for a blog post comparing local LLMs on a Raspberry Pi 5, a Raspberry Pi 5 with a Hailo AI HAT+ 2, and an N100 mini PC. Mention privacy, speed, and cost.
For the performance tests, the main metrics we’re interested in are the total generation time for a fixed number of tokens, which gives us an indication of the initial processing time, often called time to first token, and then the tokens generated per second.
Testing The Pi 5 Only Setup
Let’s start out with the Pi 5 only setup.
You’ll notice that I have a USB connected mSATA drive connected to the Pi as the boot drive and that’s because I want to keep the PCIe port free to also try add the AI Hat+ 2 and to see how that boosts performance, but I also don’t want the Pi running off a slower microSD card which may affect model loading and startup times.
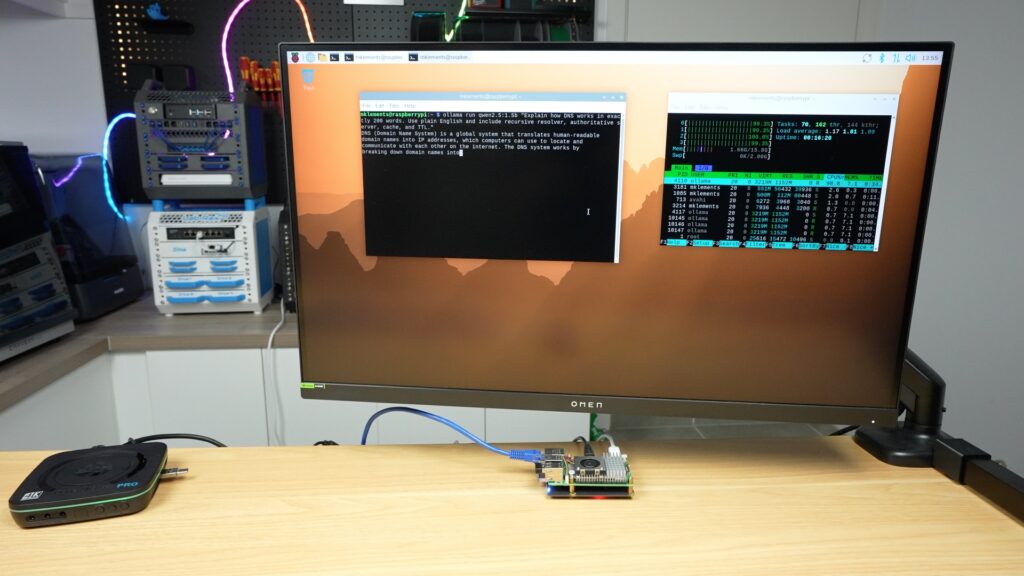
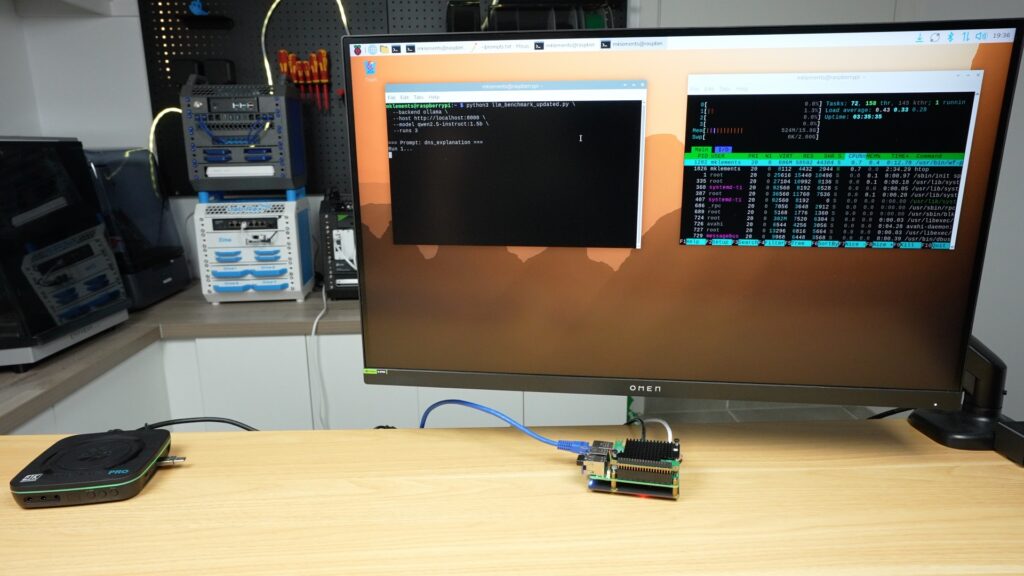
I’m running Pi OS Trixie on it, and I’ve installed Ollama and downloaded the Qwen2.5:1.5b model.
To kind of prime the system, before I run the actual prompts, I always start by just sending the prompt “hello”.
Then we can start with the prompts. I’ll link a file with the actual prompt outputs in each hardware section.
So first up is the DNS explanation. I was actually pleasantly surprised by how quickly the Pi ran this. It was outputting around 11 tokens per second. You could also see all four of the Pi’s CPU cores are running at 100% during the output, and the active cooler was spinning up. So you can’t do anything else on the Pi while the response is being generated. This is important to consider for the Hailo test.
To assess the prompts, it’s going to be a bit subjective, but I’ll check that it includes the things I’ve asked it to, that it gets the details or calculations correct and the quality or structure of the overall response in relation to each other.
The Pi’s response is quite good, it’s got the correct inclusions that I asked for, and it’s accurately written. It’s a little bit simplified, but I’d say it’s quite clear.
Next up is the physics question.
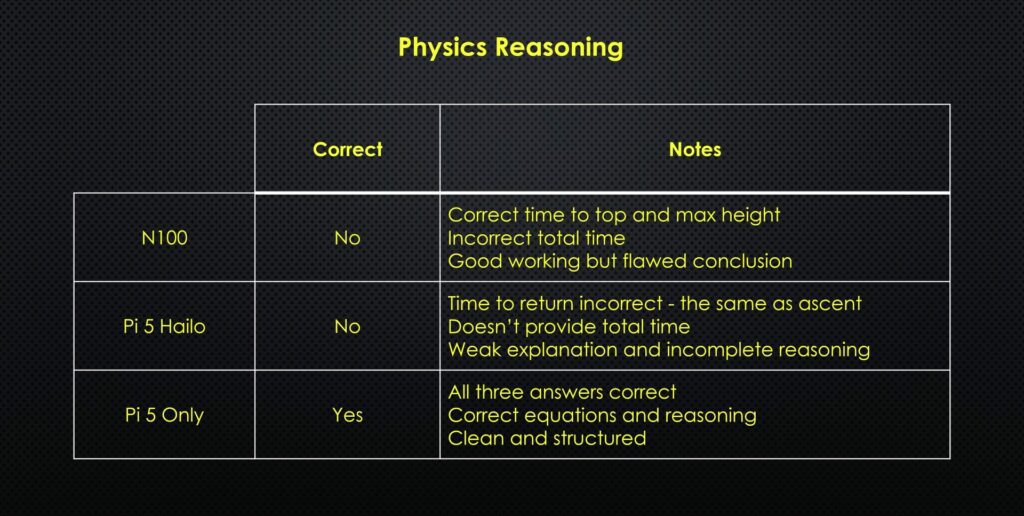
This question requires the model to interpret what is being asked, then choose and apply the correct equations and then work them out correctly.
This one’s quite easy to assess. It’s got all three of the answers correct, it’s used the correct equations and reasoning, and it’s clean and well-structured.
Lastly, we’ve got the blog intro.
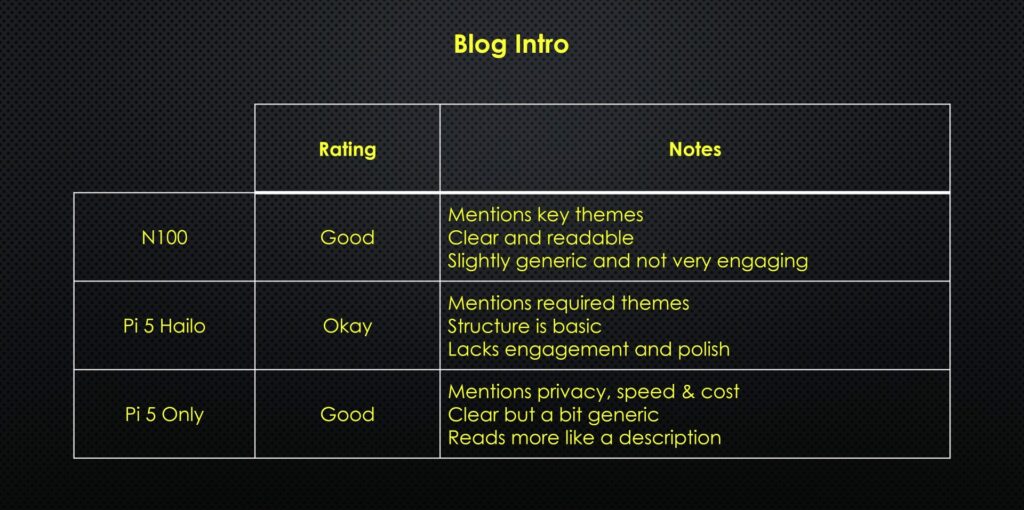
This assessment is again quite subjective, but I’d say it’s quite good. It reads a bit like a description rather than an intro, but it mentions privacy, speed and cost and it is quite clearly written.
I then ran the performance test script, which runs the same three prompts three times each and controls the model and prompts a bit better to give us some performance data to analyse, which I’ll graph and show you at the end.
Testing The Pi 5 With Hailo AI HAT+2 Accelerator
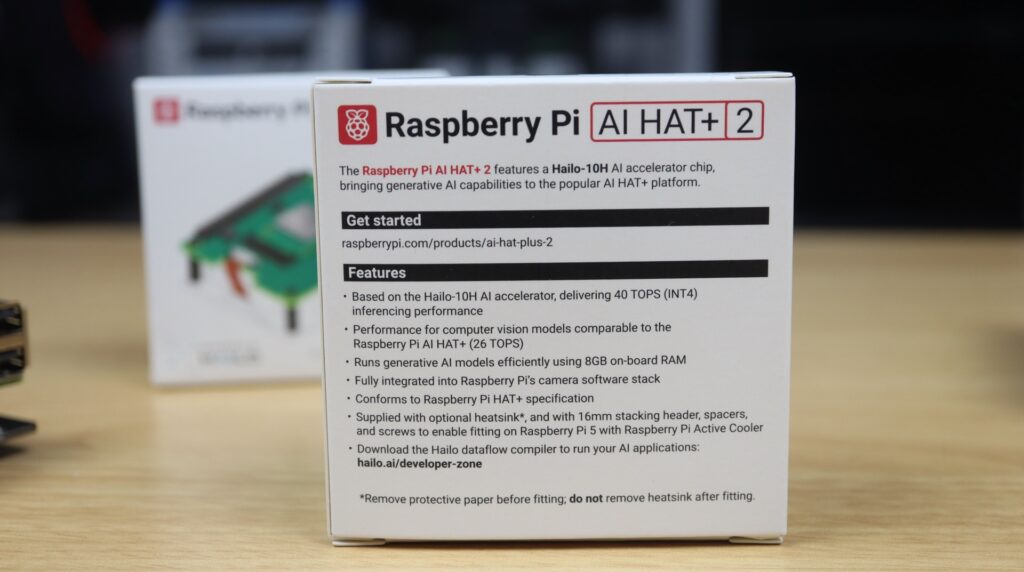
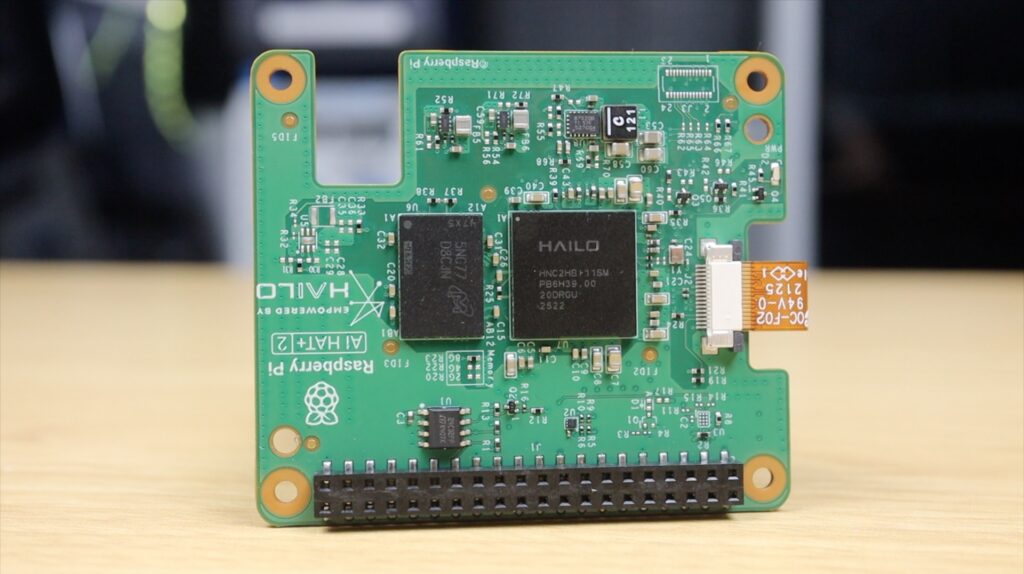
Raspberry Pi have an original AI Kit based on the Hailo-8L accelerator, which adds up to 13 TOPS to the Pi. Unfortunately, this hat doesn’t have any RAM on it, and it’s designed around image processing, so it can’t be used to run LLMs. That brings us to the Hat+ 2. This one’s based on the Hailo-10H accelerator, which can do up to 40 TOPS, but more importantly, it’s got 8GB of onboard RAM, which allows it to run generative AI models or LLMs.
The implementation on the software side is a bit more complex than just running Ollama, but they’ve got some preconfigured models to choose from, one being the Qwen2.5-instruct:1.5b model, which is one of the reasons why I chose it for testing.
The difference in software means that it’s presented differently in the terminal, the whole response is provided after it has been generated. But in this case, while the prompt is being generated, there is no load on the Pi’s CPU cores. So the Pi is completely free to work on or manage other tasks.
We’ll go through the numbers a bit later, but the hat was noticeably slower in producing the responses, which honestly wasn’t what I expected. The accelerator is supposed to make this faster.
And it didn’t end there. The quality of the responses was also quite poor.
The DNS explanation had inaccurate information, terminology issues and missed explaining resolver flow.
The physics reasoning prompt got the wrong return time, didn’t provide the total time and in general had weak explanations and incomplete reasoning.
And lastly, the blog intro mentions the required themes, but the structure is very basic, and it lacks engagement or thought.
I thought maybe the model was just a bit weak, although it should be very similar to the one being run on the Pi 5 only, so I then tried running one of its Deepseek models, but that didn’t help.
The DNS explanation was worse, it didn’t produce a usable answer, and it mainly just outputted thinking text.
It calculated the incorrect height for the physics questions, which then led to the wrong time being calculated. And it again showed confused reasoning and thinking out loud.
The blog intro contains incorrect technical claims, isn’t aligned with the prompt intent, and just felt hallucinated and unreliable.
At this point, I started questioning whether this accelerator was actually designed for this kind of workload at all. After all, the models that I’ve tried running are the ones specifically configured for this hat.
So all up not a great result for the AI Hat+ 2, but I still ran the 3 test script using the Qwen model anyway to compare performance with the other options.
Testing The N100 Mini PC
The N100 Mini PC has a faster processor than the Pi 5, so on paper, it should produce better results. At $210, it also costs about the same as the base Pi 5 setup. The 16GB Pi 5, power supply, active cooler, mSATA drive and storage hat come to a combined $205, and that’s going off the list price of the Pi 5, which is often difficult to get.
This comes ready to run, you just need to plug it in.
I’ve installed Ubuntu 25.10 on it so that we can run the same Ollama version and Qwen model that we ran on the Pi 5. So it looks and feels very similar to the Pi 5, but lets see how it performs.
The completed DNS explanation is very good. It’s got the correct inclusions, it’s well structured and it’s easy to follow. There are a couple of minor wording inefficiencies but that’s due to the small model being run.
I had high hopes for the physics reasoning but it let me down. It got the correct time to top and maximum height but calculated the incorrect total time. The working out and equations are correct but it came to the wrong conclusions. Because it was close, I ran it a second time and it then gave me all three correct answers.
The blog intro was about the same as on the bare Pi 5. It’s good, mentions the key themes, its clear and readable but slightly generic and not very engaging.
Prompt Results Summaries
DNS Explanation

Physics Reasoning
Blog Post Intro
Comparing The Performance Testing Results Between Options
Overall, the quality of the responses from the bare Pi 5 and the N100 PC is quite good. They’re obviously nowhere near the level of modern cloud-based models, but they’re very usable for light tasks running locally. I was quite disappointed that the accelerator performed worse than the Pi itself, albeit that the Pi was free to do other things while the accelerator worked on the prompts.
For LLMs specifically, I wouldn’t recommend the Hailo AI Hat+ 2, especially given its $130 price tag. It’s clearly designed more for vision and edge AI workloads and not general language models.
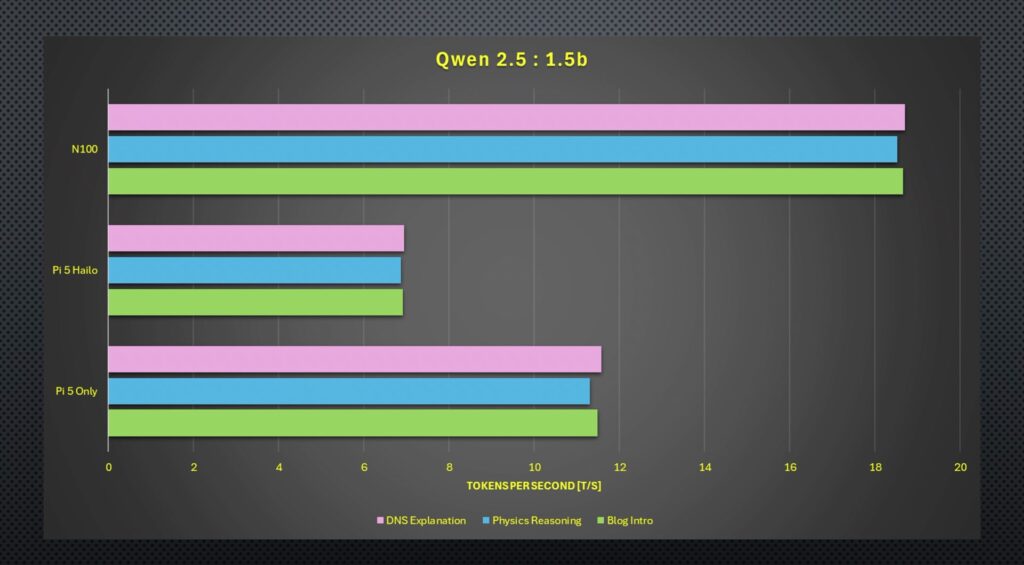
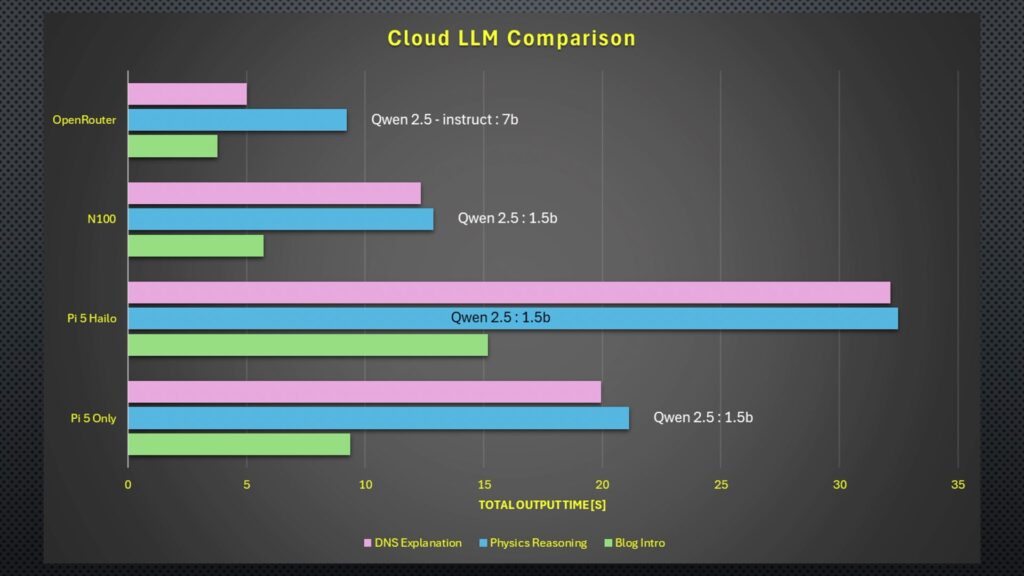
As for the performance test results, in terms of raw tokens per second output, the N100 PC is the clear winner. It was over one and a half times faster than the bare Pi 5 and almost three times faster than the Hailo accelerator. Running the DeepSeek model on the Hailo accelerator only results in about a 2% improvement.
Moving on to the total time, the results were quite similar again. The N100 is the fastest by quite a significant margin, and the Hailo accelerator takes more than double the N100s time.
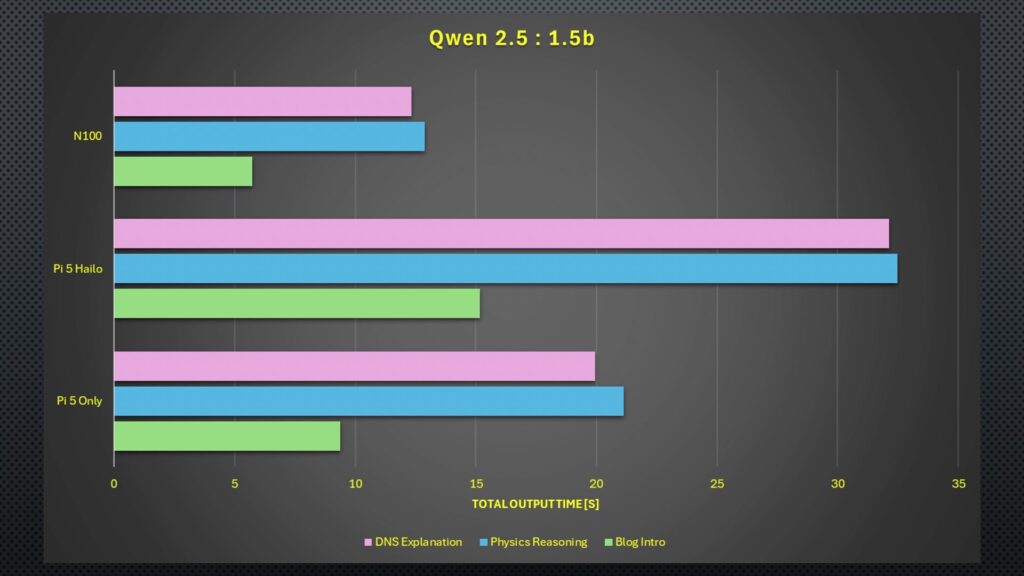
Interestingly, the total time across the board was significantly faster for the blog intro, and given that the tokens per second were similar to other prompts, this indicates that the models spent significantly longer before generating the first token for the DNS and physics responses. That’s probably because the blog intro prompt is quite open-ended, whereas the DNS prompt asked for specific inclusions, and the physics one has to be numerically correct and use the correct equations.
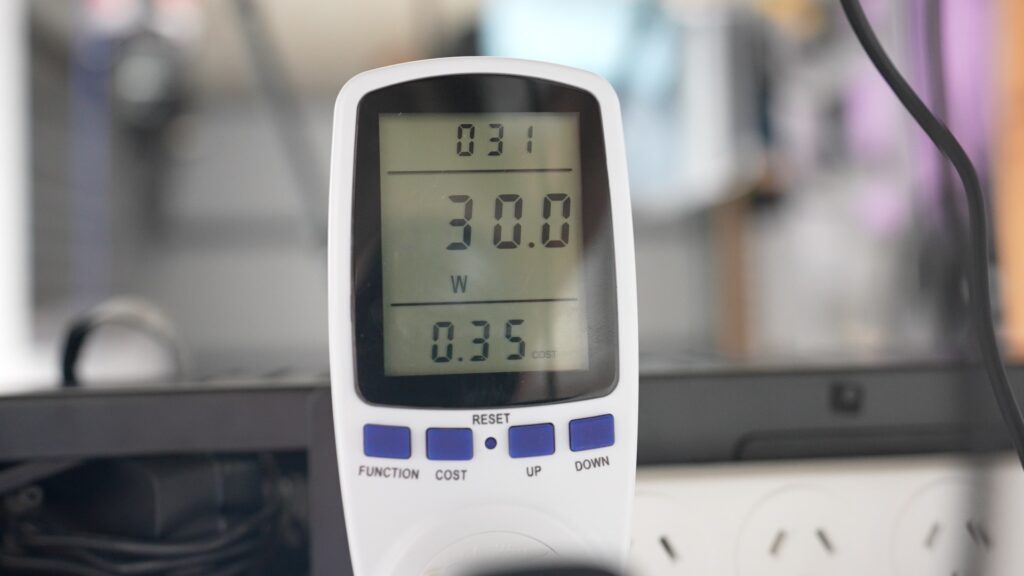
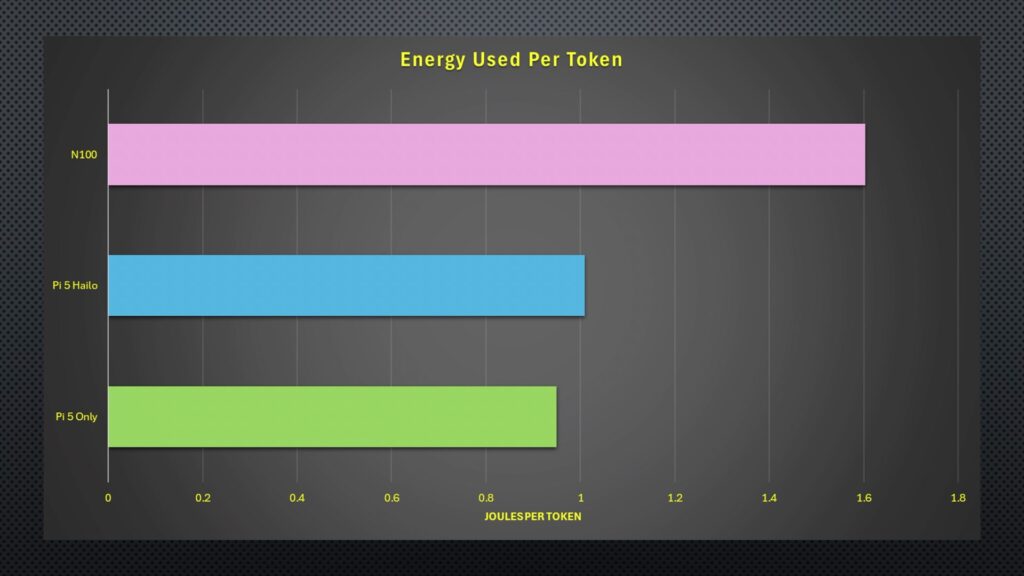
Lastly, power consumption, the Pi 5 only uses 11W under full generation load, the Pi 5 and Hailo accelerator use 7W, and the N100 PC uses a much higher 30W. Adjusted for the speed at which each device produces the output, we can calculate the energy consumed per token. Unsurprisingly, the N100 PC is the least efficient, using the most energy per token, but because of the Hailo accelerator’s speed, the Pi 5 only setup comes in slightly better, even though its power draw is higher.
Comparison With An Online Model
So is running your own LLM locally worth it?
Well, to really figure that out, we need something to compare it to. So I found a comparatively low-level cloud-based model that was available through a paid API. For the comparison, we’re going to run the same Qwen2.5 model, but the smallest model size that they have available is their 7 billion parameter one.
I put the same three prompts and then the test script through this cloud-based model, and these were the results.
The DNS explanation was a lot better structured and gave the best balance between simplicity and correctness.
The physics reasoning response was also correct and clearly explained without providing too much fluff.
And lastly, the blog post had the right inclusions and was well structured.
Performance was also significantly better. The OpenRouter model dwarfs the other results in tokens per second and runs faster in terms of total time, too, although this was a little bit more comparable.
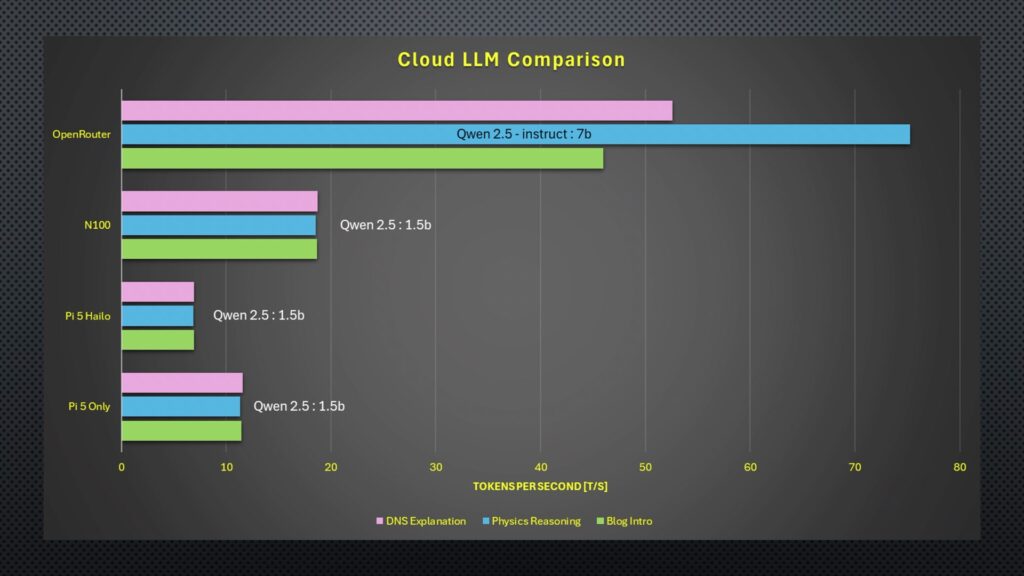
Perhaps most interesting is the cost. So after my hello, three test prompts and then 9 performance test prompts. The total cost for all of these tests was just 0.06 cents, or six hundredths of a cent.
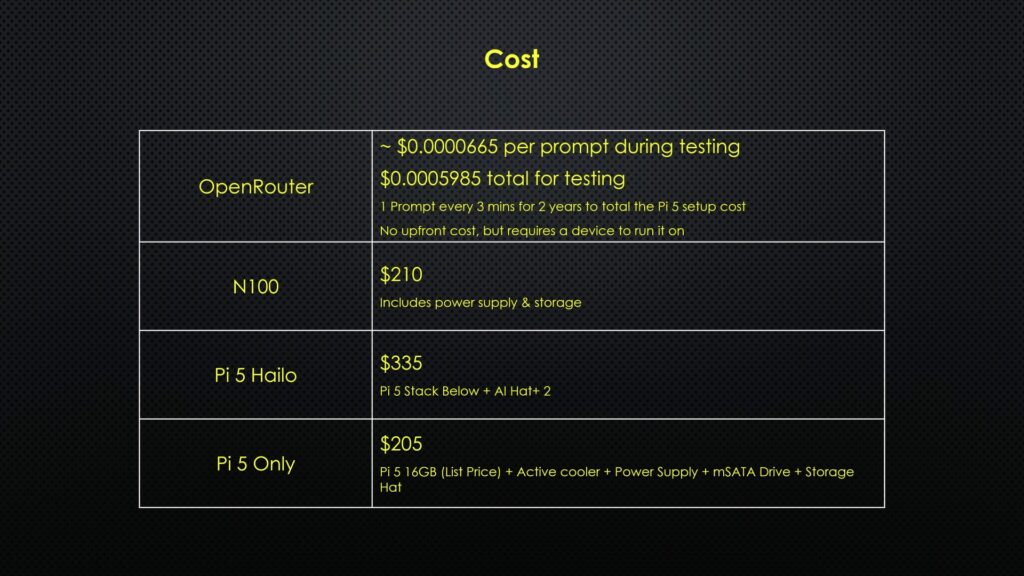
I could run a similar prompt every 3 minutes for about 2 years before I’d spend the same as the hardware cost of the Pi setup, and that’s before electricity costs.
So, really, I think the answer comes down to privacy and whether or not you have internet access. If you’re handling sensitive information or don’t want to share private data with another company, or if you’re deploying the model in a location that doesn’t have a reliable internet connection, then it makes sense to run a model locally. But if not, it’s probably going to be better value to make use of a cloud-based service. You also have the added benefit of being able to run more powerful models for certain tasks and cheaper models for less intensive ones.
Let me know in the comments section below what hardware you’ve tried running local LLMs on and what your experience has been with them, or if there’s anything else you’d like to see me try run on them.