Last week, I put together a water-cooled Raspberry Pi 4 and overclocked it to 2.0Ghz to see how well the cooling system would work. It was really effective and only saw a couple of degrees increase in temperature when running at full CPU load for 5 minutes, even when overclocked.
This sounds good, but the PC water cooling system used on the Pi costs a couple of times more than the Pi does, and uses more power than the Pi to run too. So I wanted to have a look at whether some other options could be more cost-effective, and how well they work to keep the Pi cool in comparison.
I got together a couple of common Raspberry Pi cooling options, and I’m going to be comparing the running temperature and cost for each of them. We’ll be looking at just putting aluminium heat sinks onto the Pi, then using the heat sinks in conjunction with a fan in a compact case, then a more significant fan and heatsink combination called an Ice Tower, and finally the water cooling system.
Here’s a video of the tests and results, read on for the written guide:
Purchase Links For The Raspberry Pi Cooling Solutions
- Heat Sink Cooling Kit – Buy Here
- Cooling Fan Case – Buy Here
- Ice Tower – Buy Here
- Ice Tower (Low Profile) – Buy Here
- Water Cooled Pi (Build Guide) – Find Here
Note: Some of the above parts are affiliate links. By purchasing products through the above links, you’ll be supporting this site, with no additional cost to you.
Testing The Raspberry Pi Cooling Options
For each cooling option, I’ll start by running the CPU at full load at the default clock frequency of 1.5Ghz, and then we’ll do a second test with the Pi overclocked to 2.0Ghz. I’ll record the CPU temperature at 1-second intervals and plot these onto a graph for each.
I’ll collect the data like this:
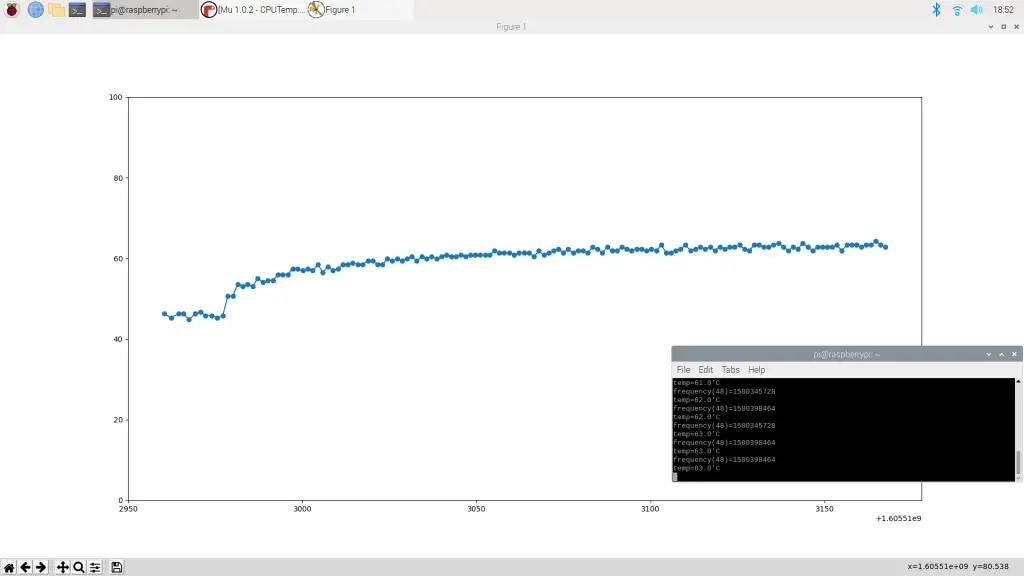
The Raspberry Pi 4 allows the CPU temperature to go up to 80°C before it starts throttling the CPU performance to lower the temperature and prevent the CPU from burning out.
From the test results, it looks like mine starts throttling the CPU around 83 or 84 degrees, but we’ll work on 80 as the documented limit.
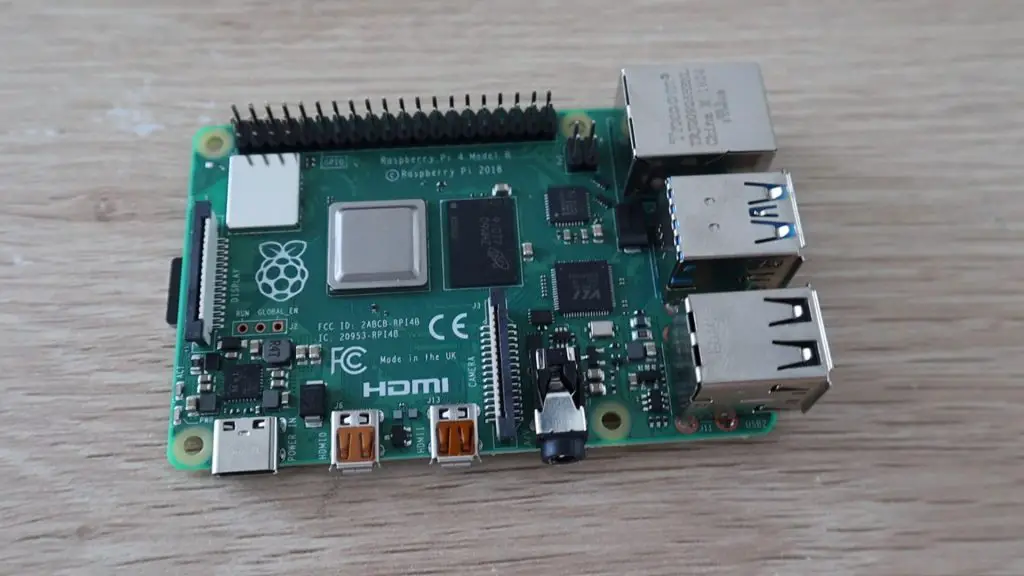
So if any of the cooling options exceed 80 degrees then you’re going to start getting limited performance from the Pi, and you’ll probably reduce its life by running it this hot for extended periods of time.
It’s also worth remembering that this test just runs the CPU at maximum load indefinitely. This represents a worst case scenario. In practice, your Pi will likely only use a fraction of the CPU capacity for most of its running time, obviously depending on your application and usage.
Testing The Aluminium Heat Sinks
Let’s start out with the plain aluminium heat sinks.
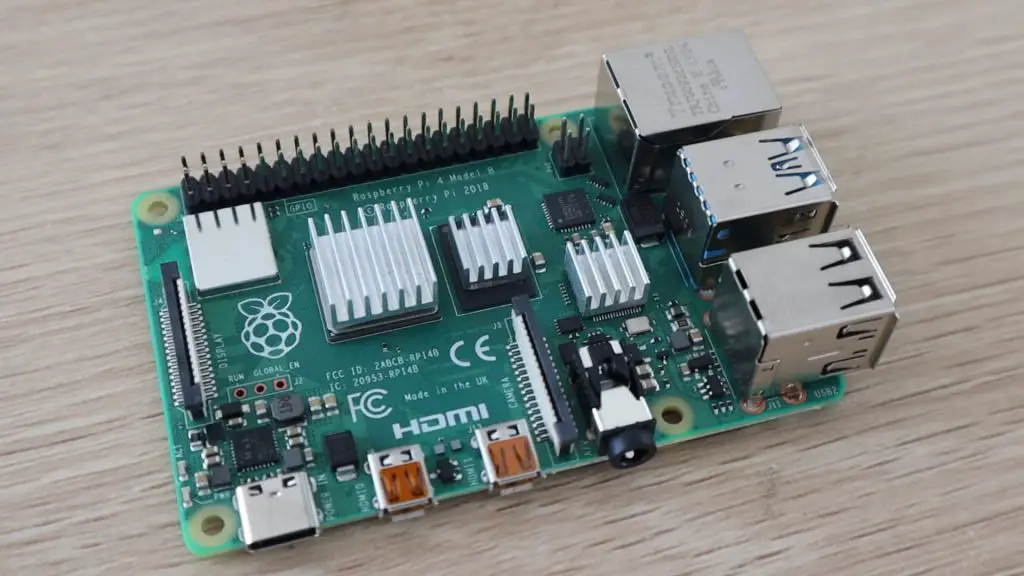
This is by far the cheapest option, you can usually get a set of these for around $1 – $2. They have a peel-off back and you just stick them onto the heat-generating components on the Pi.
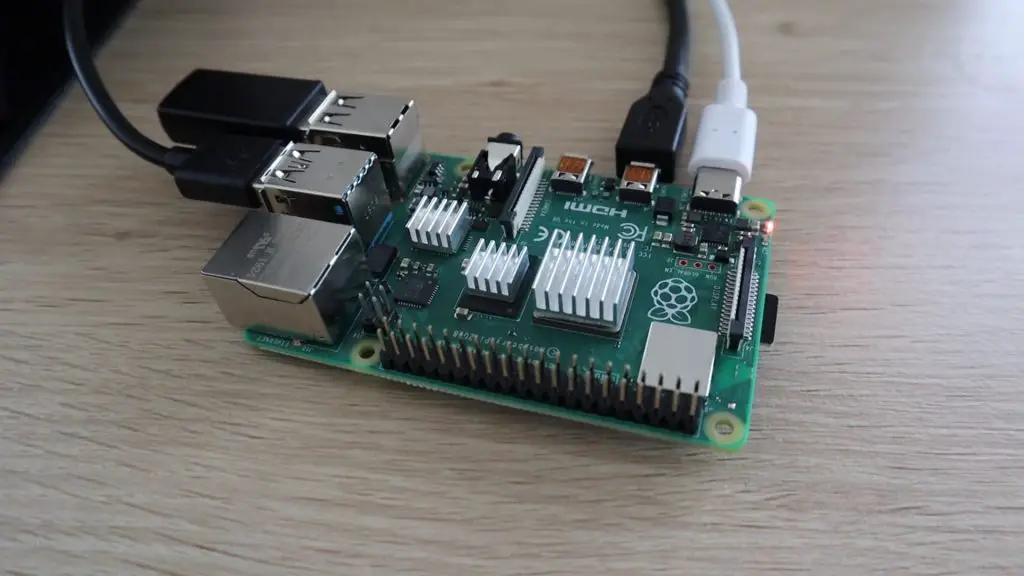
The benefit of the heat sink only option is that it is completely silent, so if you’ve got a low-intensity application for your Pi then this might be a good option.
Let’s see how well they do in the thermal tests. We’ll start off at 1.5 Ghz.
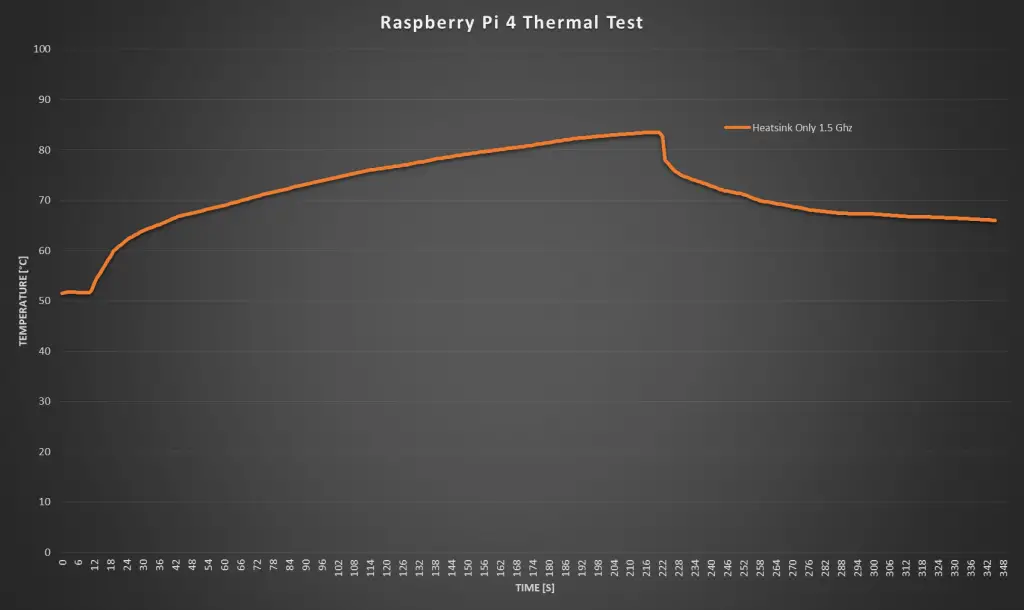
Right off the mark, before even starting the test, the Pi is already running quite warm. We’ve got a starting temperature of around 51 degrees.
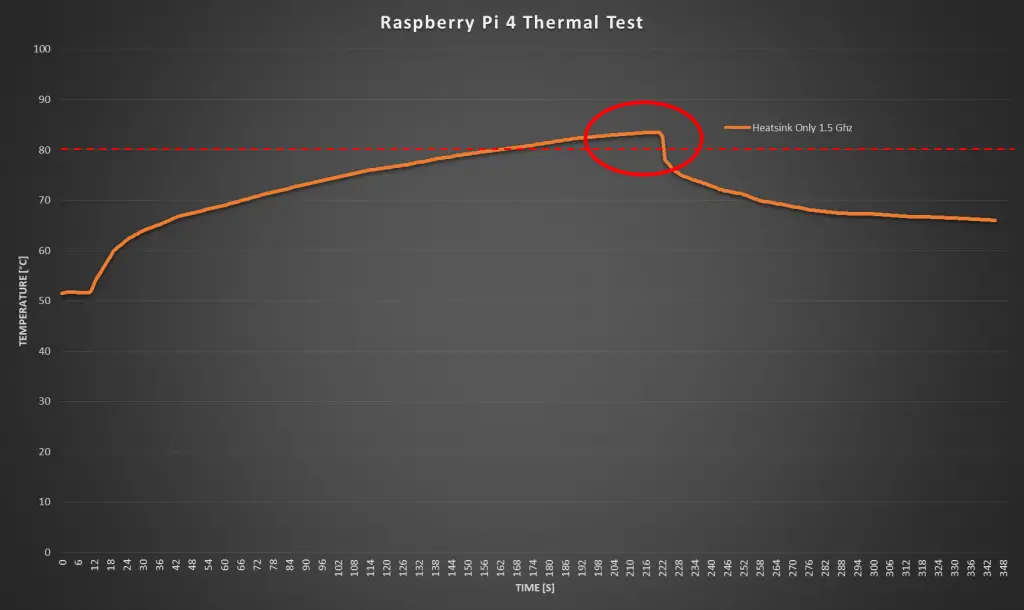
It took around a minute and forty seconds before the CPU was at 80 degrees and the performance started getting throttled.
There isn’t much point in continuing the test once we’ve hit 80 degrees as we’re then losing CPU performance and the temperature will just stay around 80 degrees as the Pi manages the CPU load.
So, I stopped the test and you can see that the temperature initially dropped off quite quickly, but flattened out after another minute or so to around 65 degrees. So it would take a long time to get back down to the 50 degree starting temperature.
Next I increased the clock frequency to 2.0Ghz.
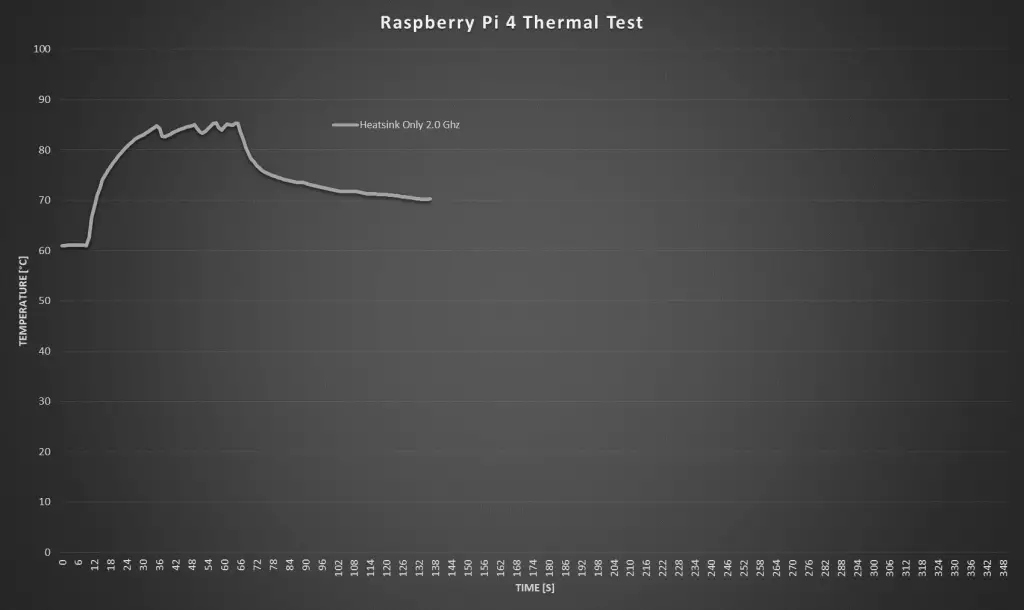
Running at 2.0 Ghz, we had a starting temperature of around 61 degrees at idle, which is already pretty high. It only took about 10 seconds to reach 80 degrees once the test was started.
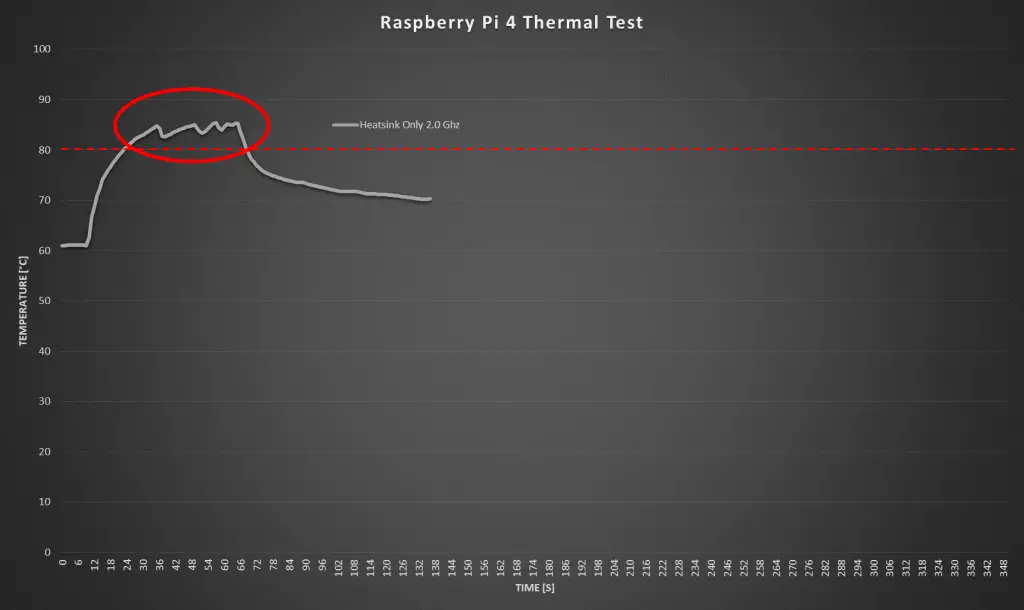
You can also clearly see the Pi throttling the CPU performance on this graph.
The cool down curve after the test is quite similar to the 1.5 Ghz test, flattening out at a slightly higher temperature than at the start of the test.
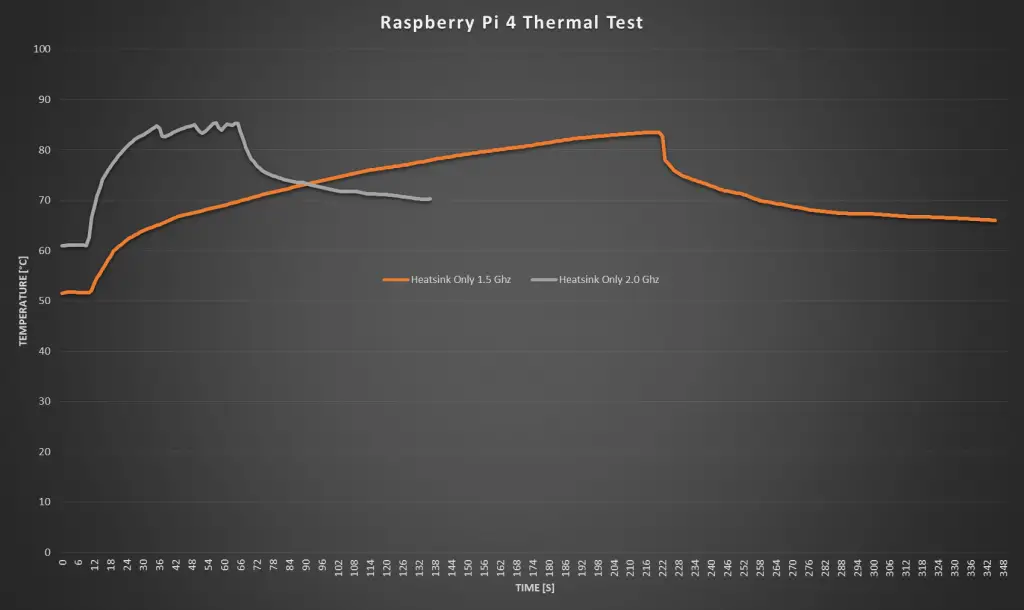
Here are the two heat sink only graphs plotted together. You can see how much faster the 2.0Ghz test increased the CPU temperature, it’s basically unusable without any active cooling.
Testing The Fan Case
Next let’s move on to the fan case.
I typically enjoy making my own cases for Raspberry Pi’s, but I had this one from an earlier version Pi lying around, so I just opened up the cutouts for the HDMI ports on the side to make it fit.
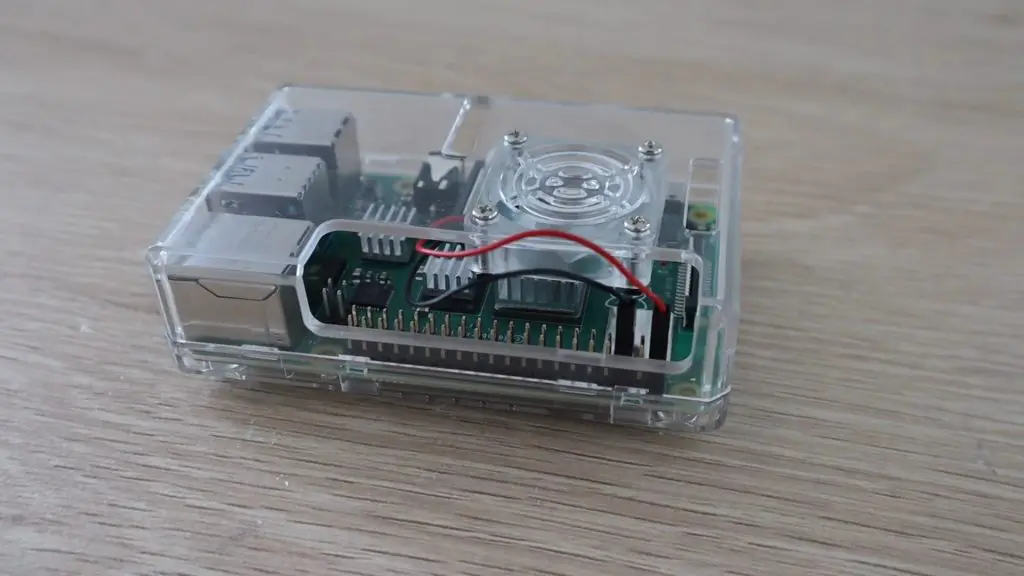
The fan and CPU are in the same place, so the fan is blowing down directly onto the CPU heat sink. These acrylic cases with fans as also quite a cheap option and usually range between $5 and $10 for a case, including the fan and heat sinks.
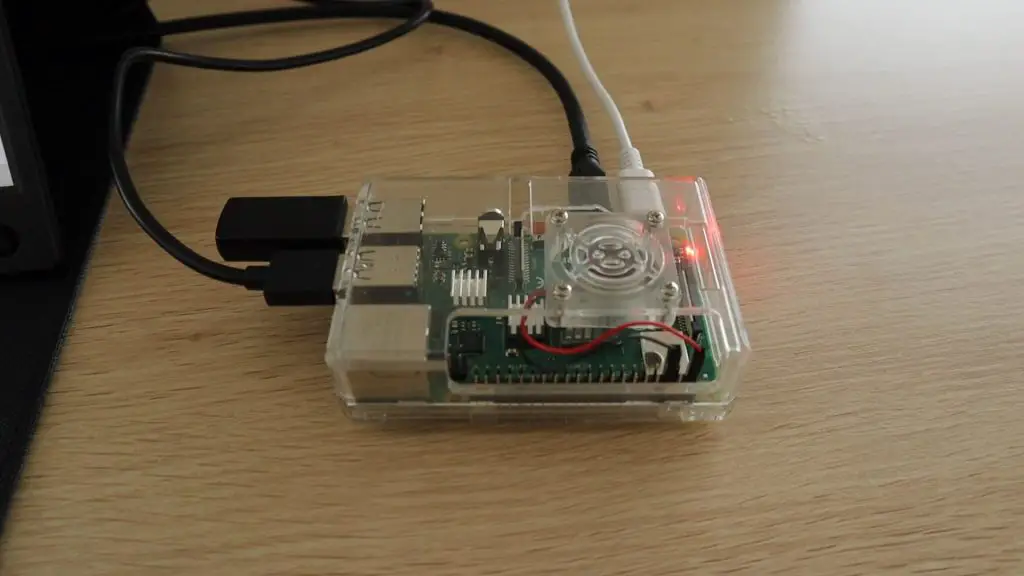
These small fans are quite noisy, so it can be distracting if you’re just using your Pi as a desktop computer or you use it as a media player on your TV. Have a listen to the sound it makes in the video at the beginning of this post.
Let’s see how effective the fan is at keeping the CPU cool.
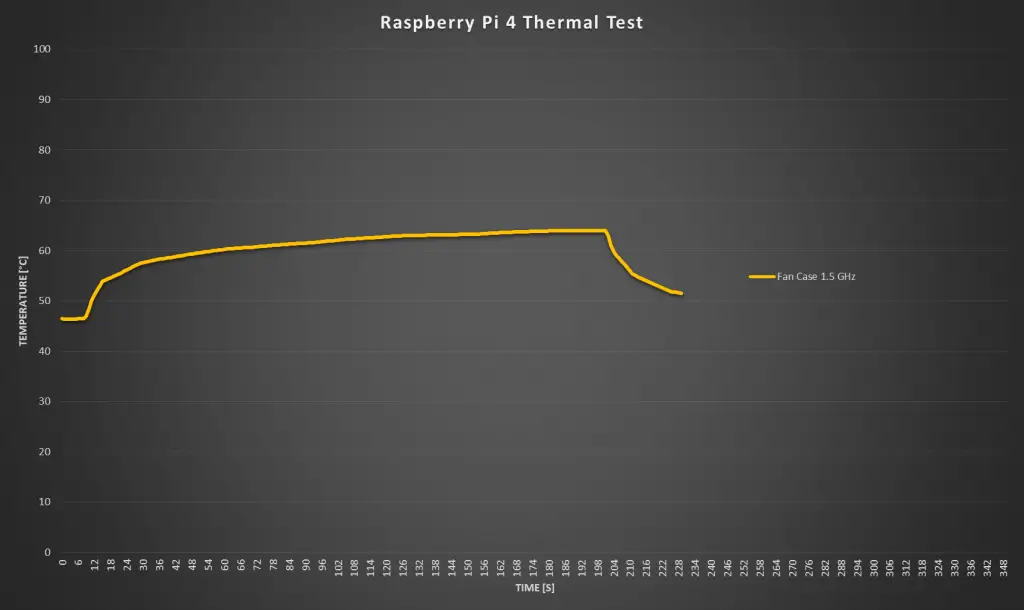
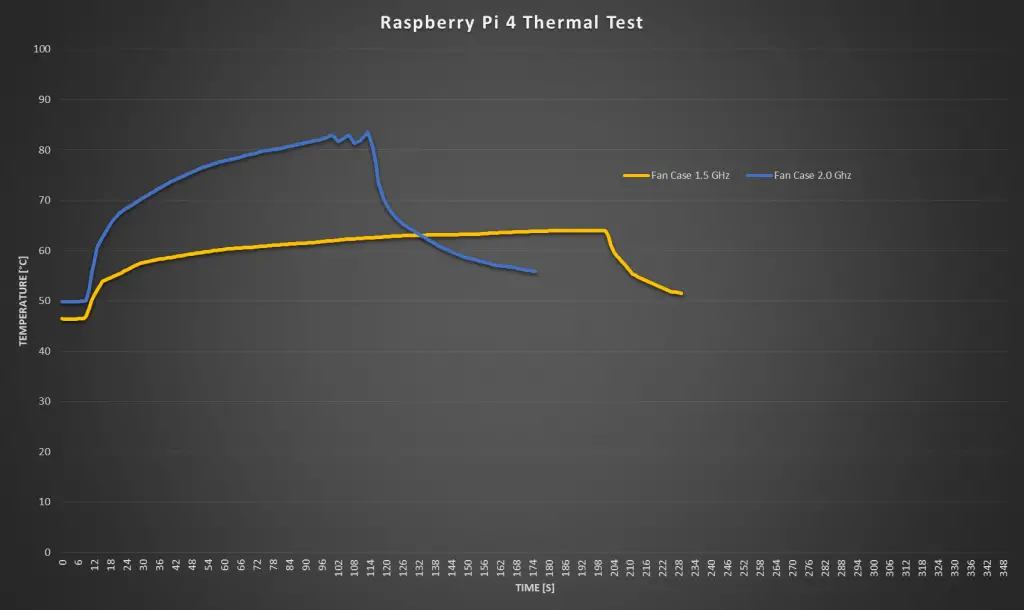
The fan has already helped reduce the starting temperature to a lower, 46 degrees. I was then able to run the test for a full three and a half minutes without the Pi overheating. The temperature seems to stabilise around 65 degrees. The temperature also drops off much faster now once the test is stopped.
So you can comfortably use your Pi at any CPU load in a fan case at 1.5 Ghz.
Now let’s try overclocking it to 2.0 Ghz and see if the temperature still stays under 80 degrees.
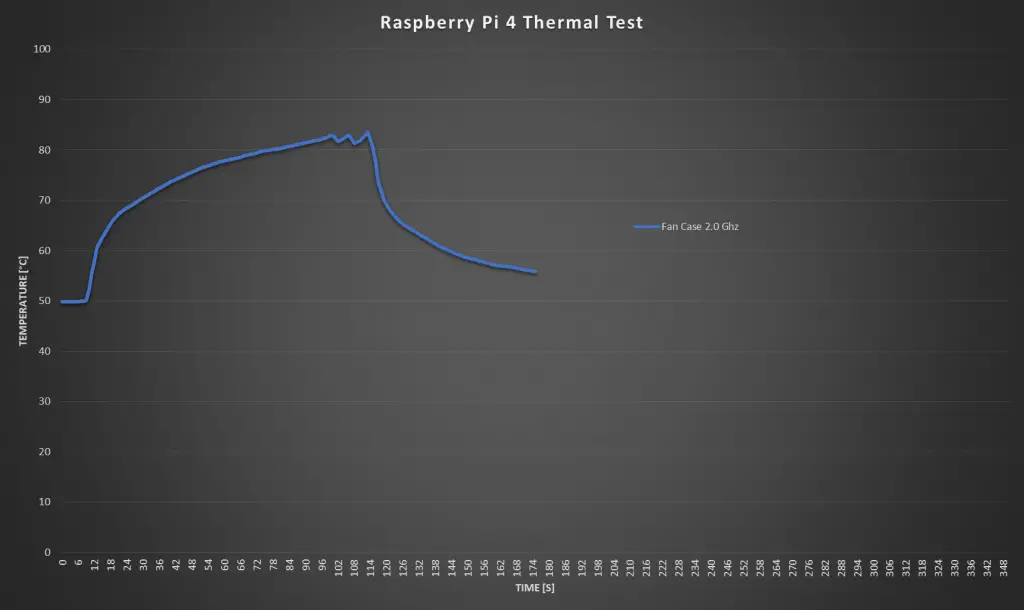
The idle temperature at 2.0 Ghz increase a little, to 50 degrees and unfortunately we weren’t able to complete the test at 2.0 Ghz.
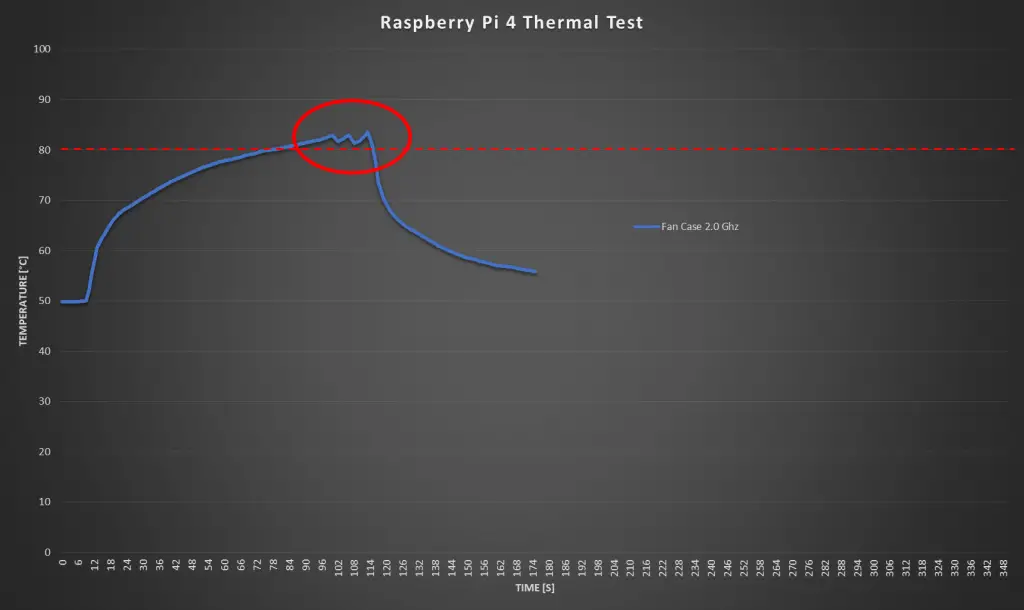
The Pi overheated a little over a minute into the test and started throttling the CPU performance. There was still a sharp drop in temperature once the test stopped, so the case fan helps quite a bit, but is not an effective option if you’re going to be overclocking your Pi.
Here is a comparison between the two tests with the fan case.
Testing The Ice Tower
Now lets have a look at the Ice Tower.
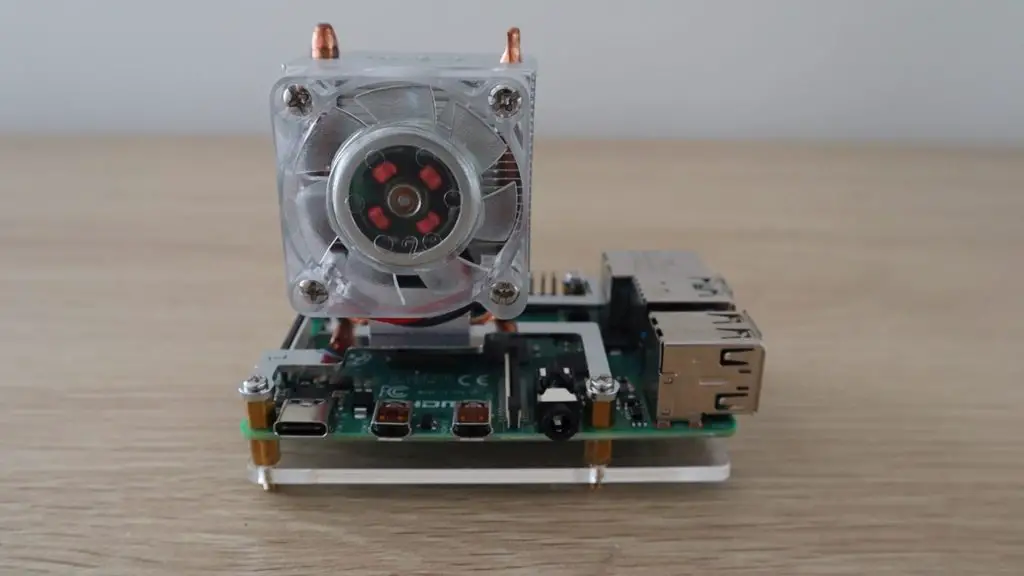
This has become a popular option for Raspberry Pi cooling, and they make a low profile version now too. They also quite affordable, costing around $20 to $25. The Ice Tower has a much bigger heatsink with heat pipes to a large radiator with a significantly larger fan than the case.
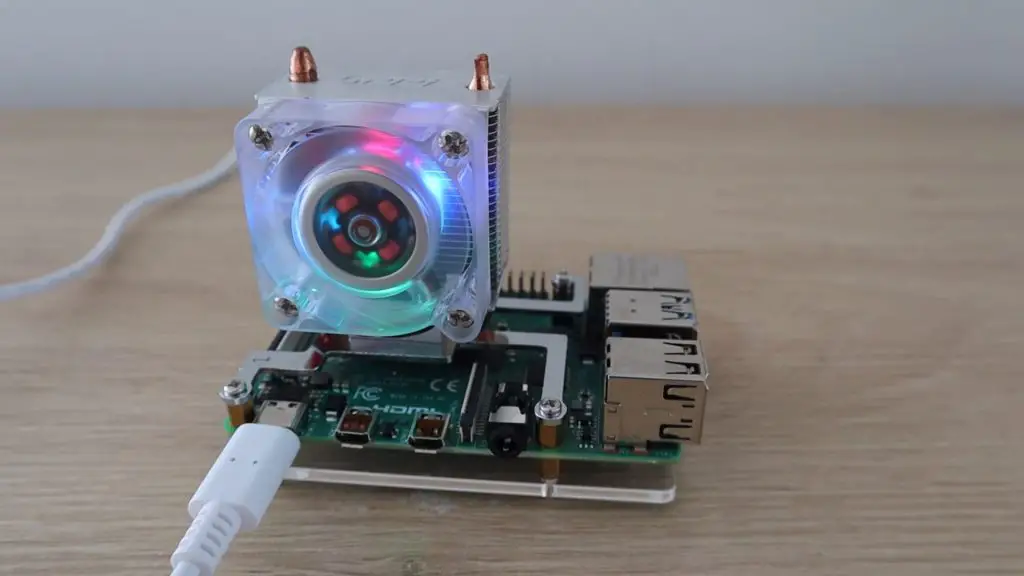
The Ice Tower is also quite loud, its about the same sound level as the case fan, so let’s see if it does better in the thermal test.
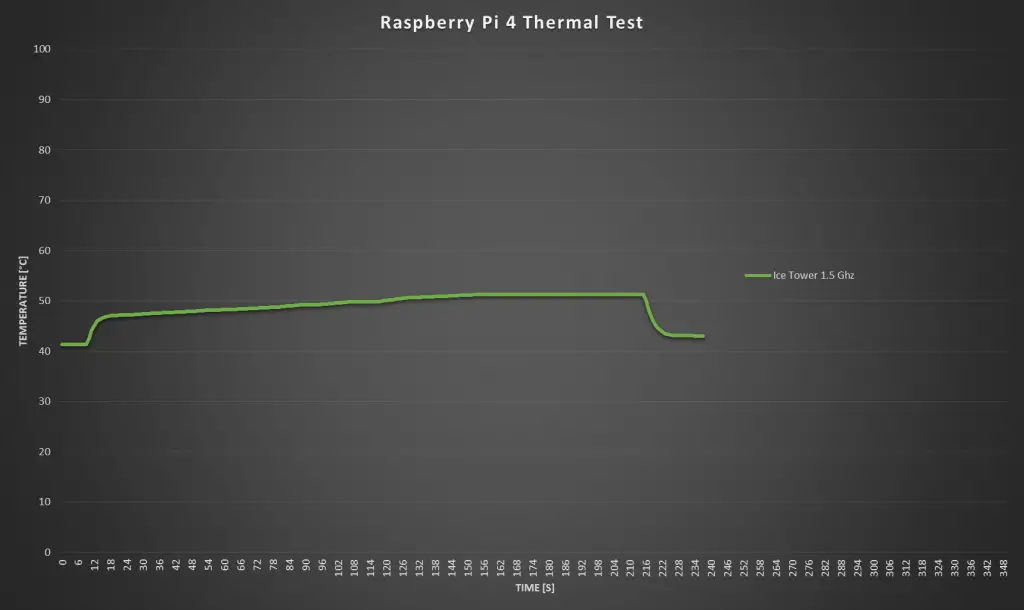
Our starting temperature is now lower than with the case, at just 41 degrees and I was able to run the test for the full three minutes and it only went slightly over 50 degrees. This is more than a 10 degree difference over the fan case. You can also see that the temperature returns to almost the same as the idle temperature just 20 seconds after the test is stopped, which is the quickest so far.
The Ice Tower is looking promising for overclocking, so lets try taking it up to 2.0 ghz.
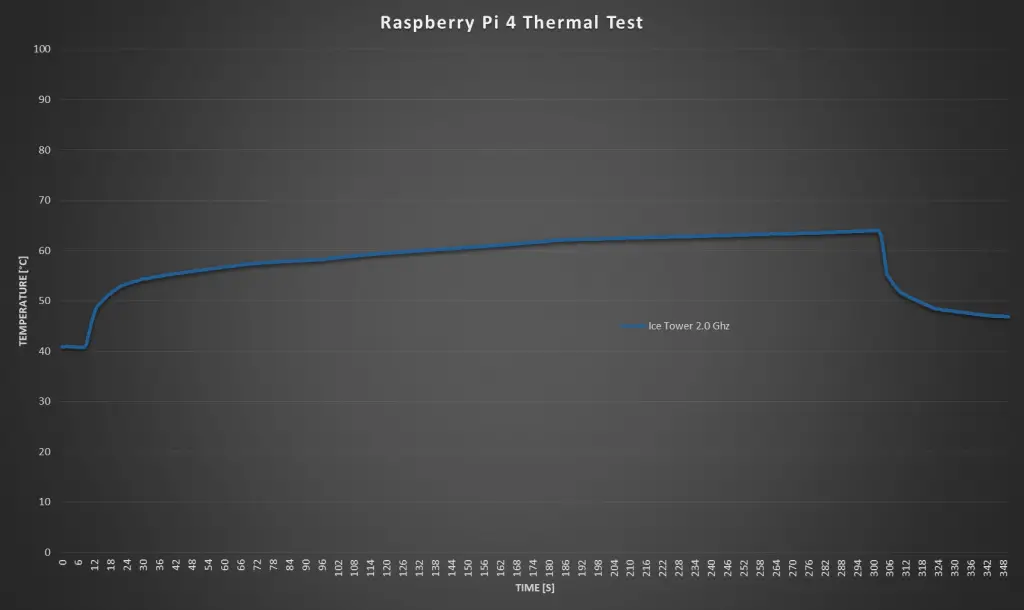
There wasn’t much difference between the idea temperature at 1.5 Ghz and at 2.0 Ghz, at 2.0 Ghz we again started around 41 degrees.
The Ice Tower managed the full run of 3 minutes without going much over 60 degrees, but it looked like it was still steadily increasing. So I left it running for a further 2 minutes to see how it went and it started flattening out at about 65 degrees.
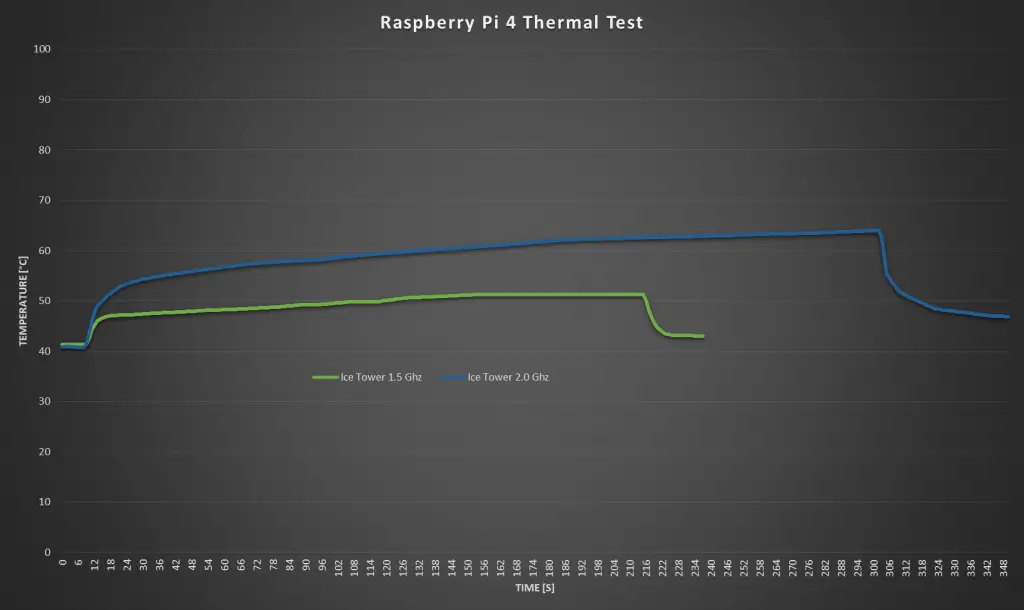
So an Ice Tower is a great option for Raspberry Pi cooling, even when overclocked. It is quite a lot more than the previous two options and you’ll still need to get a case or cover for your Pi, but there are a few options available with a cutout specifically for the Ice Tower.
Testing The Water Cooled Pi
Now let’s look at the final option, the water cooling system which I built for mine.
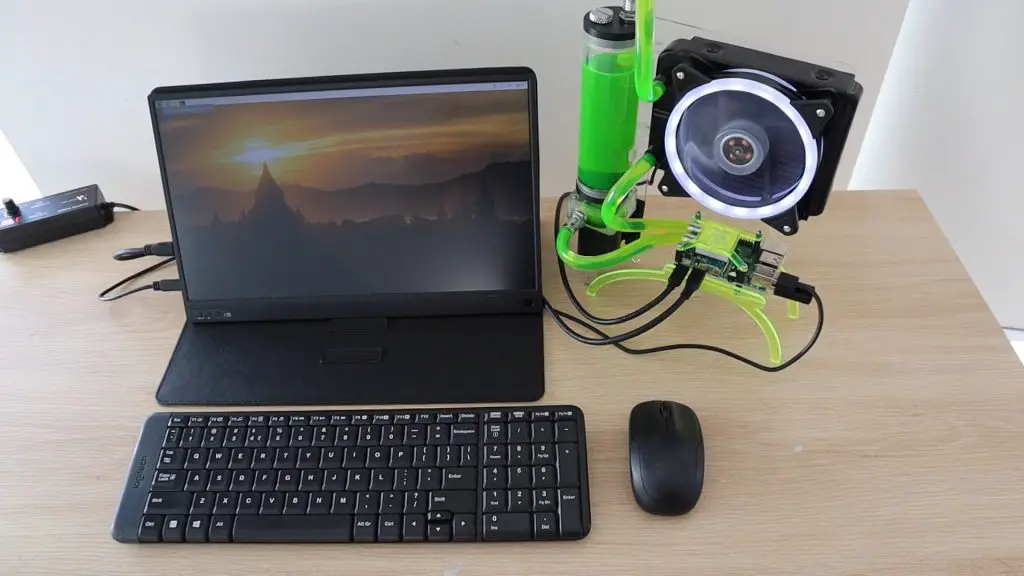
This setup is by far the largest and the most expensive. The cooling system cost around $100 for all of the parts to assemble it and this was using a cheap non-name brand kit, which is definitely not the best quality.
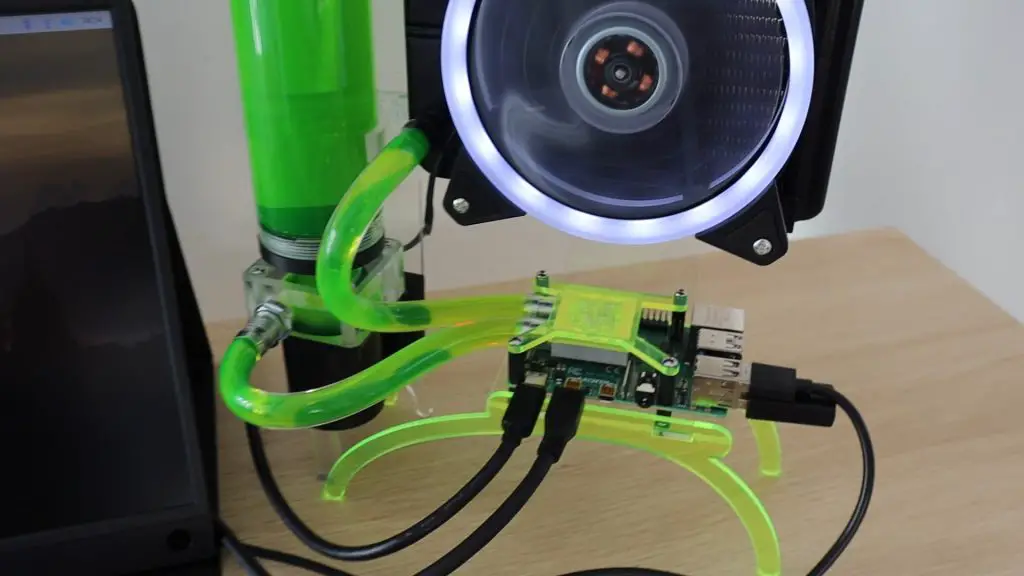
One benefit of this setup is that it is much quieter than the fan case or the Ice Tower, as the larger 120mm fan turns much slower.
Let’s see how the water cooled setup does in the thermal test.
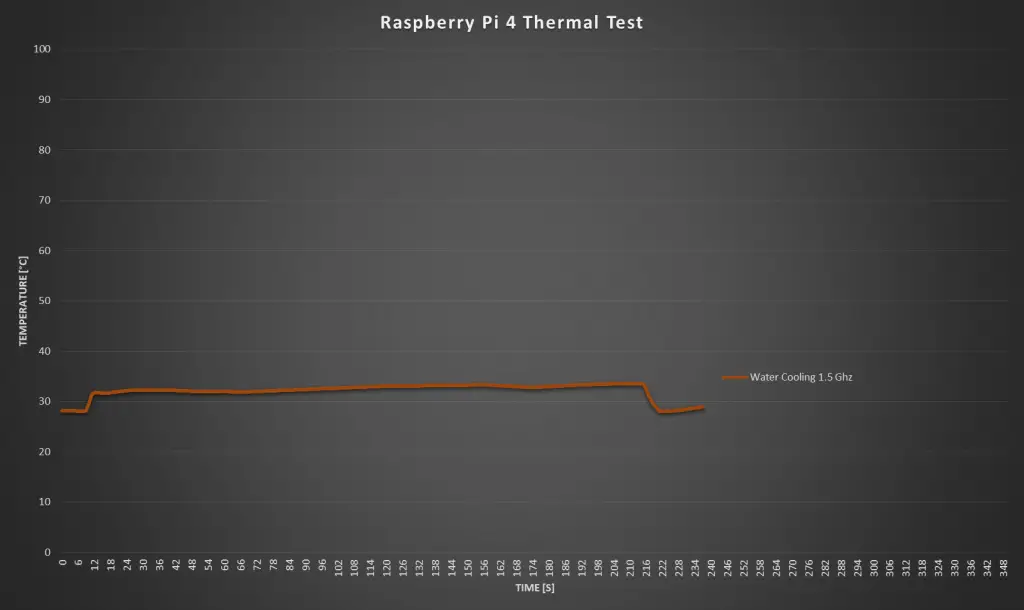
Starting with the 1.5 Ghz test, the idle temperature is now just 28 degrees, which is over 10 degrees lower than the Ice Tower and 20 degrees lower than the heat sink option.
There was a noticeable spike in temperature when the test started, but it remains fairly constant at around 32 degrees for the three and a half minutes of the test. It also dropped back down to the starting temperature almost instantly when the test was stopped.
Now let’s try overclocking it to 2.0 Ghz.
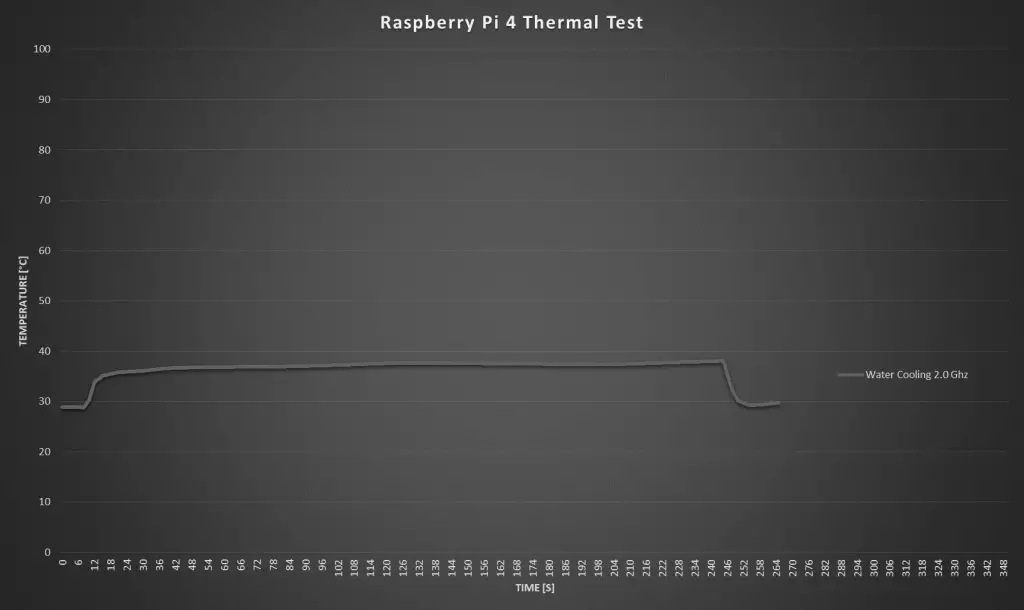
At 2.0 Ghz, we have the same starting temperature of around 28 degrees. We again have a noticeable spike when starting the test, but the temperature stays around 38 degrees for the rest of the test. I ran this test for four minutes before stopping it, and the temperature dropped off almost instantly again when it stopped.
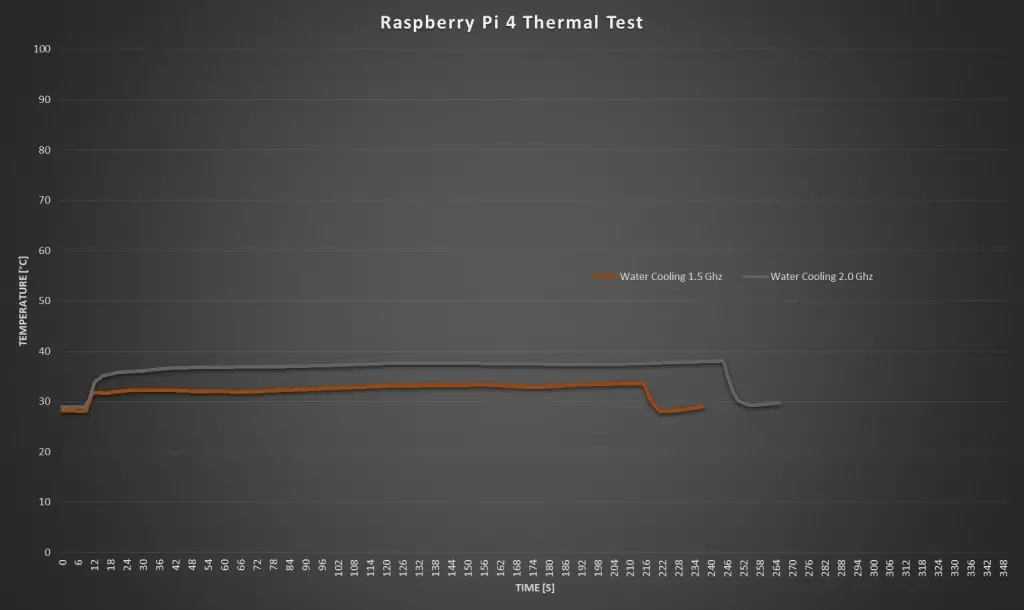
So the water cooling system definitely works the best at keeping the Pi cool and providing a much quieter cooling solution. But it is way more expensive than the other options and is much more difficult to assemble. It’s also not exactly compact, this system is a couple of times larger than the Ice Tower and that’s already considered to be a large heatsink for a Pi.
Summary Of The Raspberry Pi Cooling Tests
Here’s an overlay of all of the Raspberry Pi cooling options which I’ve tested today:
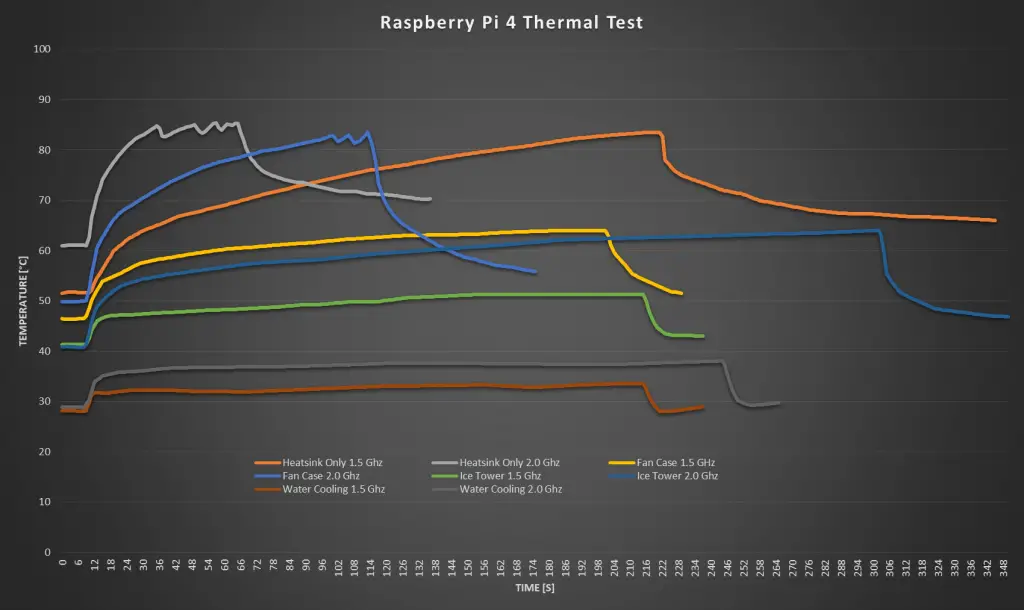
It’s quite noticeable just how much better the ice tower and the water cooling circuits are for high CPU loads, especially when overclocked. Heat sinks only and fan cases are great if you’re going to be using your Pi for light loads, such as a Pi-hole, network storage, or WiFi camera. If you’re going to be doing any CPU intensive tasks, like video editing, light gaming, or simulations then you’ll need to get a more substantial cooling solution, like the Ice Tower. And if you’re a fan of overkill like me, then you definitely need a water-cooled Pi.
Let me know in the comments section what your Raspberry Pi cooling solution is.


Curious why you say the ice tower is as loud as the case fans. I have 2 ice towers, and even with your ear next to them, you can barely hear them. As to your temps, my pi4B’s, running at 2.147Ghz, idle with the ice tower at about 28 deg. Using CPUburnA53, after 15 minutes are only at 49 degrees and no longer rising. By comparison, running stress instead of CPUburnA53, it never gets over 43 degrees. Did you use thermal compound with the ice tower, or just put it on the pi after peeling off the stick on heat sinks and leave the residue from the stick on heat sink on it?
Maybe they ship out with different fans or my case fan is unusually quiet. I have two standard Ice Towers and a Low-profile one and they’re all as loud as the case fan, maybe a dB or so less, but nothing significant. They’re definitely all audible from 3-5m away when running on my desk.
With regards to the temperatures, that’s why I’ve stated the idle temperatures as well. The idle and maximum temperature very much depend on what your ambient temperature is. These temperatures were measure in my workshop in Australia in summer, so the room temperature is around 30C to start with. The point of the test was to compare the cooling solutions against each other, not to produce the lowest result. A Pi running an Ice Tower in a 40-degree room would probably show a higher temperature than one with just a small aluminium heatsink in a 5-degree room.