Arduino is a versatile open source platform for electronics prototyping. It’s a fun, simple and powerful way for anyone to start experimenting with creating interactive projects. Here’s how to get started writing and uploading your first Arduino program, called a sketch. You can follow this link to download the developer.
What Equipment You Will Need
For this project, you will just be using the components on board and won’t require any wiring or additional electrical components.
What You’ll Need:
- Arduino (Uno is used in this project) – Buy Here
- USB A to B Cable – Buy Here
- A Computer (PC or Mac are supported)
When looking at the board, you’ll notice that there are strips of pin sockets down each side which are numbered. These pins are used by the Arduino to interact with the connected components. On the Uno board, there are 13 digital pins which can be set to on or off and used as input or outputs as well as 5 analogue pins, these are used for proportional inputs like detecting the temperature or measuring something. The remaining pins are for power supplies and then a few other functions you will most likely never need.
The Arduino Uno has a small LED attached to pin 13. As a first program, we will make this LED flash continuously.
How To Use The Arduino Software
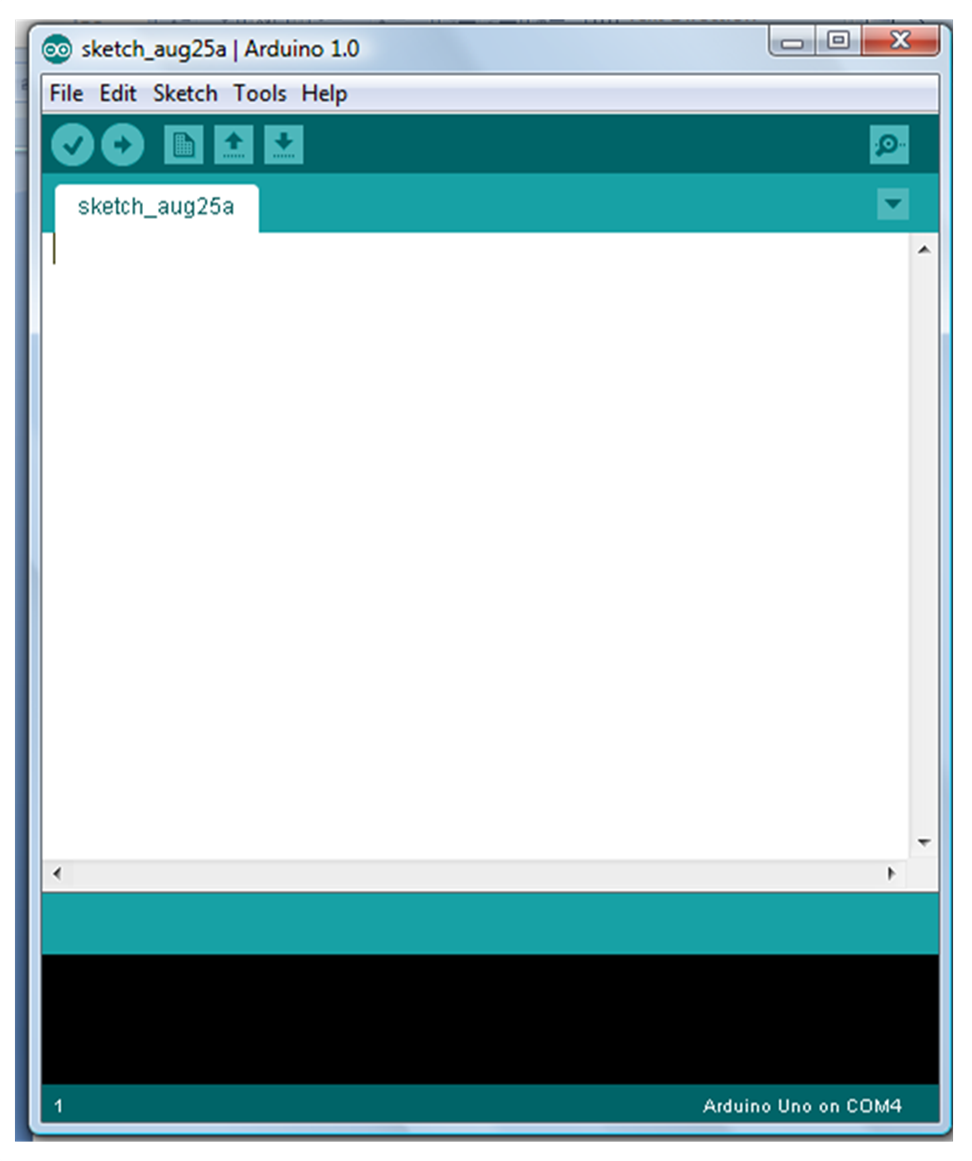
Start by opening the developer:
When you open the developer, you will be presented with a new, blank sketch. A sketch is a program which can be uploaded onto the Arduino in order to tell it what to do.
A basic sketch consists of two primary functions, the setup function which is run once when the Arduino is powered up and the loop function which is then run continuously. The setup function is therefore where you would write any setup steps and the loop function is where you would write the steps which you wish to have repeated.
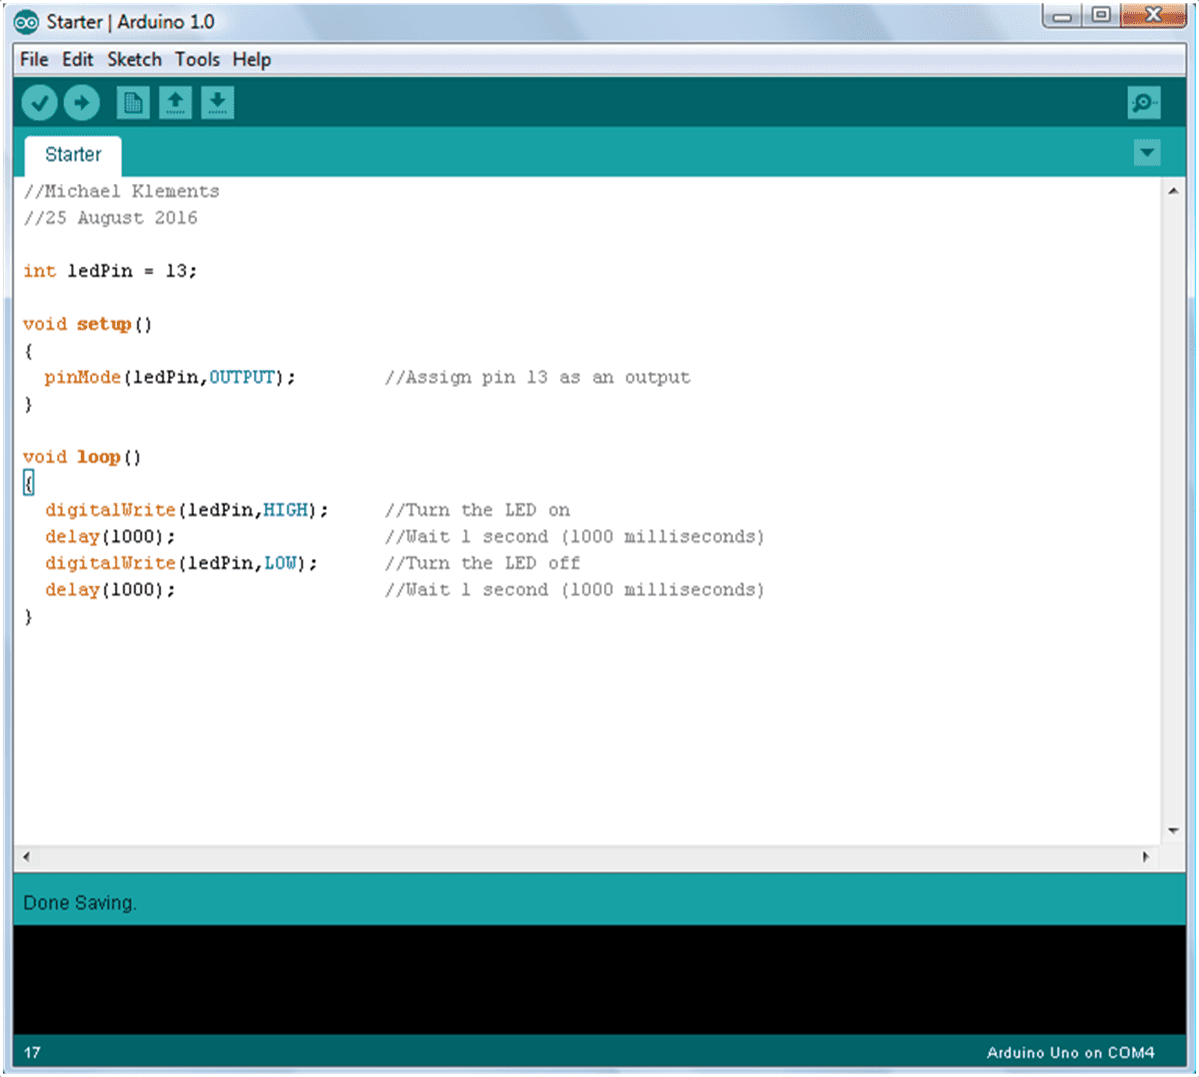
To get the LED to flash, we start by assigning a pin to each function. In this case we have the LED attached to pin 13 so we declare the variable ledPin as an integer 13. In the setup function we need to tell the processor that the ledPin is an output pin, each digital pin on the Arduino can be assigned as an input or output pin.
Finally we write the loop function. We want the LED to come on, which is done by setting the output of the ledPin to HIGH. Wait one second, 1000 milliseconds and then turn off by setting the output to LOW. We then need to wait one second again before turning the LED back on. The reason we use delays between on and off instructions is that the Arduino can run hundreds of instructions per second, without the delays it would turn the LED on and off so quickly we wouldn’t even notice it flickering. It would just appear a bit dimmer. Try this out once you have the first program running.
//The DIY Life
//Michael Klements
//25 August 2016

int ledPin = 13;

void setup()
{
  pinMode(ledPin,OUTPUT);        //Assign pin 13 as an output
}

void loop()
{
  digitalWrite(ledPin,HIGH);     //Turn the LED on
  delay(500);                   //Wait 1 second (1000 milliseconds)
  digitalWrite(ledPin,LOW);      //Turn the LED off
  delay(1000);                   //Wait 1 second (1000 milliseconds)
}
You can download the program used in the example here so that you don’t have to write it out: LED Code.
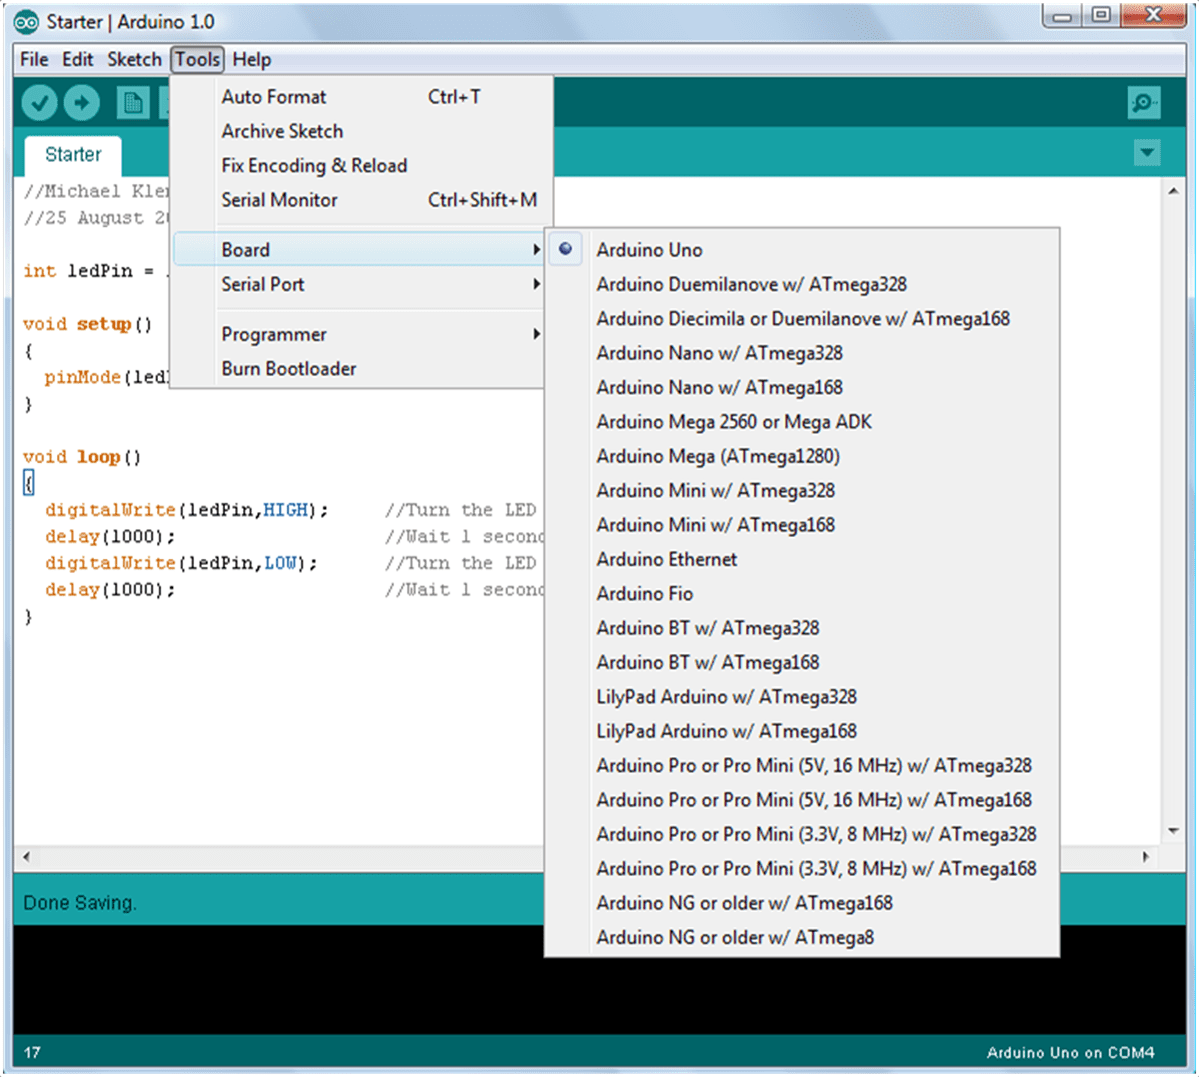
Once the code is complete, you need to upload it onto the Arduino. First go to Tools > Board and make sure that your specific board is selected. In this case the board is the Arduino Uno.
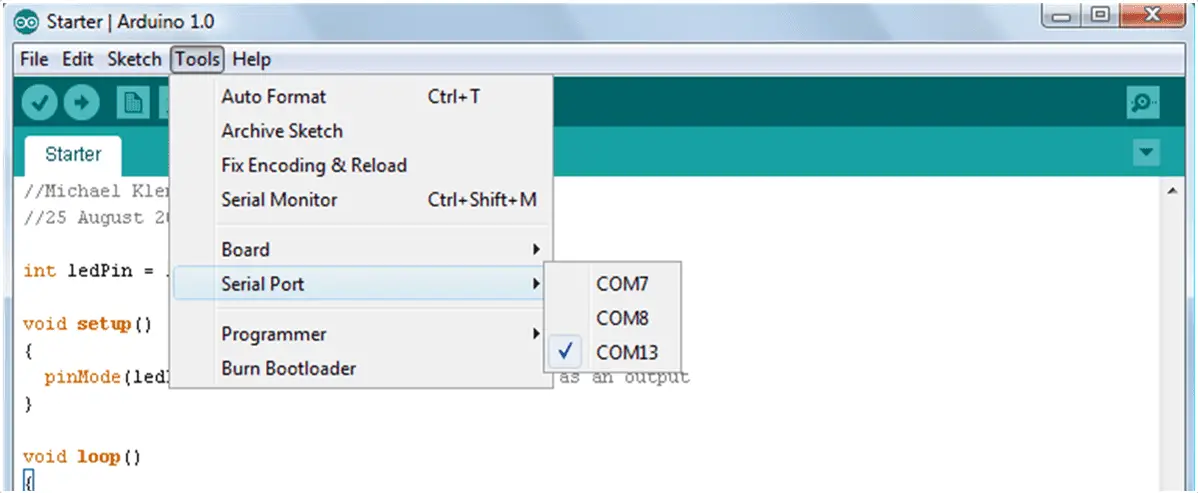
Next you need to plug the board into one of your computers USB ports using a USB A to B cable. Once the device has been detected by your computer, select the serial port on which your board is connected by going to Tools > Serial Port. If you are not sure, start from the top and try to upload the code on each. You will just get an error message about establishing communication if you select the wrong one. Alternately, go to your computers device manager, under com ports it will list your Arduino Uno and in brackets the com port on which it is connected.
Finally go to File > Upload and your developer should say compiling in the bottom left and a progress bar shows up on the bottom right. In this stage the developer is compiling your instructions into machine code which the Arduino understands. As soon as this is complete (provided there are no errors in your code), the TX and RX lights will flash on your Arduino, the developer will say uploading and the program will be uploaded. If the upload is successful, a message will be displayed in the bottom section of the developer which says Done Uploading.
As soon as the program finishes uploading, it will run the code. The TX and RX lights will go off and you should see the LED on pin 13 turning on and off every 1s.
The TX and RX lights flash during communication with the computer and finally the LED begins flashing as per the code:
Try and play around with different length delays once this program is working.
Congratulations, your just wrote and uploaded your first program onto an Arduino. Let us know if you have any queries or issues in the comments section below, we would love to help you out.


Good article!
Lucid and powerful explanation!!
Hallo Michael,
Zeker een mooie duidelijke uitleg.
Misschien is een tekeningetje van het breadboard ook wel handig.
Met vriendelijke groet
Leo
I think this is the clearest, most unambiguous ‘Getting Started with Arduino’ that I have found so far. I have looked at, and bounced off, quite a few.
I’ll let you know how I get on. I’m using a Uno connected to a Raspberry Pi.
Nik
Interesting! As soon as the UNO was connected the LED in question started to flash before anything was uploaded. This was a new UNO out of a sealed bag. Do they come with BLINK preloaded? Uploading another incidence of BLINK, but with shorter delay times, gave a faster flash rate.
Result!! The UNO and the Raspi are communicating.
That is enough progress for today. Time for a beer.
Tomorrow I will try a servo, then a stepper motor.
Just an aside. The UNO with the 28 pin thro hole chip used the port “/dev/tty/ACM0” to communicate, but those with the SM chip used the port “dev/tty/USB0”. I’ve no idea why that is.
Hi Nik,
Thanks for the great feedback and welcome to Arduino. We all remember our first sketch upload and I’m sure you’ll be kept busy for many years to come!
Yes, Arduino Unos generally come with the LED blink sketch uploaded. If you plug a new one into a power source it should start blinking the on board LED without you having to upload the sketch. I’m not sure how this originated but I would guess it has something to do with being able to do a quick test of the board without having to plug any peripherals into it.
Your PC assigns the COM port to your Arduino, it probably has something to do with the different bootloaders used on different boards and how your PC identifies it. I’ve seen some people say that their PCs frustratingly change COM ports with each sketch upload and some say that their PC identified a Due as an external keyboard.
Yes, PCs can be a mixed blessing. I couldn’t get Arduino IDE to load onto my laptop but it just fell onto a Raspberry Pi 3 with no driver problems at all. So that is what I’m using.
I soon got a servo working. Very rattly little things aren’t they. But stepper motors are proving more difficult. Full step is working very smoothly and looks good on an oscilloscope, but microstepping sounds and feels very rough and looks it on the scope. Of course it is microstepping that I want. Several things to try, so lockdown won’t get too tedious anytime soon. Not that I can see it really going away anytime soon either. No camping this year, that’s for sure.
I’ve never tried programming an Arduino on a Raspberry Pi, I’ll have to try that out!
What stepper motors and drivers are you using? I usually find microstepping at 1/8 or 1/16 steps a bit smoother but the motors do make an interesting pattern of sounds at the various step intervals.
Did all the steps above, but got an error message: Arduino: 1.8.14 Hourly Build 2020/06/24 01:33 (Windows 10), Board: “Arduino Uno”
sketch_jul10a:1:1: error: expected unqualified-id before numeric constant
4
^
C:\Users\Dan\Documents\Arduino\sketch_jul10a\sketch_jul10a.ino: In function ‘void setup()’:
sketch_jul10a:24:11: error: ‘ledPin’ was not declared in this scope
pinMode(ledPin,OUTPUT); //Assign pin 13 as an output
^~~~~~
C:\Users\Dan\Documents\Arduino\sketch_jul10a\sketch_jul10a.ino:24:11: note: suggested alternative: ‘ldiv’
pinMode(ledPin,OUTPUT); //Assign pin 13 as an output
^~~~~~
ldiv
C:\Users\Dan\Documents\Arduino\sketch_jul10a\sketch_jul10a.ino: In function ‘void loop()’:
sketch_jul10a:29:16: error: ‘ledPin’ was not declared in this scope
digitalWrite(ledPin,HIGH); //Turn the LED on
^~~~~~
C:\Users\Dan\Documents\Arduino\sketch_jul10a\sketch_jul10a.ino:29:16: note: suggested alternative: ‘ldiv’
digitalWrite(ledPin,HIGH); //Turn the LED on
^~~~~~
ldiv
exit status 1
expected unqualified-id before numeric constant
This report would have more information with
“Show verbose output during compilation”
option enabled in File -> Preferences.
This looks like you haven’t added the line int ledPin = 13; before the setup function. Or you’ve spelled ledPin differently in this line. Remember that the code is case sensitive, so LEDPin, ledPin, and ledpin are all different in the program.
Great tutorial, thanks!
Is this possible with an illuminated push button? I am unsure about the wiring to only light up the LED when that button is pressed?
Hi Dewald,
It is possible and depends on the type of push button and how many contacts it has. If your button has two contacts, you can wire the LED through one of them to illuminate it when the button is pushed. If not, you can connect the LED to the Arduino and turn it on when the button is pushed.
I’ve been cogitating during lockdown.
(They can’t get you for it in the UK, provided you keep it to six people or less from no more than two households, but NOT in your back garden. So communal winter solstice naked dancing round a bonfire, even with masks, is out of the question as well then. Pah!!)
But seriously, I’m using steppers reclaimed from surplus dot matrix printers and from a couple of new Makeblock XY V2 plotter kits from a reduced to clear bin just for the metalwork etc, with A4988 postage stamp controllers, and they didn’tlike microstepping.
Maladjustment (I just wound it up to max) of Vref was the problem.
The document POLOLU-2128.pdf describes why the active current limiting provided by the A4988 chip is a good and desirable thing, and what goes wrong if you don’t adjust Vref carefully. This information brought much needed clarity to an obscure subject.
I now know that steppers are not really the thing to move a 1.5M x 1M 300W solar panel, but that a 12V linear actuator rescued from a discarded tilt and lift armchair might do it. Whether the extra energy captured would exceed the energy needed to do the moving remains to be seen. My tent is solar powered by this panel which charges a 100AH car battery in the tent, which then operates a 12V compressor fridge, LED lighting, water pumps and the radio etc. For the first time in three years the battery didn’t make it through the night after a couple of very dull days in July. The emergency backup of charging from the car didn’t work. I’d changed the car in the interim hadn’t I. Doh!!
The MakeBlock stuff is destined to be a five axis plotter type thing that dispenses solder paste onto surface mount pcbs. But it still needs a lot of work to be done.
Hi Nik,
Haha, at least you’re managing to keep yourself busy!
Yeah, I don’t think stepper motors are well suited to anything which needs to be “on” or “held in place” for long periods of time. I think the key with a linear actuator is to make sure that it is able to hold the panel in place once it is turned off so that you’re only powering it when it is actually moving the panel. The research that I’ve done is that adding a single axis of tracking can get you an extra 15-30% out of your panel (admittedly I’ve never tested this though), so this should get you quite a bit more energy than the actuator requires.
Can i purchace the r4 board for your project? Since its not .uch more on Amazon. It has wi-fi bluetooth so i would not have to upgrade later as i progress. Iam just wondering if the r4 works with your project o want to make a solar tracker i wont have to worry about inferior electronics not tracking as well as they should. Thank youu Randy Fitzgerald
Yes the R4 is compatible with the same sketches and projects as the R3 so if you’re buying new then it makes sense to go with the R4.