Changing your vehicles motor oil is surprisingly easy and saves you time and money. You no longer need to drop your vehicle off at a service center, arrange lifts to work and collect it in the afternoon, the whole job should take less than an hour. You should be changing your motor oil every 10000 – 15000km (6000-9000miles) depending on the age of the vehicle and the driving style.
There are typically three steps in changing your motor oil, drain the old oil, replace the oil filter, refill the sump with new oil.
What You Will Need:
- Replacement Oil (Consult Your Owner’s Manual For The Type, Only Use Brand Name Oil)
- Replacement Oil Filter (According To Your Vehicle Model)
- Oil Drip Tray
- Box Wrench/Allen Key For Sump Plug
- Strap Oil Filter Wrench
Drain The Old Oil
Warning: Only attempt to drain the oil when your engine is cool, hot oil can cause severe burns.
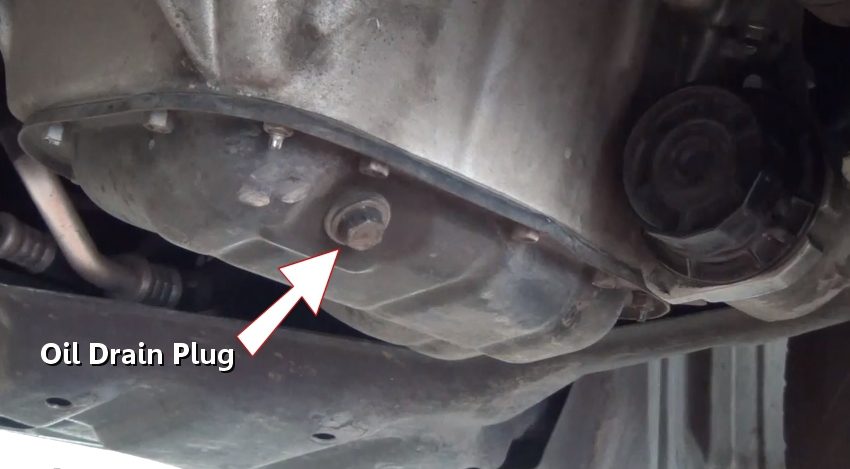
Firstly you will need to jack up your vehicle. This may not be necessary if you have an SUV or a vehicle with good ground clearance. You just need to be able to reach the sump drain plug on the bottom of the engine. Place an oil pan underneath the drain plug and then loosen and remove the drain plug with a box wrench or allen key (rotate the wrench/key counter-clockwise).
Allow all of the oil to drain out of the sump. When the oil stops dripping, replace the sump drain plug. Be careful when reinserting the plug, it should be finger tight almost all the way. If it is sticking then remove it and try again as you most likely have the threads misaligned and tightening it with a wrench will permanently damage the engine block.
Replace The Oil filter
The oil filter is typically replaced from the top of the engine. Position the oil pan on the ground underneath the oil filter. Use a strap type oil filter wrench to loosen the filter, it will also screw off counter clockwise. Replace the oil filter with a new one, screw it on until it is hand tight, again making sure that the threads are properly aligned. Once the filter is hand tight, use the strap wrench to tighten it a further ¼ turn. It is important not to over tighten the filter. If you do over tighten the filter then next time you need to change it, you will not be able to remove it.
Replace The Oil
Remove the oil filler cap on top of the engine block. There are a number of reservoirs and caps on the engine so ensure that you remove the one labelled oil. It is easiest to refill the oil with an oil funnel, place the funnel into the filling hole and pour in the oil. Look in your car’s owners manual for details on how much oil to add, most cars take around 3.5 to 5 litres of oil (4 to 5 quarts). Rather add too little, check the level and add more as necessary. When the oil sump is full, replace the oil filler cap.
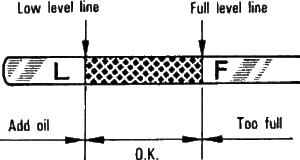
To check the oil level, remove the oil dip stick, wipe it off with a paper towel or old rag and reinstall the dip stick. Allow it to stand for a few seconds and then remove it and see how far the stick is covered with oil. There should be indicator markings on the dip stick which tell you when it is full.
Lastly you need to dispose of the used motor oil. Pour the oil out of the drip dray and into the container which the new oil came from. Take the bottle to your nearest oil recycling centre or car service centre. Do not dispose of the oil in the trash or pour it down the drain, oil is a harsh environmental contaminant and causes severe damage to the environment when disposed of incorrectly.


