If you’ve installed solar panels on a camper van to provide you with electricity on your camping trip or at home to supplement your electricity usage or take your home completely off grid then you probably know that the panels work the best when they are aligned directly towards the sun. This sounds simple enough, except that the sun moves throughout the day. This is why there are now a number of different mechanisms which work on a range of principles with the purpose of aligning your panel or array of panels directly towards the sun, called a solar tracker.
There are two principle types of trackers, single and duel axis trackers. Single axis trackers are adjusted every month or so account for seasonal changes in the suns position, the single axis is then used to track the daily movement of the sun across the sky. Duel axis trackers eliminate the need for monthly adjustment by using one axis to track the suns daily movement and another axis to track the seasonal movement. A single axis solar tracker improves solar output by around 25% and a dual axis tracker by around 40% according to this article on Altestore.
This solar tracker control system is designed to take light measurements from the east and west (left and right) side of the solar panel and determine which way to move the panel to point it directly at the source of the light. A servo is used to actuate the panel tracker; these are available in a broad range of sizes and can be scaled according to your panel size. Although this tracker is single axis, the two sensors and servo can simply be duplicated to provide dual axis control.
This project assumes you know the basics of Arduino programming, otherwise read our article on getting started with Arduino.
You could also take this project further by building your own solar panel as well, here is our guide on how to build a solar panel at home. If you are thinking of switching some or all of your homes power requirements to solar power, read our article on switching to solar power first.
Update: After numerous requests to include information on the modifications required to the circuit as well as to the code needed to drive a linear actuator for heavier panels or arrays of panels, the article is now available – Arduino Solar Tracker – Linear Actuator
What You Will Need For A Solar Tracker
- An Arduino (Uno used here) – Buy Here
- Single Axis Tracking Stand (Brief DIY Design Shown Below)
- 2 x 4.7K Resistors – Buy Here
- 2 x LDRs – Buy Here
- PWM Servo – Buy Here
How To Make The Control System
First you need to start by assembling the components onto your solar panel, or breadboard. The LDRs (light dependent resistors) or PRs (photo-resistors) change resistance with changing light, therefore they need to be connected in such a way that the changing resistance is converted into a changing voltage signal which the Arduino understands. The servo is controlled through one of the Arduino’s PWM outputs.
Assemble the Components
If you are going to be installing the solar tracker permanently then you may want to solder the resistors and LDRs together so that they cannot come loose. If you are simply trying this project for fun then a breadboard is perfect.
The basic circuit for the connection of the LDRs and servo to the Arduino is shown below:
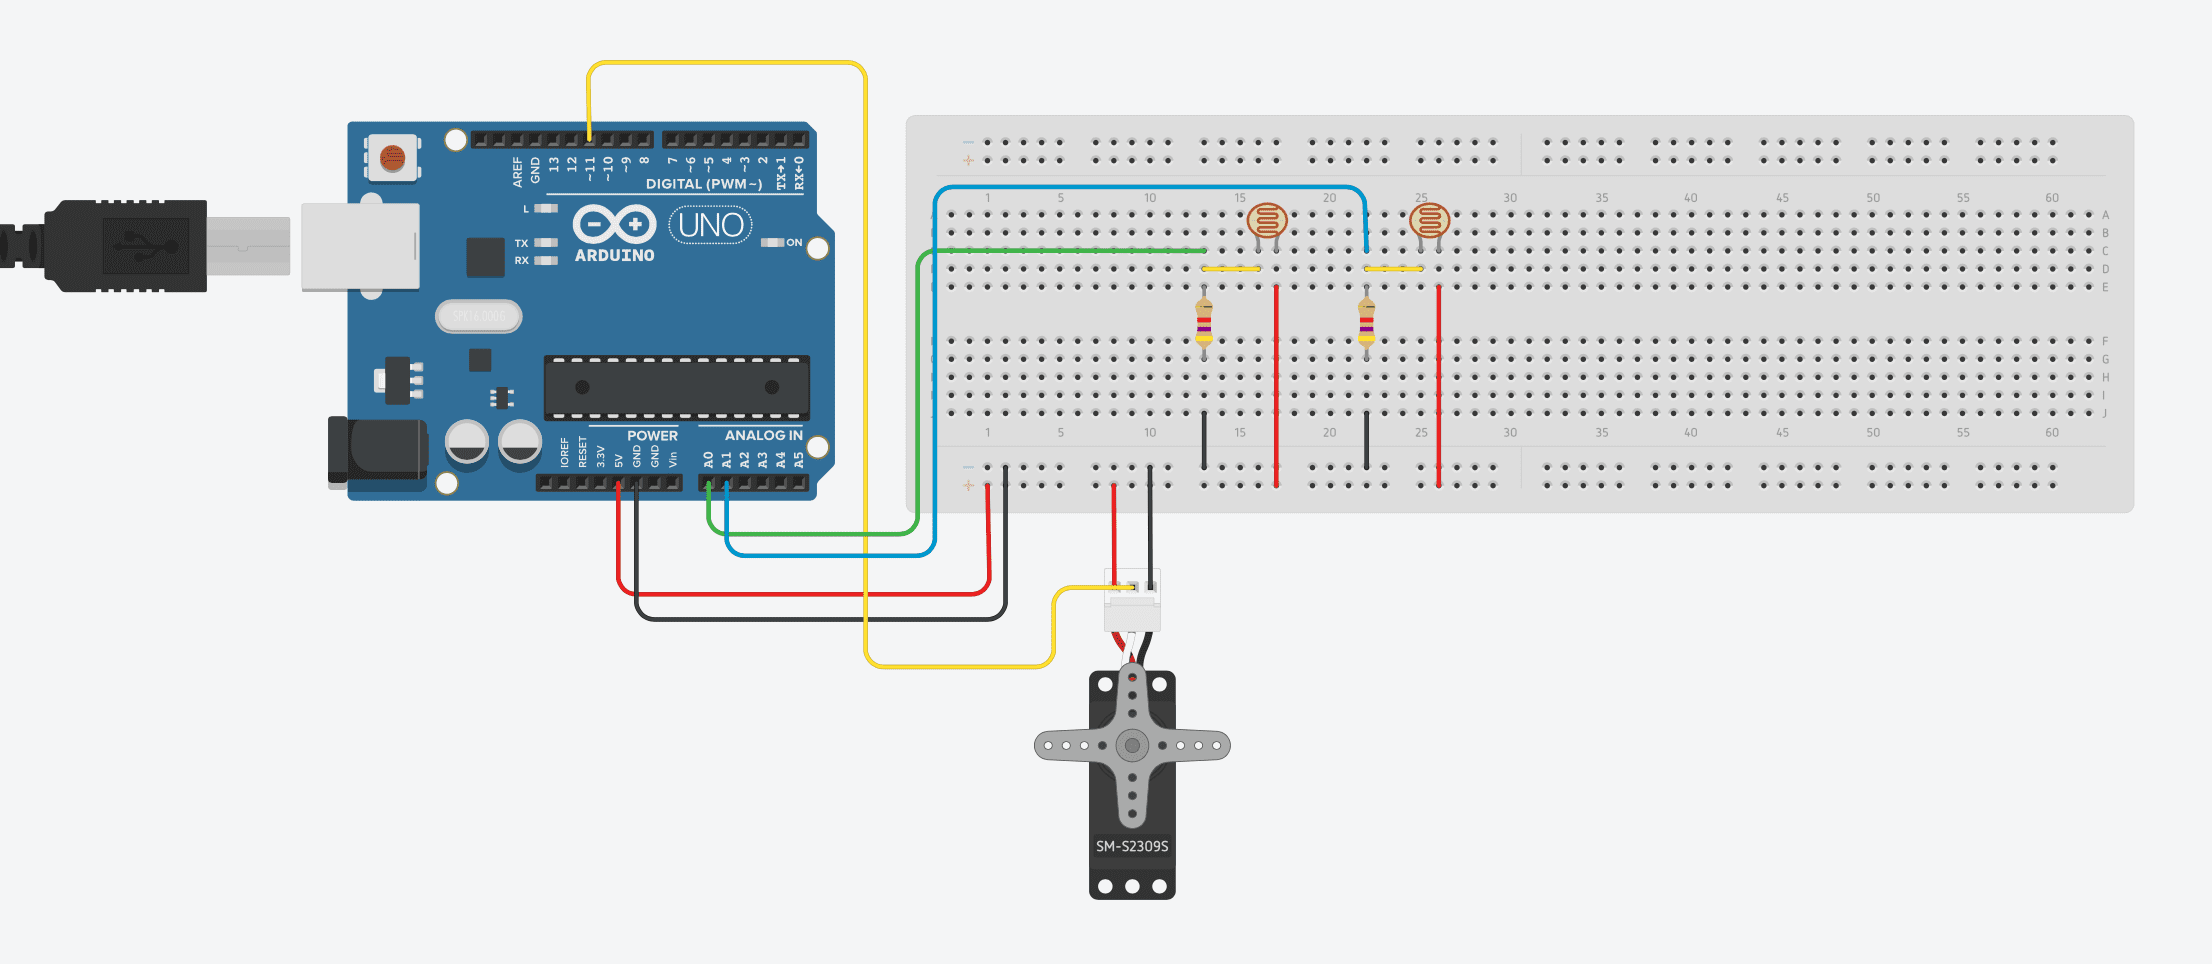
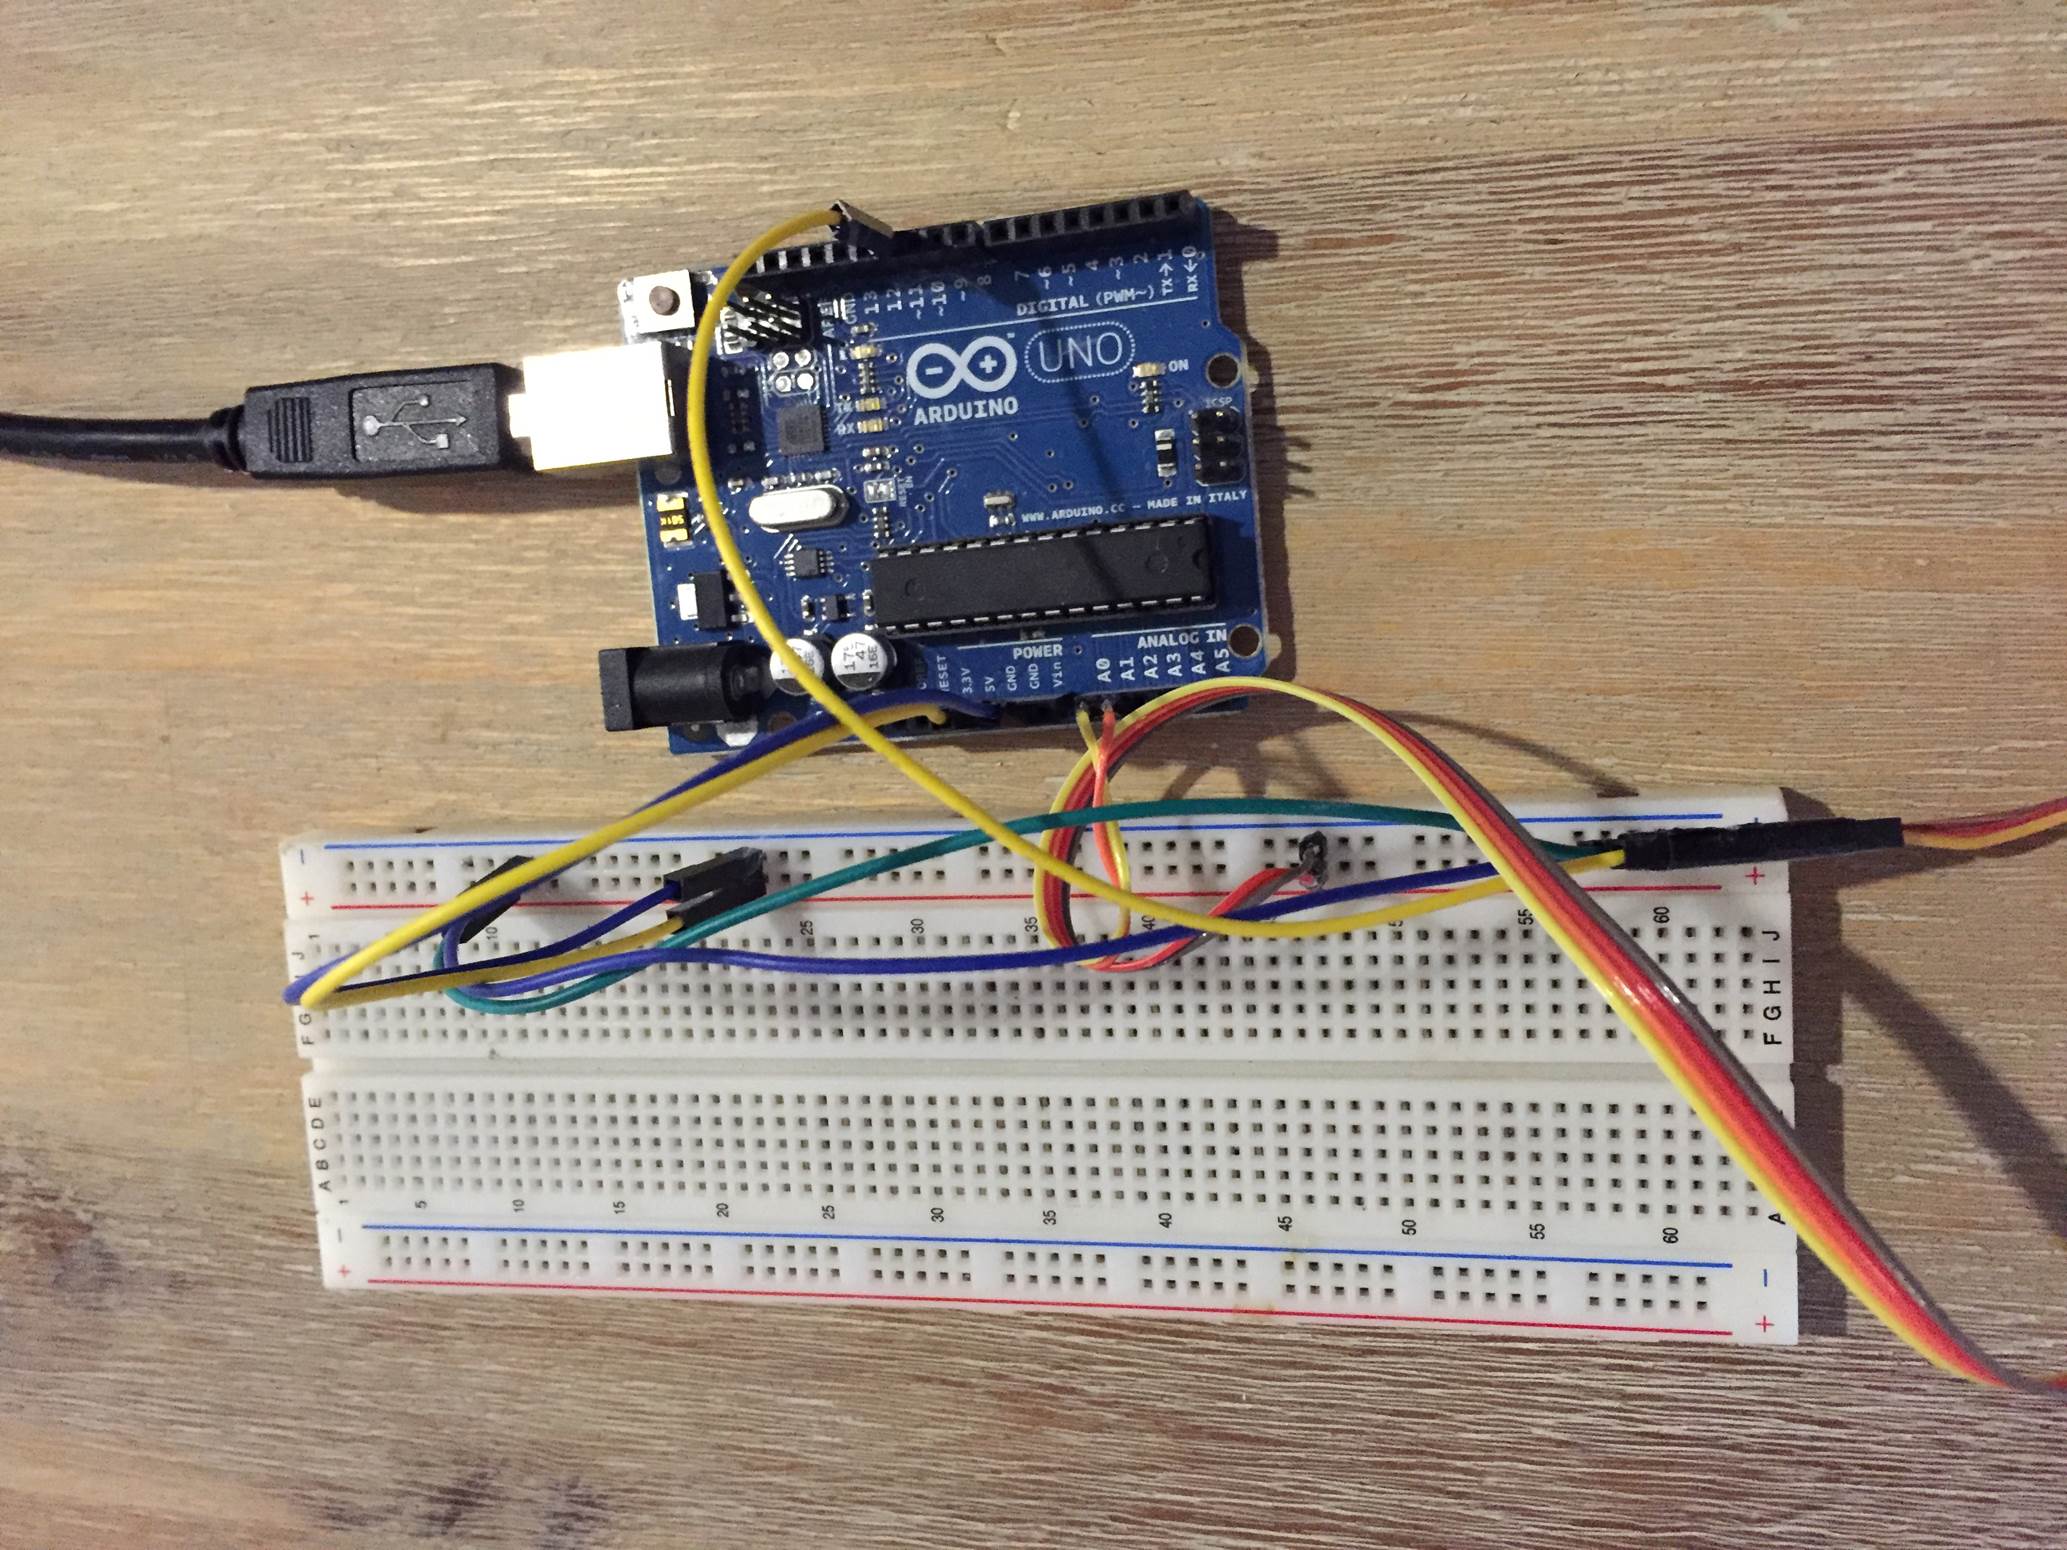
A breadboard connection diagram is shown below:
The resistors R1 and R2 are each 4.7K, the PR1 and PR2 are the two LDRs and the servo can be any PWM hobby servo. If you are using a servo larger than 9 grams then the Arduino will probably not be able to supply it enough power to achieve its full torque capability, you will need to supply the servo directly with its own 5V power source.
If you are making this a permanent installation, then it is best to solder the resistors right up near the LDRs on the panel. This way you can run a single 4 core wire from the control box up to the sensors on the panel, the four cores will be 5V, Gnd and then signal 1 and 2 from the LDRs. Once your LDRs and resistors have been soldered together, you can mount them on your solar panel. Mount the LDRs on the east and west (left and right) sides of the panel facing towards the sun. Make sure that they are not shaded in any way by the frame and have an unobstructed view of the sun.
A breadboard has been used in this project purely to distribute the Ardunio’s 5V power supply to both the resistors and the servo.
The servo needs to be sized according to the size of your solar panel. The panel used in this example is small and relatively light; a small servo was therefore used and is powered by the Arduino. For a larger servo (anything above 9 grams), you will need to power the servo externally as the Arduino doesn’t have sufficient capacity for it. Make sure that you connect the external power sources ground to the Arduinos GND as well otherwise the PWM control signal to the servo will not work.
Upload the Sketch
Now you can upload your sketch onto your Arduino, if you haven’t uploaded a sketch before then follow this guide on getting started.
//The DIY Life
//10 October 2016
//Michael Klements

#include <Servo.h>

Servo tracker;  // create servo object to control a servo
int eastLDRPin = 0;  //Assign analogue pins
int westLDRPin = 1;
int eastLDR = 0;   //Create variables for the east and west sensor values
int westLDR = 0;
int error = 0;
int calibration = 204;  //Calibration offset to set error to zero when both sensors receive an equal amount of light
int trackerPos = 90;    //Create a variable to store the servo position

void setup()
{
  tracker.attach(11);  // attaches the servo on pin 11 to the servo object
}


void loop()
{
  eastLDR = calibration + analogRead(eastLDRPin);    //Read the value of each of the east and west sensors
  westLDR = analogRead(westLDRPin);
  if(eastLDR<350 && westLDR<350)  //Check if both sensors detect very little light, night time
  {
    while(trackerPos<=160)  //Move the tracker all the way back to face east for sunrise
    {
      trackerPos++;
      tracker.write(trackerPos);
      delay(100);
    }
  }
  error = eastLDR - westLDR;          //Determine the difference between the two sensors.
  if(error>15)        //If the error is positive and greater than 15 then move the tracker in the east direction
  {
    if(trackerPos<=160)  //Check that the tracker is not at the end of its limit in the east direction
    {
      trackerPos++;
      tracker.write(trackerPos);  //Move the tracker to the east
    }
  }
  else if(error<-15)  //If the error is negative and less than -15 then move the tracker in the west direction
  {
    if(trackerPos>20)  //Check that the tracker is not at the end of its limit in the west direction
    {
      trackerPos--;
      tracker.write(trackerPos);  //Move the tracker to the west
    }
  }
  delay(100);
}
Here is the link to download the Solar Tracker code.
Calibrate the Sensor Error
Because of differences between the LDRs, resistors and the resistance of the wire used, there will be a difference between the signal received from both sensors even when they are receiving the same amount of light. This is taken into account by introducing a calibration offset into the calculation, this number will need to be adjusted in your code according to your setup. Adjust this calibration factor where it is declared in the code,
Line 13: int calibration = 204.
The most accurate way to determine this factor is to shine a light equally between both sensors and then use the Serial monitor on your computer to read the values output by the east and west sensor. The difference between these two values will be the calibration offset. The LDRs are very sensitive so the tracker only moves when the difference between them is greater than 15 in the code otherwise it would be continuously tracking forwards and backwards and wasting power.
If you are not familiar with the Serial interface then you can play around with this value until the tracker remains still when a light is shined equally onto both sensors.
Making A Single Axis Tracking Stand
While this article is not intended to detail making a tracking stand because of the extremely diverse range and size of panels available, here is a brief outline on the design along with some key pointers.
Your stand should look something like this when it is complete:
Ideally the stand should be made from aluminium angle as it is strong, durable and suitable for outdoor use but it can also be made from wood, plywood or PVC piping.
The stand is essentially made in two parts, the base and the panel support. They are joined around a pivot point on which the panel support rotates. The servo is mounted onto the base and the arm actuates the panel support.
The panel should protrude from the panel support as little as possible to keep the out of balance load on the servos to a minimum. Ideally, the pivot point should be placed at the centre of gravity of the panel and panel support together so that the servo has an equal load placed on it no matter which direction the panel is facing although this is not always practically possible.
Two servos may be used for heavier panels, one on each side of the panel. The geometry needs to be the same and the servos need to be the same type/model. You can then duplicate the servo code in the software so that both servos are given the same reference position and move together to actuate the panel.
For very heavy panels or for solar arrays, the servos will need to be replaced with stronger stepper motors. The stepper motors will need to be driven by a driver board such as this one.
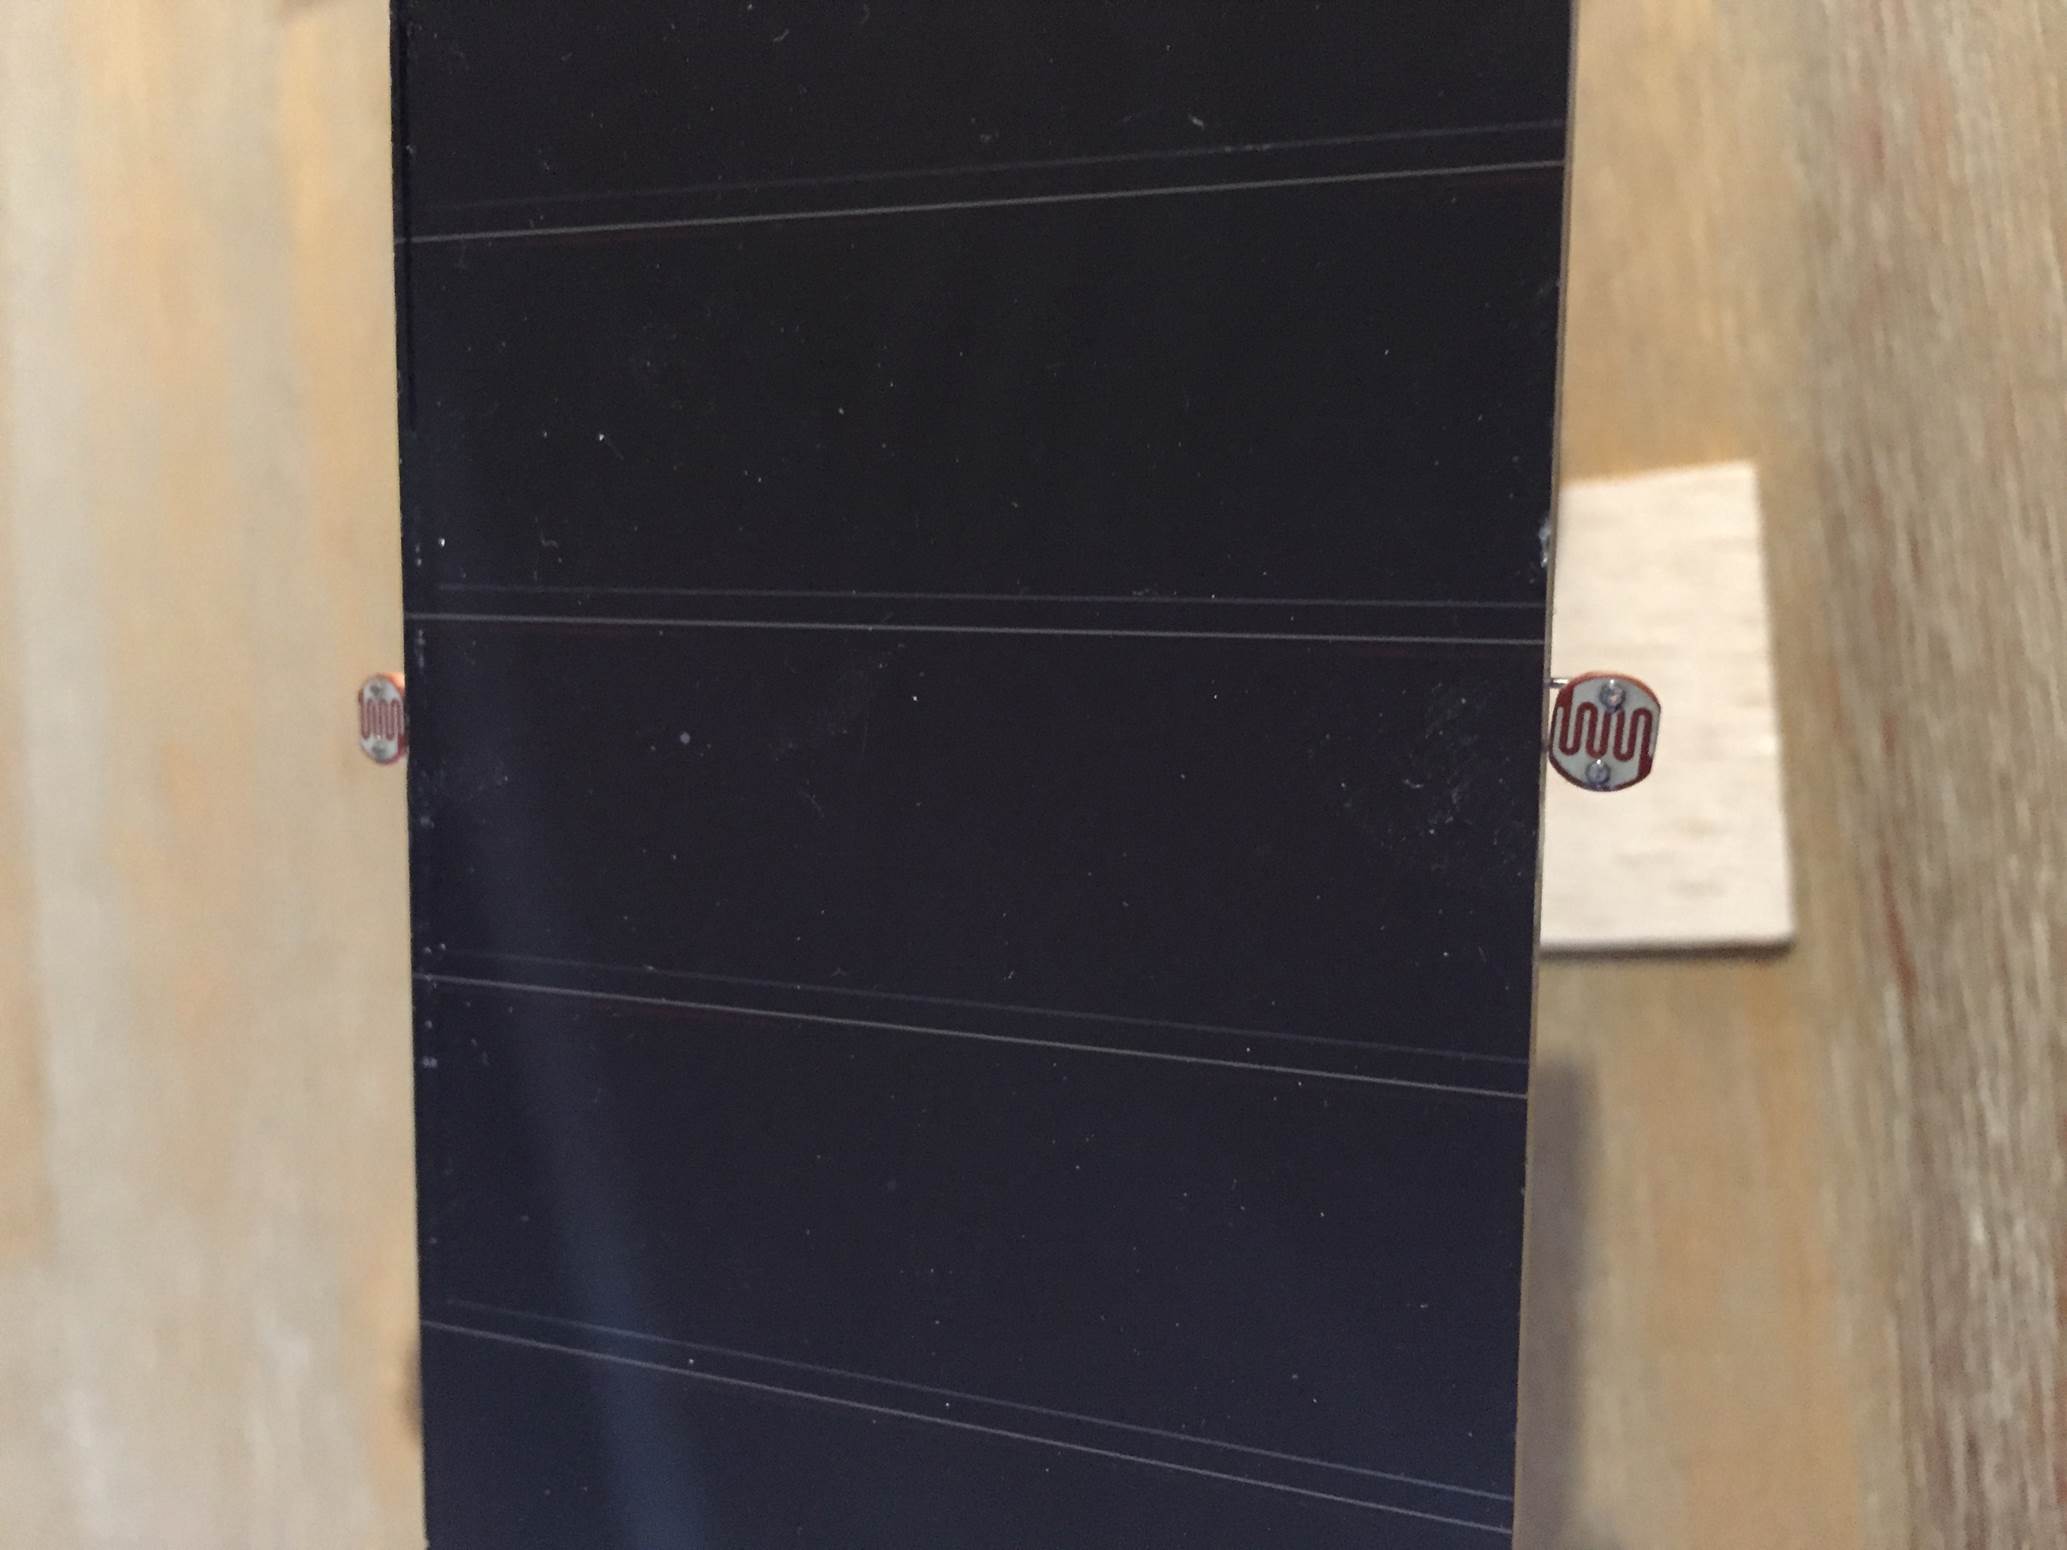
The stand used in this guide to test the concept and the code has been made up using a camera pan and tilt bracket which was then glued onto a wooden base. Here are some close up photos of the stand.
The Solar Tracker In Operation
Here is a video of the solar tracker in operation indoors with a torch being used to simulate the movement of the sun:
Would you like to learn more about this project? Are you interested in projects similar to this one? Then Practical Arduino Projects is the book for you, available now on Amazon as an eBook or in Print form.
Have you tried out making your own solar tracker? Let us know your experiences, tips and tricks in the comment section below. We would love to see your project as well.


sir what is the project cost
It depends on the size of your solar panels. The tracker in this guide along with the stand and Arduino cost around $25.
I am very interested in this project for camping.
How much power will the system take to run all day? I’m just learning about arduino
Is there a way of monitoring the power ( live) that the solar panel is producing?
Hi Bob,
It depends on the size of your solar panel but it won’t be more than a couple of watts, the motor/servo is only running for a few seconds every ten to fifteen minutes or so.
Yes you could measure the power being produced by the solar panel but you could only do this if something was actually using the power or charging a battery. Have a look at our Off Grid Van or RV Power Information system project for some ideas on how to do this.
Hey,
Thank you for posting this.
Can this be modified to a heliostat? https://en.wikipedia.org/wiki/Heliostat
Thank you,
Phi
Hi Phi,
Yes you could. It wouldn’t require much modification, you would just mount the actuators onto the reflector and the photoresistors onto the object you are reflecting the sun onto. When the reflected light starts to drift out of the centre of the target then it will move the reflector to bring it back in line. Good luck with the project, it sounds interesting.
hi
i am trying to do do this project for school
i do not understand when you say that you need to assemble your components on the solar panel . is there a pcb on the back of it or something.
plse reply soon . i have only 2 months to do this
Hi Varun,
There is no PCB on the back, you just need to mount the two LDRs onto the edges of you solar panel facing towards the sun. Good luck with your project.
Hi, could you share the code you would use to read the sensor outputs in the serial monitor?
Hi Albert,
Here’s a brief tutorial on using the serial monitor function on your Arduino – https://www.the-diy-life.com/using-the-arduino-ide-serial-monitor/
Specifically for this example I’d add the serial monitor output lines after the LDR readings, line 24 and 25. You’ll need to add Serial.println(eastLDR); and Serial.println(westLDR);
do you post a dual AXIS SOLAR TRACKER KIT DIY?
Thanks
Hi Tom,
I don’t have DIY kits, just write ups on the projects I’ve done. I’ve found it to be uneconomical to build a dual axis tracker as you get most of the benefit from just using a single axis tracker and the complexity of a second axis is not worth the extra power you are able to get out.
Hi Michael,
I am trying to attempt this project however I am running into some trouble.
I have tried to set up the schematic on my breadboard but whenever I upload the code to Arduino and try to run it, my servo motor only rotates continuously counter-clockwise.
I am using a 955CR High Torque Metal Gear Servo-360 (56 g).
I also am using a Battery Holder (Double 2AA) to send more power to it as you said since it is more than 9g but I am not sure if this is the problem or not.
Also, I try to cover the photocells and it doesn’t seem to be working or doing anything at all with the servo moving.
I am very new to this but I am trying to make this work for a project so your feedback would be much appreciated! Thank you for taking your time and hope to hear back soon my friend.
Hi Alex,
I think as a start you should try proving that you are getting reliable signals from your photoresistors and that you are able to drive your servo. Use the Serial monitor on your computer to display the values being read from your photoresistors in different lighting conditions and that you are able to generate a differential with which to direct the servo. Once that is working then try giving your servo a set of PWM reference signals and see if it is responding and moving correctly. Once you’ve established these two then you can start working on getting the system working correctly.
Your servo shouldn’t move continuously if it is being provided with a fixed reference. It should move to a position and then stop. If your servo is moving continuously then there is either something wrong with the servo or it is a specially made continuous rotation servo which is not really suitable for this type of project.
Hope this helps.
Hello Michael,
I have checked to see if all of my components are working. I switched my servo which before was continuous but now I am using a Micro Servo (9g) that comes with an Arduino kit.
Nevertheless, when I upload the code, now the servo just moves a little but for a second, and stops.
However, I simply think my components aren’t connected to the breadboard properly. Is there any more information or maybe websites or photos of the breadboard setup that I can maybe go off of?
Or maybe I can send a photo of my breadboard to be given a look at?
If you have any resources that can help me set up the schematic, this will help out a lot. I know it is simple, however for some reason I can’t get it to work.
Thanks for your time! Sorry to bother with simple questions as such.
Very nice construction in the morning going east
Hi, amazing tutorial! I was just wondering how to connect the LDRs to the back of the solar panel as I am a bit confused on how to get two cables to connect to the breadboard? Thank you!
When I installed the LDRs on the panels I no longer has them connected to the breadboard. I soldered the wired connections as per the circuit diagram and had the leads plug directly into the Arduino.
Ah so the solar panels and LDRs are not wired together they just face the same way. Thank you for all your help
Yes, there are no connections between the solar panel and the LDRs. They’re just mounted onto the solar panel.
Good luck with your project!
I’m very tempted to do this for my school project.
Would there be any tests/experiments with some sensor to investigate before creating this?
I’m required to do some sort of investigation using a sensor but I’m not sure what to do with this project.
Thank you for your help
I love this project!
Yes, you can experiment with LDRs and measuring light levels without building the whole project. LDRs can be bought online for a few cents each.
What would be the reason for doing that experiment?
You need to decide what you’re wanting to investigate and that will tell you what you can test. The tracker in itself could be used as a test to compare the power generated by the panel without tracking and with tracking.
Sorry for bothering, but last question.
I searched up on amazon to buy a solar panel but they were all big solar panels costing at few hundreds. Are there any small cheap solar panels I can use for this project? I’m not really wanting to spend few hundreds of dollars just for this project
Thanks again
Yes, look on eBay or AliExpress for small electronics project solar panels or solar cells.
Hi,
i’m trying to make this project but I’m not sure how to connect the components the LDR and other elements to the solar panel. What type of solar panel do I need to buy?
On the backside of the solar panel there’s a + and – sign with a metal circle and a few more metal circles. I’m using an arduino kit so I can’t weld or anything. Which solar panel do you recommend if I’m trying to make this project using an arduino kit? And how do I connect them?
I think you’re confusing the two circuits. The Arduino, LDR and servo circuits are used to move the solar panel to track the sun’s movement. The solar panel is used to power something else. So, depending on what you’re trying to power, your panel could be a range of sizes.
what i meant was, how do i connect to the solar panel? I’m just not sure how the connection works between the wires and the solar panel. If possible, can I see the backside of the solar panel of your solar tracker? I wanna take a look how you connected them.
do I have to weld? or something else?
Different panels have different connection options, some come with wires pre-soldered, some have pads to solder wires to and some have connectors for pre-made cables. The one in the video had pre-soldered wires, so it just had a red (positive) and black (negative) lead on the back.
how do i mount the LDRs and resistors on the solar panel? I’m new to these things so please understand. Do I use tape?
i just don’t get how to connect the LDR and resistor all the way to the breadboard if they are mounted on the panel.
I just used some hot glue, epoxy would be better if your panel gets hot in the sun. You’ll need to solder a length of wire onto each to run them back to your breadboard/Arduino
Let’s say I don’t know which resistor to use (in this case i don’t know 4.7k should be used)
what kind of tests can I do to figure out which resistor would work best?
Also, what equations can be used?
Thank you very much
The resister is just used to limit the current through the LDR. If you know your LDRs resistance then you can just use V = IR to calculate your resistors.
If I want to make a 2-axis solar tracking system, where can I connect the other servo motor to the stand.
You need to design a 2 axis stand. You’ll need another platform to mount this stand onto which is also able to tilt but along a second axis.
Hello,
I connected everything on the breadboard and uploaded the code but the servo moves ccw very little by little until it reaches 90 degrees and stops. Why is this happening? FYI, i only have 2k and 5k resistors and I tried both of them but result is same. Do I have to fix some codes in the Arduino? There’s no reaction if I cover the photoresistors. I have 5 days to finish this project i would appreciate quick answer.
Hi Kai,
There are many reasons why the system isn’t working correctly. You need to do some fault finding. Try displaying the analogue input values from each sensor on your serial monitor and make sure that they’re sensible and are changing when you cover the LDRs. If those are working correctly then try getting your servo to just sweep left and right using the example code. Once you’ve got both of these working then you should be able to get the rest of the code working properly.
Hi ! very interesting project! Have you tried to run it with only the solar panel as its source?
I haven’t tried this with this size panel (it’s too small to power a servo), but most large trackers run on the supply from the panel that they’re moving.
Hi, i am not sure why the EastLDR is not working for me
why east ldr not working ???
I want to know if you have a 3d model for the stand
Unfortunately not, this was just made from some scrap wood that I had available.